Thursday, 5/23/19-Friday, 5/24/19
If you have not already, create an Exam Folder in your folder for this class. Your wrap-up and .psd file will go in here.
Review the Character and Sidekick Design Checklist
THINK LIGHT SOURCE AND SHADOW!
THINK OF THE BASIC SHAPES YOU SHADED, CREATE FORM!
THINK SMOOTH BLENDING OF COLORS!
THINK CONTRASTS FOR YOUR LIGHTS AND DARK-USE THE ENTIRE VALUE SCALE.
FOCUS ON THE MAIN CHARACTER! THE SIDEKICK MAY NOT HAPPEN......
Review the Character and Sidekick Design Checklist
THINK LIGHT SOURCE AND SHADOW!
THINK OF THE BASIC SHAPES YOU SHADED, CREATE FORM!
THINK SMOOTH BLENDING OF COLORS!
THINK CONTRASTS FOR YOUR LIGHTS AND DARK-USE THE ENTIRE VALUE SCALE.
FOCUS ON THE MAIN CHARACTER! THE SIDEKICK MAY NOT HAPPEN......
Monday, 5/20/19-Wednesday, 5/23/19
Seniors, a print folder was shared with you. I will send the end of the day, Wednesday, with pickup on Thurs./Fri.
This is it!
You should have your Face Exercises completed.
You should have a plan for your Character!
Use this week to create and digitally paint your character in Photoshop. Your goal is to have it completed by the end of the hour THURSDAY!
If you have not already, create an Exam Folder in your folder for this class. Your wrap-up and .psd file will go in here.
Review the Character and Sidekick Design Checklist
TIPS TO REMEMBER:
Things to do:
You should have your Face Exercises completed.
You should have a plan for your Character!
Use this week to create and digitally paint your character in Photoshop. Your goal is to have it completed by the end of the hour THURSDAY!
If you have not already, create an Exam Folder in your folder for this class. Your wrap-up and .psd file will go in here.
Review the Character and Sidekick Design Checklist
TIPS TO REMEMBER:
- Watch your lines for overlapping. For example, where can you extend a line a little to make that arm look like it is in front of the body? Avoid Tangents.
- Use the draw through method! You don't want your characters to look like flat stickers! Each basic shape should look 3D.
- No tracing your references! References are there to support you, not do it for you!
- Focus on having a refined, colored character by the end of the hour Thursday. If we need to scratch the sidekick, we will. But I want at least one finished design.
Things to do:
- Visual Library Assignment Theme #1-pdf instruction are in your folder. See me for specific instructions or if you'd like to review the tutorial again. Don't forget about the slideshow shared with you.
- Deconstruction of skeleton and skull (4/29/19)
- Deconstructed Poses (4/30/19)
- NEW Poses in Motion (5/7/19)
- NEW Face Exercises 1-11 (5/9/19)
Friday, 5/17/19
Excellent gallery of Digital Painting faces and hair at this link. One example below. Look at the smooth blending, highlights and shadows throughout. Don't be afraid to change up brushes for your hair!

TIPS TO REMEMBER:
Create an Exam Folder in your folder for this class. Your wrap-up and .psd file will go in here.
You should have a sketch of your character ready to go into Photoshop when you come back on Tuesday....if you are not spending extra time during Red 52 or after school, that will give you three hours to paint!!!
Review the Design Checklist for requirements.
Things to do:
Exercise 1-Constructed skull from front and side
Exercise 2-Add construction lines according to face given. Watch for tilt of head both left to right and up and down.
Exercise 3- Add normal facial features according to construction lines to see how changing the proportion changes the overall face.
Exercise 4- Complete at least four of the faces. Change the distance between features, move them around to see how it changes the face.
Exercise 5-Read pgs 11-12. Complete blocking in the hair.
Exercise 6- Read pgs. 13-17. You may also want to watch some of the Eyes tutorial. Draw masculine and feminine eyes plus eyes from different angles.
Exercise 7- Read pgs. 18-21. You may also want to watch so of the Noses tutorial. Draw noses from different angles plus interesting and fascinating noses.
Exercise 8- Read pgs. 22-25. You may also want to watch some of the Lips and Mouths tutorial. Draw masculine and feminine lips along with lips to match the expression.
Exercise 9- Read pgs. 26-27. You may also want to watch some of the Ears tutorial. Draw ears to match the style of the character.
Exercise 10-. Read pgs. 28-30. You may also want to watch some of the Hair and Facial Hair tutorials. Create masculine hair and facial hair.
Exercise 11- Read pg 31- Draw only 3 with feminine hairstyles.
Read pgs 32-34 to see the different cartoon archetypes that are commonly used.
Of course, your goal is to get through all 11 by the end of the hour Tuesday or Wednesday. The sooner you do, the sooner you can jump into your final project/exam. I'll have a Design Checklist for you tomorrow to preview so you can start brainstorming and sketching....
THEN....Character and Sidekick Design Checklist
Zero's for Exercises 1-11 go in TODAY!.
- Watch your lines for overlapping. For example, where can you extend a line a little to make that arm look like it is in front of the body? Avoid Tangents.
- Use the draw through method! You don't want your characters to look like flat stickers! Each basic shape should look 3D.
- No tracing your references! References are there to support you, not do it for you!
- Focus on having a refined, colored character by the end of the hour Thursday. If we need to scratch the sidekick, we will. But I want at least one finished design.
Create an Exam Folder in your folder for this class. Your wrap-up and .psd file will go in here.
You should have a sketch of your character ready to go into Photoshop when you come back on Tuesday....if you are not spending extra time during Red 52 or after school, that will give you three hours to paint!!!
Review the Design Checklist for requirements.
Things to do:
- Visual Library Assignment Theme #1-pdf instruction are in your folder. See me for specific instructions or if you'd like to review the tutorial again. Don't forget about the slideshow shared with you.
- Deconstruction of skeleton and skull (4/29/19)
- Deconstructed Poses (4/30/19)
- NEW Poses in Motion (5/7/19)
- NEW Face Exercises 1-11 (5/9/19)
- Watch the first tutorial (Face Construction)
- Read the Face book (in Google folder in the 'Face' folder) through each exercise BEFORE you try it.
- Complete Exercises (I shared a folder that has your exercises to download)- READ THE BOOK SECTION FOR EACH FIRST!!! (Read through Ex. 1, then try it etc.)
Exercise 1-Constructed skull from front and side
Exercise 2-Add construction lines according to face given. Watch for tilt of head both left to right and up and down.
Exercise 3- Add normal facial features according to construction lines to see how changing the proportion changes the overall face.
Exercise 4- Complete at least four of the faces. Change the distance between features, move them around to see how it changes the face.
Exercise 5-Read pgs 11-12. Complete blocking in the hair.
Exercise 6- Read pgs. 13-17. You may also want to watch some of the Eyes tutorial. Draw masculine and feminine eyes plus eyes from different angles.
Exercise 7- Read pgs. 18-21. You may also want to watch so of the Noses tutorial. Draw noses from different angles plus interesting and fascinating noses.
Exercise 8- Read pgs. 22-25. You may also want to watch some of the Lips and Mouths tutorial. Draw masculine and feminine lips along with lips to match the expression.
Exercise 9- Read pgs. 26-27. You may also want to watch some of the Ears tutorial. Draw ears to match the style of the character.
Exercise 10-. Read pgs. 28-30. You may also want to watch some of the Hair and Facial Hair tutorials. Create masculine hair and facial hair.
Exercise 11- Read pg 31- Draw only 3 with feminine hairstyles.
Read pgs 32-34 to see the different cartoon archetypes that are commonly used.
Of course, your goal is to get through all 11 by the end of the hour Tuesday or Wednesday. The sooner you do, the sooner you can jump into your final project/exam. I'll have a Design Checklist for you tomorrow to preview so you can start brainstorming and sketching....
THEN....Character and Sidekick Design Checklist
Zero's for Exercises 1-11 go in TODAY!.
Thursday, 5/16/19 Red 52 Schedule
TIPS TO REMEMBER:
Great example of form here! Look at the use of highlights and shadows! Overlapping!
- Watch your lines for overlapping. For example, where can you extend a line a little to make that arm look like it is in front of the body? Avoid Tangents.
- Use the draw through method! You don't want your characters to look like flat stickers! Each basic shape should look 3D.
- No tracing your references! References are there to support you, not do it for you!
- Focus on having a refined, colored character by the end of the hour Wednesday. If we need to scratch the sidekick, we will. But I want at least one finished design.
Great example of form here! Look at the use of highlights and shadows! Overlapping!
https://www.behance.net/gallery/1597787/Animals-chery
Create an Exam Folder in your folder for this class. Your wrap-up and .psd file will go in here.
Things to do:
Exercise 1-Constructed skull from front and side
Exercise 2-Add construction lines according to face given. Watch for tilt of head both left to right and up and down.
Exercise 3- Add normal facial features according to construction lines to see how changing the proportion changes the overall face.
Exercise 4- Complete at least four of the faces. Change the distance between features, move them around to see how it changes the face.
Exercise 5-Read pgs 11-12. Complete blocking in the hair.
Exercise 6- Read pgs. 13-17. You may also want to watch some of the Eyes tutorial. Draw masculine and feminine eyes plus eyes from different angles.
Exercise 7- Read pgs. 18-21. You may also want to watch so of the Noses tutorial. Draw noses from different angles plus interesting and fascinating noses.
Exercise 8- Read pgs. 22-25. You may also want to watch some of the Lips and Mouths tutorial. Draw masculine and feminine lips along with lips to match the expression.
Exercise 9- Read pgs. 26-27. You may also want to watch some of the Ears tutorial. Draw ears to match the style of the character.
Exercise 10-. Read pgs. 28-30. You may also want to watch some of the Hair and Facial Hair tutorials. Create masculine hair and facial hair.
Exercise 11- Read pg 31- Draw only 3 with feminine hairstyles.
Read pgs 32-34 to see the different cartoon archetypes that are commonly used.
Of course, your goal is to get through all 11 by the end of the hour Tuesday or Wednesday. The sooner you do, the sooner you can jump into your final project/exam. I'll have a Design Checklist for you tomorrow to preview so you can start brainstorming and sketching....
THEN....Character and Sidekick Design Checklist
Zero's for Exercises 1-11 go in at the end of this week.
Create an Exam Folder in your folder for this class. Your wrap-up and .psd file will go in here.
Things to do:
- Visual Library Assignment Theme #1-pdf instruction are in your folder. See me for specific instructions or if you'd like to review the tutorial again. Don't forget about the slideshow shared with you.
- Deconstruction of skeleton and skull (4/29/19)
- Deconstructed Poses (4/30/19)
- NEW Poses in Motion (5/7/19)
- NEW Face Exercises 1-11 (5/9/19)
- Watch the first tutorial (Face Construction)
- Read the Face book (in Google folder in the 'Face' folder) through each exercise BEFORE you try it.
- Complete Exercises (I shared a folder that has your exercises to download)- READ THE BOOK SECTION FOR EACH FIRST!!! (Read through Ex. 1, then try it etc.)
Exercise 1-Constructed skull from front and side
Exercise 2-Add construction lines according to face given. Watch for tilt of head both left to right and up and down.
Exercise 3- Add normal facial features according to construction lines to see how changing the proportion changes the overall face.
Exercise 4- Complete at least four of the faces. Change the distance between features, move them around to see how it changes the face.
Exercise 5-Read pgs 11-12. Complete blocking in the hair.
Exercise 6- Read pgs. 13-17. You may also want to watch some of the Eyes tutorial. Draw masculine and feminine eyes plus eyes from different angles.
Exercise 7- Read pgs. 18-21. You may also want to watch so of the Noses tutorial. Draw noses from different angles plus interesting and fascinating noses.
Exercise 8- Read pgs. 22-25. You may also want to watch some of the Lips and Mouths tutorial. Draw masculine and feminine lips along with lips to match the expression.
Exercise 9- Read pgs. 26-27. You may also want to watch some of the Ears tutorial. Draw ears to match the style of the character.
Exercise 10-. Read pgs. 28-30. You may also want to watch some of the Hair and Facial Hair tutorials. Create masculine hair and facial hair.
Exercise 11- Read pg 31- Draw only 3 with feminine hairstyles.
Read pgs 32-34 to see the different cartoon archetypes that are commonly used.
Of course, your goal is to get through all 11 by the end of the hour Tuesday or Wednesday. The sooner you do, the sooner you can jump into your final project/exam. I'll have a Design Checklist for you tomorrow to preview so you can start brainstorming and sketching....
THEN....Character and Sidekick Design Checklist
Zero's for Exercises 1-11 go in at the end of this week.
Wednesday, 5/15/19
Inspiration! Check this out before you begin!! It is worth a couple minutes of your time. Marvel Characters created as Illustrations
You should have the printed pdf of Faces and the exercises. Complete them ASAP. Make sure to read the instructions for each exercise below as my requirements might be adjusted. ALSO, check out the tutorials that match up with the exercise to SEE it being done.
Things to do:
Exercise 1-Constructed skull from front and side
Exercise 2-Add construction lines according to face given. Watch for tilt of head both left to right and up and down.
Exercise 3- Add normal facial features according to construction lines to see how changing the proportion changes the overall face.
Exercise 4- Complete at least four of the faces. Change the distance between features, move them around to see how it changes the face.
Exercise 5-Read pgs 11-12. Complete blocking in the hair.
Exercise 6- Read pgs. 13-17. You may also want to watch some of the Eyes tutorial. Draw masculine and feminine eyes plus eyes from different angles.
Exercise 7- Read pgs. 18-21. You may also want to watch so of the Noses tutorial. Draw noses from different angles plus interesting and fascinating noses.
Exercise 8- Read pgs. 22-25. You may also want to watch some of the Lips and Mouths tutorial. Draw masculine and feminine lips along with lips to match the expression.
Exercise 9- Read pgs. 26-27. You may also want to watch some of the Ears tutorial. Draw ears to match the style of the character.
Exercise 10-. Read pgs. 28-30. You may also want to watch some of the Hair and Facial Hair tutorials. Create masculine hair and facial hair.
Exercise 11- Read pg 31- Draw only 3 with feminine hairstyles.
Read pgs 32-34 to see the different cartoon archetypes that are commonly used.
Of course, your goal is to get through all 11 by the end of the hour Tuesday or Wednesday. The sooner you do, the sooner you can jump into your final project/exam. I'll have a Design Checklist for you tomorrow to preview so you can start brainstorming and sketching....
THEN....Character and Sidekick Design Checklist
Zero's for Exercises 1-11 go in at the end of this week.
You should have the printed pdf of Faces and the exercises. Complete them ASAP. Make sure to read the instructions for each exercise below as my requirements might be adjusted. ALSO, check out the tutorials that match up with the exercise to SEE it being done.
Things to do:
- Visual Library Assignment Theme #1-pdf instruction are in your folder. See me for specific instructions or if you'd like to review the tutorial again. Don't forget about the slideshow shared with you.
- Deconstruction of skeleton and skull (4/29/19)
- Deconstructed Poses (4/30/19)
- NEW Poses in Motion (5/7/19)
- NEW Face Exercises 1-11 (5/9/19)
- Watch the first tutorial (Face Construction)
- Read the Face book (in Google folder in the 'Face' folder) through each exercise BEFORE you try it.
- Complete Exercises (I shared a folder that has your exercises to download)- READ THE BOOK SECTION FOR EACH FIRST!!! (Read through Ex. 1, then try it etc.)
Exercise 1-Constructed skull from front and side
Exercise 2-Add construction lines according to face given. Watch for tilt of head both left to right and up and down.
Exercise 3- Add normal facial features according to construction lines to see how changing the proportion changes the overall face.
Exercise 4- Complete at least four of the faces. Change the distance between features, move them around to see how it changes the face.
Exercise 5-Read pgs 11-12. Complete blocking in the hair.
Exercise 6- Read pgs. 13-17. You may also want to watch some of the Eyes tutorial. Draw masculine and feminine eyes plus eyes from different angles.
Exercise 7- Read pgs. 18-21. You may also want to watch so of the Noses tutorial. Draw noses from different angles plus interesting and fascinating noses.
Exercise 8- Read pgs. 22-25. You may also want to watch some of the Lips and Mouths tutorial. Draw masculine and feminine lips along with lips to match the expression.
Exercise 9- Read pgs. 26-27. You may also want to watch some of the Ears tutorial. Draw ears to match the style of the character.
Exercise 10-. Read pgs. 28-30. You may also want to watch some of the Hair and Facial Hair tutorials. Create masculine hair and facial hair.
Exercise 11- Read pg 31- Draw only 3 with feminine hairstyles.
Read pgs 32-34 to see the different cartoon archetypes that are commonly used.
Of course, your goal is to get through all 11 by the end of the hour Tuesday or Wednesday. The sooner you do, the sooner you can jump into your final project/exam. I'll have a Design Checklist for you tomorrow to preview so you can start brainstorming and sketching....
THEN....Character and Sidekick Design Checklist
Zero's for Exercises 1-11 go in at the end of this week.
Tuesday, 5/14/19 Red 52 Schedule
Bellwork: Title your entry, "Pen tool to brush experiment"
Watch the tutorial below. The beginning of the video shows how to draw (rough to refined). At 3 min 15 secs, he talks about how to convert a pen tool line to a brush stroke. You will see how it makes a clean, vector like line. After the 5 min mark he goes into coloring. So just watching those two minutes should do you...but you're welcome to watch the whole thing.
My question to you is one I want you experiment with any old sketch assignment. Can you use the pen tool and convert it to a brush and still keep the varied line width? As his example shows, his lines are very static (all the same) and it has lost the 'drawn' quality. Experiment and see what you find out. Paste a screenshot with your experiment in your journal.
Character and Sidekick Design Checklist Chat
Things to do:
Exercise 1-Constructed skull from front and side
Exercise 2-Add construction lines according to face given. Watch for tilt of head both left to right and up and down.
Exercise 3- Add normal facial features according to construction lines to see how changing the proportion changes the overall face.
Exercise 4- Complete at least four of the faces. Change the distance between features, move them around to see how it changes the face.
Exercise 5-Read pgs 11-12. Complete blocking in the hair.
Exercise 6- Read pgs. 13-17. You may also want to watch some of the Eyes tutorial. Draw masculine and feminine eyes plus eyes from different angles.
Exercise 7- Read pgs. 18-21. You may also want to watch so of the Noses tutorial. Draw noses from different angles plus interesting and fascinating noses.
Exercise 8- Read pgs. 22-25. You may also want to watch some of the Lips and Mouths tutorial. Draw masculine and feminine lips along with lips to match the expression.
Exercise 9- Read pgs. 26-27. You may also want to watch some of the Ears tutorial. Draw ears to match the style of the character.
Exercise 10-. Read pgs. 28-30. You may also want to watch some of the Hair and Facial Hair tutorials. Create masculine hair and facial hair.
Exercise 11- Read pg 31- Draw only 3 with feminine hairstyles.
Read pgs 32-34 to see the different cartoon archetypes that are commonly used.
Of course, your goal is to get through all 11 by the end of the hour Tuesday or Wednesday. The sooner you do, the sooner you can jump into your final project/exam. I'll have a Design Checklist for you tomorrow to preview so you can start brainstorming and sketching.
Zero's for Exercises 1-11 go in at the end of this week.
Things to do:
- Visual Library Assignment Theme #1-pdf instruction are in your folder. See me for specific instructions or if you'd like to review the tutorial again. Don't forget about the slideshow shared with you.
- Deconstruction of skeleton and skull (4/29/19)
- Deconstructed Poses (4/30/19)
- NEW Poses in Motion (5/7/19)
- NEW Face Exercises 1-11 (5/9/19)
- Watch the first tutorial (Face Construction)
- Read the Face book (in Google folder in the 'Face' folder) through each exercise BEFORE you try it.
- Complete Exercises (I shared a folder that has your exercises to download)- READ THE BOOK SECTION FOR EACH FIRST!!! (Read through Ex. 1, then try it etc.)
Exercise 1-Constructed skull from front and side
Exercise 2-Add construction lines according to face given. Watch for tilt of head both left to right and up and down.
Exercise 3- Add normal facial features according to construction lines to see how changing the proportion changes the overall face.
Exercise 4- Complete at least four of the faces. Change the distance between features, move them around to see how it changes the face.
Exercise 5-Read pgs 11-12. Complete blocking in the hair.
Exercise 6- Read pgs. 13-17. You may also want to watch some of the Eyes tutorial. Draw masculine and feminine eyes plus eyes from different angles.
Exercise 7- Read pgs. 18-21. You may also want to watch so of the Noses tutorial. Draw noses from different angles plus interesting and fascinating noses.
Exercise 8- Read pgs. 22-25. You may also want to watch some of the Lips and Mouths tutorial. Draw masculine and feminine lips along with lips to match the expression.
Exercise 9- Read pgs. 26-27. You may also want to watch some of the Ears tutorial. Draw ears to match the style of the character.
Exercise 10-. Read pgs. 28-30. You may also want to watch some of the Hair and Facial Hair tutorials. Create masculine hair and facial hair.
Exercise 11- Read pg 31- Draw only 3 with feminine hairstyles.
Read pgs 32-34 to see the different cartoon archetypes that are commonly used.
Of course, your goal is to get through all 11 by the end of the hour Tuesday or Wednesday. The sooner you do, the sooner you can jump into your final project/exam. I'll have a Design Checklist for you tomorrow to preview so you can start brainstorming and sketching.
Zero's for Exercises 1-11 go in at the end of this week.
Monday, 5/13/19
Bellwork: Title your entry, "Character Brainstorm Sidekick"
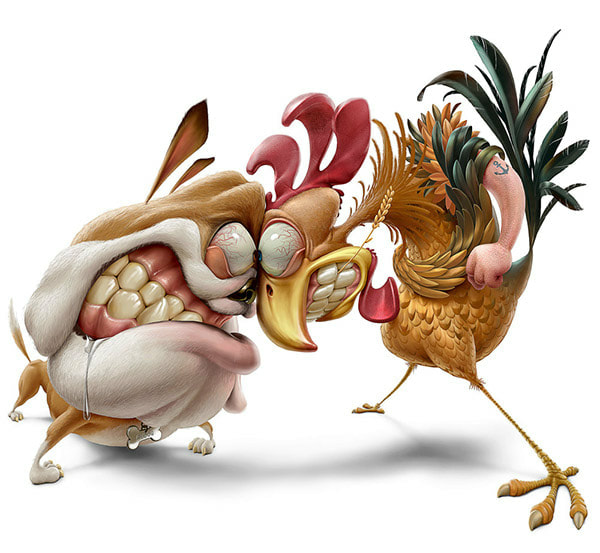
Many characters have an animal sidekick like the image below. List at least three animals that could possibly be included in your final design as a sidekick.
Many characters have an animal sidekick like the image below. List at least three animals that could possibly be included in your final design as a sidekick.
When you complete a Face exercise put the completed jpeg in your exercise folder and call me over for credit.
Things to do:
Exercise 1-Constructed skull from front and side
Exercise 2-Add construction lines according to face given. Watch for tilt of head both left to right and up and down.
Exercise 3- Add normal facial features according to construction lines to see how changing the proportion changes the overall face.
Exercise 4- Complete at least four of the faces. Change the distance between features, move them around to see how it changes the face.
Exercise 5-Read pgs 11-12. Complete blocking in the hair.
Exercise 6- Read pgs. 13-17. You may also want to watch some of the Eyes tutorial. Draw masculine and feminine eyes plus eyes from different angles.
Exercise 7- Read pgs. 18-21. You may also want to watch so of the Noses tutorial. Draw noses from different angles plus interesting and fascinating noses.
Exercise 8- Read pgs. 22-25. You may also want to watch some of the Lips and Mouths tutorial. Draw masculine and feminine lips along with lips to match the expression.
Exercise 9- Read pgs. 26-27. You may also want to watch some of the Ears tutorial. Draw ears to match the style of the character.
Exercise 10-. Read pgs. 28-30. You may also want to watch some of the Hair and Facial Hair tutorials. Create masculine hair and facial hair.
Exercise 11- Read pg 31- Draw only 3 with feminine hairstyles.
Read pgs 32-34 to see the different cartoon archetypes that are commonly used.
Of course, your goal is to get through all 11 by the end of the hour Tuesday or Wednesday. The sooner you do, the sooner you can jump into your final project/exam. I'll have a Design Checklist for you tomorrow to preview so you can start brainstorming and sketching.
Zero's for Exercises 1-11 go in at the end of this week.
Things to do:
- Visual Library Assignment Theme #1-pdf instruction are in your folder. See me for specific instructions or if you'd like to review the tutorial again. Don't forget about the slideshow shared with you.
- Deconstruction of skeleton and skull (4/29/19)
- Deconstructed Poses (4/30/19)
- NEW Poses in Motion (5/7/19)
- NEW Face Exercises 1-11 (5/9/19)
- Watch the first tutorial (Face Construction)
- Read the Face book (in Google folder in the 'Face' folder) through each exercise BEFORE you try it.
- Complete Exercises (I shared a folder that has your exercises to download)- READ THE BOOK SECTION FOR EACH FIRST!!! (Read through Ex. 1, then try it etc.)
Exercise 1-Constructed skull from front and side
Exercise 2-Add construction lines according to face given. Watch for tilt of head both left to right and up and down.
Exercise 3- Add normal facial features according to construction lines to see how changing the proportion changes the overall face.
Exercise 4- Complete at least four of the faces. Change the distance between features, move them around to see how it changes the face.
Exercise 5-Read pgs 11-12. Complete blocking in the hair.
Exercise 6- Read pgs. 13-17. You may also want to watch some of the Eyes tutorial. Draw masculine and feminine eyes plus eyes from different angles.
Exercise 7- Read pgs. 18-21. You may also want to watch so of the Noses tutorial. Draw noses from different angles plus interesting and fascinating noses.
Exercise 8- Read pgs. 22-25. You may also want to watch some of the Lips and Mouths tutorial. Draw masculine and feminine lips along with lips to match the expression.
Exercise 9- Read pgs. 26-27. You may also want to watch some of the Ears tutorial. Draw ears to match the style of the character.
Exercise 10-. Read pgs. 28-30. You may also want to watch some of the Hair and Facial Hair tutorials. Create masculine hair and facial hair.
Exercise 11- Read pg 31- Draw only 3 with feminine hairstyles.
Read pgs 32-34 to see the different cartoon archetypes that are commonly used.
Of course, your goal is to get through all 11 by the end of the hour Tuesday or Wednesday. The sooner you do, the sooner you can jump into your final project/exam. I'll have a Design Checklist for you tomorrow to preview so you can start brainstorming and sketching.
Zero's for Exercises 1-11 go in at the end of this week.
Friday, 5/10/19
Bellwork: Title your entry, "Character Brainstorm"
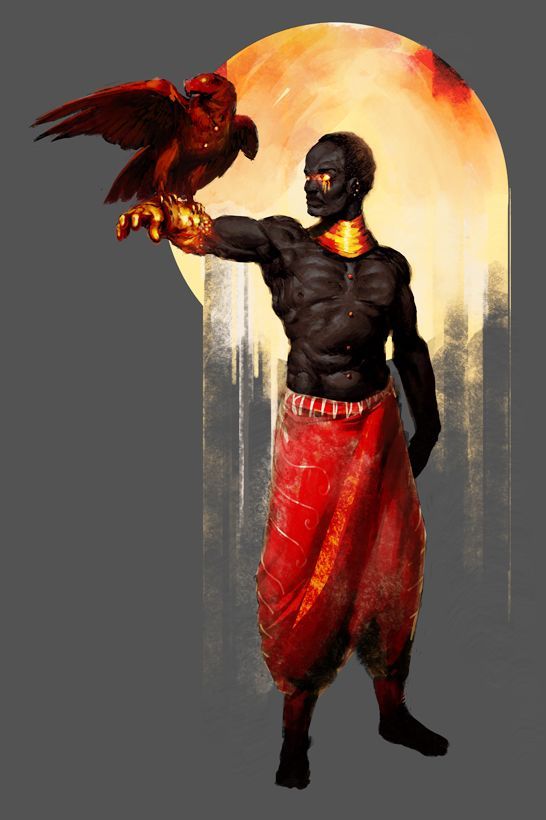
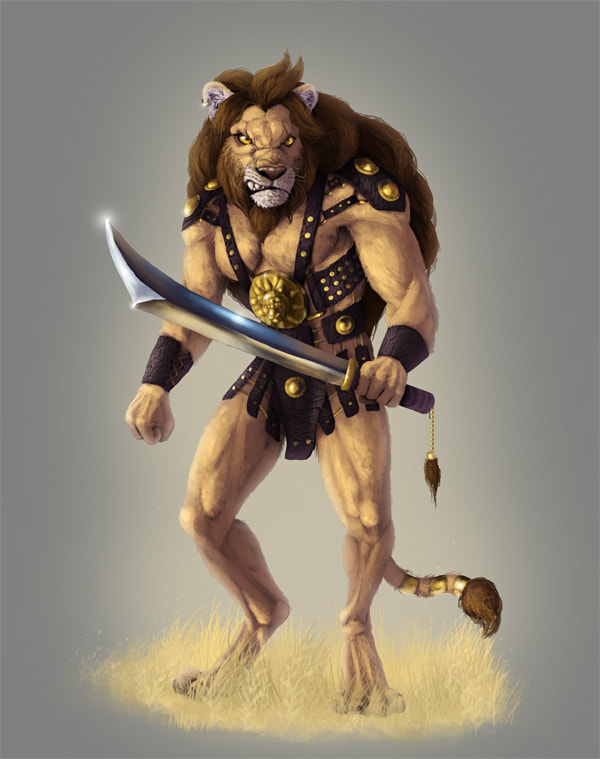
Sometimes a character is an animal in 'human form' like you see below. For you bellwork, list at least three possible animals you could base your final character on.
Sometimes a character is an animal in 'human form' like you see below. For you bellwork, list at least three possible animals you could base your final character on.
Things to do:
- Visual Library Assignment Theme #1-pdf instruction are in your folder. See me for specific instructions or if you'd like to review the tutorial again. Don't forget about the slideshow shared with you.
- Deconstruction of skeleton and skull (4/29/19)
- NEW Deconstructed Poses (4/30/19)
- NEW Poses in Motion (5/7/19)
- NEW Face Exercises 1-11 (5/9/19)
Thursday, 5/9/19 Red 52 Schedule
Bellwork: Title your entry, "Character Analysis"
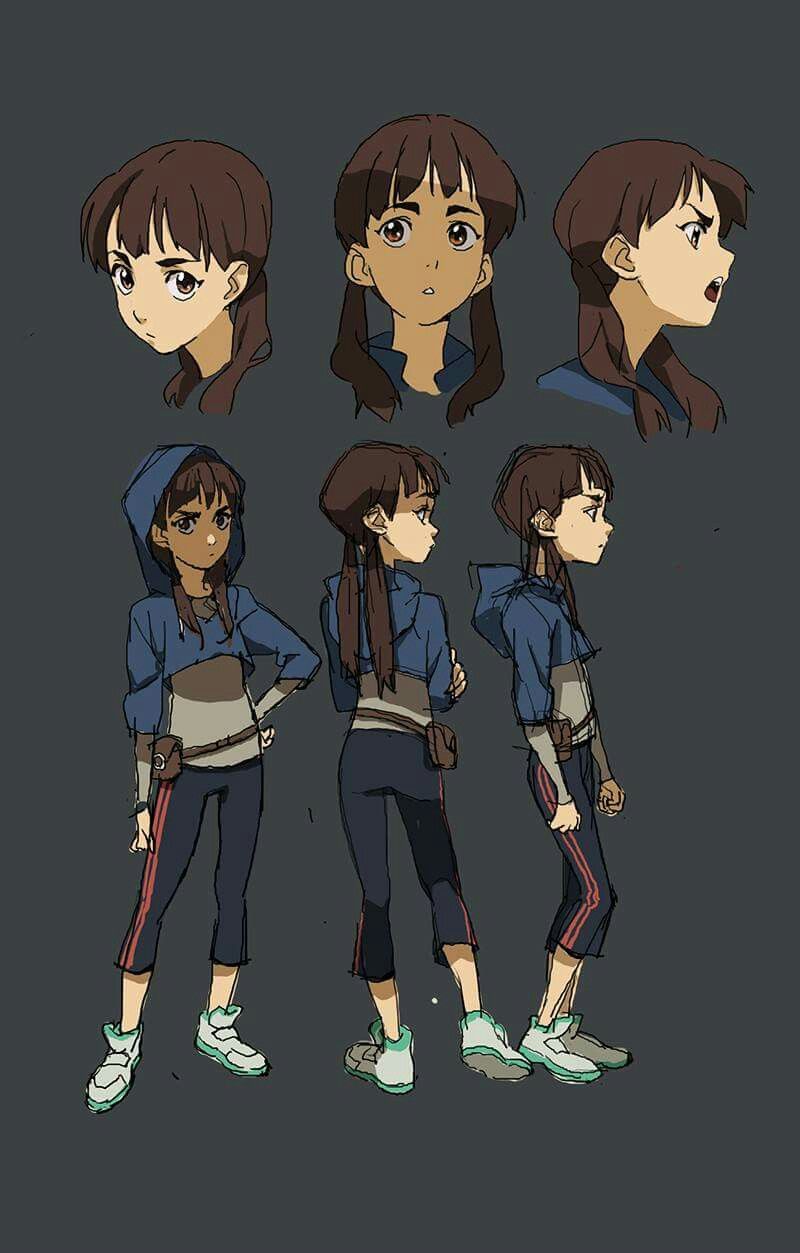
Analyze the character study sketches below. Based on what you see, answer the following questions:
Analyze the character study sketches below. Based on what you see, answer the following questions:
- What role do you think this character would play in a story? Who is she? Give details from the picture to support your answer.
- Based on the clues in the picture (clothes, facial expressions, body posture), what type of personality does this character have?
- What other information can you tell me about this character? Give details from the picture to support your answer.
NEW Face Exercises
Things to do:
- Watch the first tutorial (Face Construction)
- Read the Face book (in Google folder in the 'Face' folder) through each exercise BEFORE you try it.
- Complete Exercises (I shared a folder that has your exercises to download)- READ THE BOOK SECTION FOR EACH FIRST!!! (Read through Ex. 1, then try it etc.)
- Exercise 1-Constructed skull from front and side
- Exercise 2-Add construction lines according to face given. Watch for tilt of head both left to right and up and down.
- Exercise 3- Add normal facial features according to construction lines to see how changing the proportion changes the overall face.
- Exercise 4- Complete at least four of the faces. Change the distance between features, move them around to see how it changes the face.
Things to do:
- Visual Library Assignment Theme #1-pdf instruction are in your folder. See me for specific instructions or if you'd like to review the tutorial again. Don't forget about the slideshow shared with you.
- Deconstruction of skeleton and skull (4/29/19)
- NEW Deconstructed Poses (4/30/19)
- NEW Poses in Motion (5/7/19)
- NEW Face Exercises 1-4 (5/9/19)
Wednesday, 5/8/19
Bellwork: Title your entry, "Brainstorming roles for character"
For a character to catch the eye of the audience, he or she must have a back story. The story is found within the symbolism, other characters, setting, clothes, character features etc. that are added to the scene.
For your entry, brainstorm possible roles a girl AND a boy character might have. (They wouldn't necessarily be in the same scene or even the same story. Just want to have one of each.) To think roles, think about what the character does....a space thief, a maid, a king, a ninja?
List two possibilities of roles for each gender.
Things to do:
- Visual Library Assignment Theme #1-pdf instruction are in your folder. See me for specific instructions or if you'd like to review the tutorial again. Don't forget about the slideshow shared with you.
- Deconstruction of skeleton and skull (4/29/19)
- NEW Deconstructed Poses (4/30/19)
- NEW Poses in Motion (5/7/19)
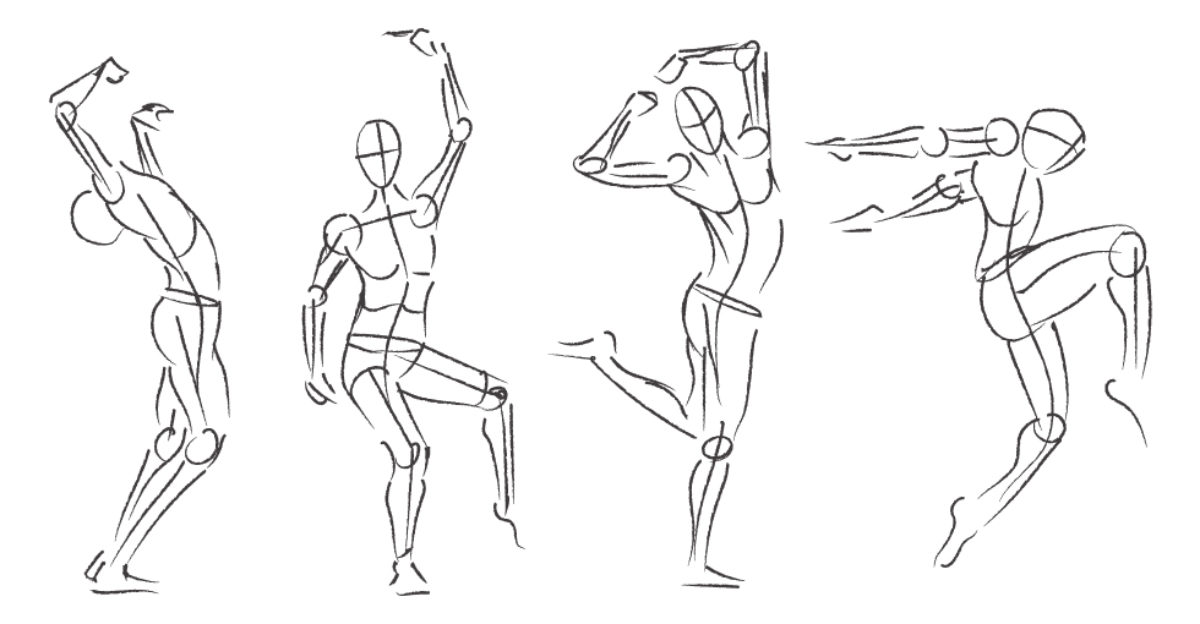
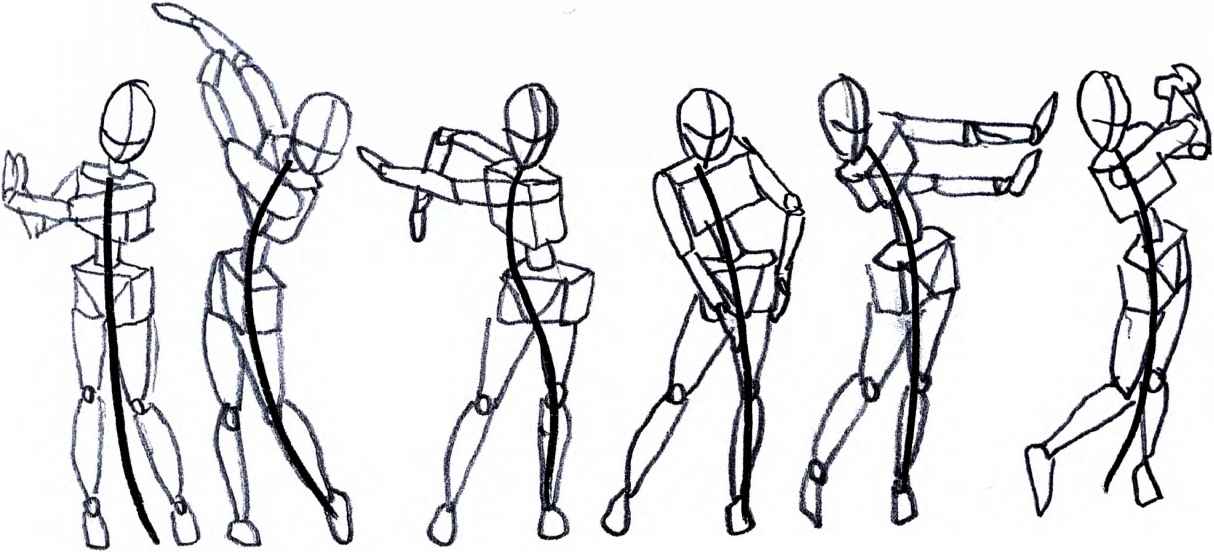
Tuesday, 5/7/19 Red 52 Schedule

Bellwork: Title your entry, "Brainstorming for Bodies in Motion"
For the Bodies in Motion assignment you are asked to illustrate a sequence of movements with 3 or more
Basic Shape bodies.
For your bellwork, list at least five actions of which one you might choose to illustrate. For example: jumping a hurdle, doing a cart wheel, running....
Things to do:
While you may look at reference pictures, you will NOT place these pictures into a layer to draw over. This is freehand. Use LIGHT, LOOSE gestures to make your rough version before adding a new layer and refining your lines, removing draw through lines, and adding line weights to show depth.
To get credit for this assignment, I will be looking for:
For the Bodies in Motion assignment you are asked to illustrate a sequence of movements with 3 or more
Basic Shape bodies.
For your bellwork, list at least five actions of which one you might choose to illustrate. For example: jumping a hurdle, doing a cart wheel, running....
Things to do:
- Visual Library Assignment Theme #1-pdf instruction are in your folder. See me for specific instructions or if you'd like to review the tutorial again. Don't forget about the slideshow shared with you.
- Deconstruction of skeleton and skull (4/29/19)
- NEW Deconstructed Poses (4/30/19)
- NEW Poses in Motion (5/7/19)
While you may look at reference pictures, you will NOT place these pictures into a layer to draw over. This is freehand. Use LIGHT, LOOSE gestures to make your rough version before adding a new layer and refining your lines, removing draw through lines, and adding line weights to show depth.
To get credit for this assignment, I will be looking for:
- A rough layer and a refined layer
- 3 or more bodies drawn in a continuous motion (see examples below)
- Bodies are drawn in proportion.
- Refined layer shows clean lines, line weights and overlapping to emphasize depth.

|
|
|
Monday, 5/6/19
Bellwork: Title your entry, "Drawing bodies in Motion"
Copy and paste the image below into your journal. Notice how the image begins with a 'spine line' and the drawn through shapes are then added with lines to show direction and turn. This will be helpful in your next assignment.
Copy and paste the image below into your journal. Notice how the image begins with a 'spine line' and the drawn through shapes are then added with lines to show direction and turn. This will be helpful in your next assignment.
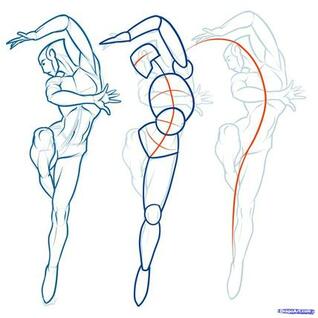
If you are done with the skeleton and the skull, move on to the next assignment, Deconstructed Poses.
Read through pg. 9 of the Easy Anatomy folder I placed in your folder on Friday. Notice how the illustrator created 3D forms using the Draw Through Method, particularly for the head, ribcage, and pelvis. He also used center lines to show how the body is twisting.
Do not add details like hair, facial feature, clothes, etc. Keep it in basic forms.
Things to do:
Read through pg. 9 of the Easy Anatomy folder I placed in your folder on Friday. Notice how the illustrator created 3D forms using the Draw Through Method, particularly for the head, ribcage, and pelvis. He also used center lines to show how the body is twisting.
- Create a Photoshop file titled, Deconstructed Poses.
- Go to the 'Model' Folder I placed in your folder and download the following mix of poses (you will need a male and female of each)....a front view and a side view.
- Move all of the poses into your Deconstructed Poses Photoshop file.
- Rename this layer, "Models". Turn down the opacity of this layer to less than 50%.
- Create a New Layer, name it "Draw Through Layer"
- On the 'Draw Through Layer' you will deconstruct the humans to simple forms. Find shapes that work for you but are also true to the shape of the body (see pg 9 for a variety of ways to do this.) Remember: DRAW LIGHTLY! You should be able to turn the opacity completely down on the 'Model' layer when done and recognize the figures and depth from the basic shapes you've created.
- Create a New Layer. Name it "Basic Refined"
- On the 'Basic Refined' Layer, turn the opacity of the 'Draw Through Layer down' (your "Models" layer can be turned off completely now) and create a more refined version of your basic shape person. Focus on
- making overlapping lines thicker
- body parts further away lighter
- clean/loose lines for shape edges
- remove or simply don't redraw the draw through lines
Do not add details like hair, facial feature, clothes, etc. Keep it in basic forms.
Things to do:
- Visual Library Assignment Theme #1-pdf instruction are in your folder. See me for specific instructions or if you'd like to review the tutorial again. Don't forget about the slideshow shared with you.
- Deconstruction of skeleton and skull (4/29/19)
- NEW Deconstructed Poses (4/30/19)
Friday, 5/3/19
Bellwork: Title your entry, "Body in Proportion?"
Download the psd file. Follow the instructions. Put your answer in your Journal with a screenshot or JPEG from the file.
Download the psd file. Follow the instructions. Put your answer in your Journal with a screenshot or JPEG from the file.
| body_in_proportion_.psd |
If you are done with the skeleton and the skull, move on to the next assignment, Deconstructed Poses.
Read through pg. 9 of the Easy Anatomy folder I placed in your folder on Friday. Notice how the illustrator created 3D forms using the Draw Through Method, particularly for the head, ribcage, and pelvis. He also used center lines to show how the body is twisting.
Do not add details like hair, facial feature, clothes, etc. Keep it in basic forms.
Things to do:
Read through pg. 9 of the Easy Anatomy folder I placed in your folder on Friday. Notice how the illustrator created 3D forms using the Draw Through Method, particularly for the head, ribcage, and pelvis. He also used center lines to show how the body is twisting.
- Create a Photoshop file titled, Deconstructed Poses.
- Go to the 'Model' Folder I placed in your folder and download the following mix of poses (you will need a male and female of each)....a front view, a side view, and a slightly turned view (3/4 turn).
- Move all of the poses into your Deconstructed Poses Photoshop file.
- Rename this layer, "Models". Turn down the opacity of this layer to less than 50%.
- Create a New Layer, name it "Draw Through Layer"
- On the 'Draw Through Layer' you will deconstruct the humans to simple forms. Find shapes that work for you but are also true to the shape of the body (see pg 9 for a variety of ways to do this.) Remember: DRAW LIGHTLY! You should be able to turn the opacity completely down on the 'Model' layer when done and recognize the figures and depth from the basic shapes you've created.
- Create a New Layer. Name it "Basic Refined"
- On the 'Basic Refined' Layer, turn the opacity of the 'Draw Through Layer down' (your "Models" layer can be turned off completely now) and create a more refined version of your basic shape person. Focus on
- making overlapping lines thicker
- body parts further away lighter
- clean/loose lines for shape edges
- remove or simply don't redraw the draw through lines
Do not add details like hair, facial feature, clothes, etc. Keep it in basic forms.
Things to do:
- NEW Visual Library Assignment Theme #1-pdf instruction are in your folder. See me for specific instructions or if you'd like to review the tutorial again. Don't forget about the slideshow shared with you.
- NEW Deconstruction of skeleton and skull (4/29/19)
- NEW Deconstructed Poses (4/30/19)
Thursday, 5/2/19 Red 52 Schedule
Bellwork: Title your entry, "Rough Basic Shapes Process Critique"
Look at the image below. Think about the drawing process we've practiced so far. While these drawings are a fabulous start, there is one major mistake that the artist committed that will make the next steps more difficult. What is it?
Look at the image below. Think about the drawing process we've practiced so far. While these drawings are a fabulous start, there is one major mistake that the artist committed that will make the next steps more difficult. What is it?
If you are done with the skeleton and the skull, move on to the next assignment, Deconstructed Poses.
Read through pg. 9 of the Easy Anatomy folder I placed in your folder on Friday. Notice how the illustrator created 3D forms using the Draw Through Method, particularly for the head, ribcage, and pelvis. He also used center lines to show how the body is twisting.
Do not add details like hair, facial feature, clothes, etc. Keep it in basic forms.
Things to do:
Read through pg. 9 of the Easy Anatomy folder I placed in your folder on Friday. Notice how the illustrator created 3D forms using the Draw Through Method, particularly for the head, ribcage, and pelvis. He also used center lines to show how the body is twisting.
- Create a Photoshop file titled, Deconstructed Poses.
- Go to the 'Model' Folder I placed in your folder and download the following mix of poses (you will need a male and female of each)....a front view, a side view, and a slightly turned view (3/4 turn).
- Move all of the poses into your Deconstructed Poses Photoshop file.
- Rename this layer, "Models". Turn down the opacity of this layer to less than 50%.
- Create a New Layer, name it "Draw Through Layer"
- On the 'Draw Through Layer' you will deconstruct the humans to simple forms. Find shapes that work for you but are also true to the shape of the body (see pg 9 for a variety of ways to do this.) Remember: DRAW LIGHTLY! You should be able to turn the opacity completely down on the 'Model' layer when done and recognize the figures and depth from the basic shapes you've created.
- Create a New Layer. Name it "Basic Refined"
- On the 'Basic Refined' Layer, turn the opacity of the 'Draw Through Layer down' (your "Models" layer can be turned off completely now) and create a more refined version of your basic shape person. Focus on
- making overlapping lines thicker
- body parts further away lighter
- clean/loose lines for shape edges
- remove or simply don't redraw the draw through lines
Do not add details like hair, facial feature, clothes, etc. Keep it in basic forms.
Things to do:
- NEW Visual Library Assignment Theme #1-pdf instruction are in your folder. See me for specific instructions or if you'd like to review the tutorial again. Don't forget about the slideshow shared with you.
- NEW Deconstruction of skeleton and skull (4/29/19)
- NEW Deconstructed Poses (4/30/19)
Wednesday, 5/1/19
Bellwork: Title your entry, "Body Proportion"
Copy the jpeg below and insert it into your journal.
Copy the jpeg below and insert it into your journal.
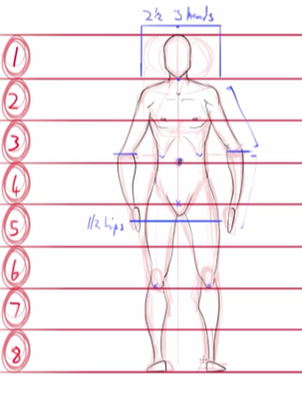
|
Example: Head 1: top of head to
chin Head 2: Head 3: Head 4: Head 5: no major landmark here Head 6: Head 7: no major landmarks here Head 8: The elbows should line up with:(hint-not the bottom of 3) From should to elbow is: From elbow to wrist is: |
If you are done with the skeleton and the skull, move on to the next assignment, Deconstructed Poses.
Read through pg. 9 of the Easy Anatomy folder I placed in your folder on Friday. Notice how the illustrator created 3D forms using the Draw Through Method, particularly for the head, ribcage, and pelvis. He also used center lines to show how the body is twisting.
Do not add details like hair, facial feature, clothes, etc. Keep it in basic forms.
Things to do:
Read through pg. 9 of the Easy Anatomy folder I placed in your folder on Friday. Notice how the illustrator created 3D forms using the Draw Through Method, particularly for the head, ribcage, and pelvis. He also used center lines to show how the body is twisting.
- Create a Photoshop file titled, Deconstructed Poses.
- Go to the 'Model' Folder I placed in your folder and download the following mix of poses (you will need a male and female of each)....a front view, a side view, and a slightly turned view (3/4 turn).
- Move all of the poses into your Deconstructed Poses Photoshop file.
- Rename this layer, "Models". Turn down the opacity of this layer to less than 50%.
- Create a New Layer, name it "Draw Through Layer"
- On the 'Draw Through Layer' you will deconstruct the humans to simple forms. Find shapes that work for you but are also true to the shape of the body (see pg 9 for a variety of ways to do this.) Remember: DRAW LIGHTLY! You should be able to turn the opacity completely down on the 'Model' layer when done and recognize the figures and depth from the basic shapes you've created.
- Create a New Layer. Name it "Basic Refined"
- On the 'Basic Refined' Layer, turn the opacity of the 'Draw Through Layer down' (your "Models" layer can be turned off completely now) and create a more refined version of your basic shape person. Focus on
- making overlapping lines thicker
- body parts further away lighter
- clean/loose lines for shape edges
- remove or simply don't redraw the draw through lines
Do not add details like hair, facial feature, clothes, etc. Keep it in basic forms.
Things to do:
- NEW Visual Library Assignment Theme #1-pdf instruction are in your folder. See me for specific instructions or if you'd like to review the tutorial again. Don't forget about the slideshow shared with you.
- NEW Deconstruction of skeleton and skull (4/29/19)
- NEW Deconstructed Poses (4/30/19)
Tuesday, 4/30/19 Red 52 Schedule
No Bellwork! Get started right away!
After speaking with DD1 and DD2, we'll have a demo and a discussion about the next two assignments then you'll have time to work.
Read through pg. 9 of the Easy Anatomy folder I placed in your folder on Friday. Notice how the illustrator created 3D forms using the Draw Through Method, particularly for the head, ribcage, and pelvis. He also used center lines to show how the body is twisting.
Do not add details like hair, facial feature, clothes, etc. Keep it in basic forms.
Things to do:
After speaking with DD1 and DD2, we'll have a demo and a discussion about the next two assignments then you'll have time to work.
- Body and Face Proportion Demo
- Explanation of 'Deconstruction of S and S' see 4/29
- Explanation of 'Deconstructed Poses'
Read through pg. 9 of the Easy Anatomy folder I placed in your folder on Friday. Notice how the illustrator created 3D forms using the Draw Through Method, particularly for the head, ribcage, and pelvis. He also used center lines to show how the body is twisting.
- Create a Photoshop file titled, Deconstructed Poses.
- Go to the 'Model' Folder I shared with you and download the following mix of poses (you will need a male and female of each)....a front view, a side view, and a slightly turned view (3/4 turn).
- Move all of the poses into your Deconstructed Poses Photoshop file.
- Rename this layer, "Models". Turn down the opacity of this layer to less than 50%.
- Create a New Layer, name it "Draw Through Layer"
- On the 'Draw Through Layer' you will deconstruct the humans to simple forms. Find shapes that work for you but are also true to the shape of the body (see pg 9 for a variety of ways to do this.) Remember: DRAW LIGHTLY! You should be able to turn the opacity completely down on the 'Model' layer when done and recognize the figures and depth from the basic shapes you've created.
- Create a New Layer. Name it "Basic Refined"
- On the 'Basic Refined' Layer, turn the opacity of the 'Draw Through Layer down' (your "Models" layer can be turned off completely now) and create a more refined version of your basic shape person. Focus on
- making overlapping lines thicker
- body parts further away lighter
- clean/loose lines for shape edges
- remove or simply don't redraw the draw through lines
Do not add details like hair, facial feature, clothes, etc. Keep it in basic forms.
Things to do:
- NEW Visual Library Assignment Theme #1-pdf instruction are in your folder. See me for specific instructions or if you'd like to review the tutorial again. Don't forget about the slideshow shared with you.
- NEW Deconstruction of skeleton and skull (4/29/19)
- NEW Deconstructed Poses (4/30/19)
Monday, 4/29/19
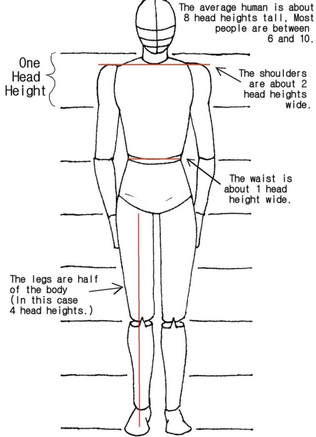
Bellwork: Title your entry, "Body Proportion"
Copy the jpeg below and insert it into your journal AND on your desktop for easy reference.
Copy the jpeg below and insert it into your journal AND on your desktop for easy reference.
Things to do:
- NEW Visual Library Assignment Theme #1-pdf instruction are in your folder. See me for specific instructions or if you'd like to review the tutorial again. Don't forget about the slideshow shared with you.
- NEW Deconstruction of skeleton and skull (4/29/19)
In your Google Folder you will find a folder labeled 'Easy Anatomy pgs. 1-9" along with a skeleton and skull jpeg.
Begin by reading the Easy Anatomy pdf. If you are comfortable with the directions, open the skeleton and skull jpeg in Photoshop and get started. I will demo and review the concepts tomorrow.
Friday, 4/26/19
NO BELLWORK, JUST TIPS.
Look at your Visual Development Library drawings you've started. Do they look flat or do they have depth?
Make sure you follow the process:
All three will go on one page at the end. Remember, #3 is from your imagination based on what you learned by creating the first two.
If you finish early, select a new theme and do it again. This is where the growth in your skills is going to happen! Practice, practice, practice!
Things to do: (LAST DAY OF THE MARKING PERIOD IS TODAY! ASSIGNMENTS 1-6 ARE ON THIS REPORT CARD.)
Look at your Visual Development Library drawings you've started. Do they look flat or do they have depth?
Make sure you follow the process:
- Draw through Method-use forms not shapes
- Overlapping lines (no tangents) AND make lines that are farther away thin and light.
- Refine stage-clean lines, details
All three will go on one page at the end. Remember, #3 is from your imagination based on what you learned by creating the first two.
If you finish early, select a new theme and do it again. This is where the growth in your skills is going to happen! Practice, practice, practice!
Things to do: (LAST DAY OF THE MARKING PERIOD IS TODAY! ASSIGNMENTS 1-6 ARE ON THIS REPORT CARD.)
- Basic Shapes Practice (See 3/11/19 for specific instructions....you'll save a lot of time that way!)
- Form Study 1-3
- 3D Cartoon Character (4/1/19)
- 3D Character Weebly Post (4/5/19)
- Draw Through Method (4/8/19)
- NEW ASSIGNMENT! Dynamic Shapes (4/11/19)
- NEW ASSIGNMENT! Visual Library Assignment Theme #1-pdf instruction are in your folder. See me for specific instructions or if you'd like to review the tutorial again.
Thursday, 4/25/19 Red 52 Schedule
CHECK SKYWARD TO MAKE SURE I HAVE ALL THE POINTS YOU DESERVE!
Bellwork: Title your entry, "Atmospheric Perspective"
In your entry answer the questions below:
Don't forget, I shared a slideshow with tips and screenshots to use as a reference/glossary as we move forward. The Visual Library Assignment pdf is in your folder.
Things to do: (LAST DAY OF THE MARKING PERIOD IS FRIDAY!)
In your entry answer the questions below:
- What is Atmospheric Perspective?
- How do you create that illusion in Character Art?
Don't forget, I shared a slideshow with tips and screenshots to use as a reference/glossary as we move forward. The Visual Library Assignment pdf is in your folder.
Things to do: (LAST DAY OF THE MARKING PERIOD IS FRIDAY!)
- Basic Shapes Practice (See 3/11/19 for specific instructions....you'll save a lot of time that way!)
- Form Study 1-3
- 3D Cartoon Character (4/1/19)
- 3D Character Weebly Post (4/5/19)
- Draw Through Method (4/8/19)
- NEW ASSIGNMENT! Dynamic Shapes (4/11/19)
- NEW ASSIGNMENT! Visual Library Assignment Theme #1-pdf instruction are in your folder. See me for specific instructions or if you'd like to review the tutorial again.
Monday, 4/22/19 - 4/24/19
DON'T FORGET TO UPLOAD ANY JPEGS/PDF'S TO THE PRINT FOLDER. I AM SENDING IT OUT AT THE END OF 6TH HOUR TODAY. (FOR PERSONAL PRINTS AND/OR FOR THE ART SHOW).
Today will be spent alternating between demos and videos up at my desk finishing with an assignment that will take 2-3 days if done well.
Make sure you have paper and something to write with for notes for the first half of the hour. I'll call you up after DD1 and DD2 are set.
Agenda:
I shared a slideshow with tips and screenshots to use as a reference/glossary as we move forward. The Visual Library Assignment pdf is in your folder. I will go over the parts I'd like completed at the end of our group time along with my expectations for this assignment.
Things to do: (LAST DAY OF THE MARKING PERIOD IS FRIDAY!)
Today will be spent alternating between demos and videos up at my desk finishing with an assignment that will take 2-3 days if done well.
Make sure you have paper and something to write with for notes for the first half of the hour. I'll call you up after DD1 and DD2 are set.
Agenda:
- Tangents demo
- Video-Line Weights
- Light to Dark demo tip
- Rough to Refined demo tip
- Video-References
- Video-Visual Library Assignment
I shared a slideshow with tips and screenshots to use as a reference/glossary as we move forward. The Visual Library Assignment pdf is in your folder. I will go over the parts I'd like completed at the end of our group time along with my expectations for this assignment.
Things to do: (LAST DAY OF THE MARKING PERIOD IS FRIDAY!)
- Basic Shapes Practice (See 3/11/19 for specific instructions....you'll save a lot of time that way!)
- Form Study 1-3
- 3D Cartoon Character (4/1/19)
- 3D Character Weebly Post (4/5/19)
- Draw Through Method (4/8/19)
- NEW ASSIGNMENT! Dynamic Shapes (4/11/19)
- NEW ASSIGNMENT! Visual Library Assignment Theme #1-pdf instruction are in your folder. See me for specific instructions or if you'd like to review the tutorial again.
Wednesday, 4/17/19 and Thursday, 4/18/19
Bellwork: Title your entry, "Static vs Dynamism"
In your entry:
TODAY'S AGENDA IS ON HOLD UNTIL I GET BACK! SORRY, TOOK A TURN FOR THE WORSE AND HAVE NO VOICE WHATSOEVER. CONTINUE WITH ANY UNFINISHED ASSIGNMENTS AND/OR PAINTING PRACTICE WITH A BLACK AND WHITE CARTOON......OR FIND A PAINTED LANDSCAPE TO TRY AND RECREATE DIGITALLY.
Today will be spent alternating between demos and videos up at my desk finishing with an assignment that will take 2-3 days if done well.
Make sure you have paper and something to write with for notes for the first half of the hour. I'll call you up after DD1 and DD2 are set.
Agenda:
I shared a slideshow with tips and screenshots to use as a reference/glossary as we move forward. The Visual Library Assignment pdf is in your folder. I will go over the parts I'd like completed at the end of our group time along with my expectations for this assignment.
Things to do:
In your entry:
- Explain the difference between Static vs Dynamic shapes.
- Explain why dynamic shapes are preferred in Character Design over static shapes.
TODAY'S AGENDA IS ON HOLD UNTIL I GET BACK! SORRY, TOOK A TURN FOR THE WORSE AND HAVE NO VOICE WHATSOEVER. CONTINUE WITH ANY UNFINISHED ASSIGNMENTS AND/OR PAINTING PRACTICE WITH A BLACK AND WHITE CARTOON......OR FIND A PAINTED LANDSCAPE TO TRY AND RECREATE DIGITALLY.
Today will be spent alternating between demos and videos up at my desk finishing with an assignment that will take 2-3 days if done well.
Make sure you have paper and something to write with for notes for the first half of the hour. I'll call you up after DD1 and DD2 are set.
Agenda:
- Tangents demo
- Video-Line Weights
- Light to Dark demo tip
- Rough to Refined demo tip
- Video-References
- Video-Visual Library Assignment
I shared a slideshow with tips and screenshots to use as a reference/glossary as we move forward. The Visual Library Assignment pdf is in your folder. I will go over the parts I'd like completed at the end of our group time along with my expectations for this assignment.
Things to do:
- Basic Shapes Practice (See 3/11/19 for specific instructions....you'll save a lot of time that way!)
- Form Study 1-3
- 3D Cartoon Character (4/1/19)
- 3D Character Weebly Post (4/5/19)
- Draw Through Method (4/8/19)
- NEW ASSIGNMENT! Dynamic Shapes (4/11/19)
- NEW ASSIGNMENT! Visual Library Assignment Theme #1-pdf instruction are in your folder. See me for specific instructions or if you'd like to review the tutorial again.
Monday, 4/15/19 and Tuesday, 4/16/19
(Sorry folks, the froggy voice on Friday exploded into yuck. I'm out today....Email me with questions or finished assignments or show me tomorrow. Ask each other for help, look to other 2nd/3rd year students for help, OR send me an email. I'll try to keep my phone handy.
No Bellwork today! Use today to get through Assignment #5. A new demo and assignments are coming your way tomorrow.
If/when you are done with everything, try finding a black and white cartoon photo/drawing and use your digital painting skills to turn it into a colored version with a light source and form.
Things to do:
If/when you are done with everything, try finding a black and white cartoon photo/drawing and use your digital painting skills to turn it into a colored version with a light source and form.
Things to do:
- Basic Shapes Practice (See 3/11/19 for specific instructions....you'll save a lot of time that way!)
- Form Study 1-3
- 3D Cartoon Character (4/1/19)
- NEW ASSIGNMENT! 3D Character Weebly Post (4/5/19)
- NEW ASSIGNMENT! Draw Through Method (4/8/19)
- NEW ASSIGNMENT! Dynamic Shapes (4/11/19)
Thursday, 4/11/19 and Friday, 4/12/19
Bellwork: Title your entry, "Draw Through Method"
In your own words, describe what the 'Draw Through Method' means.
Agenda:
In your own words, describe what the 'Draw Through Method' means.
Agenda:
- Bellwork
- Demonstration and Video at front table (once 1st demo is done)
- Dynamic Shapes Assignment explanation
| dynamic_shapes.psd |
Things to do:
- Basic Shapes Practice (See 3/11/19 for specific instructions....you'll save a lot of time that way!)
- Form Study 1-3
- 3D Cartoon Character (4/1/19)
- NEW ASSIGNMENT! 3D Character Weebly Post (4/5/19)
- NEW ASSIGNMENT! Draw Through Method (4/8/19)
- NEW ASSIGNMENT! Dynamic Shapes (4/11/19)
Wednesday, 4/10/19 (SAT Testing on Tues.)
No Bellwork today! Get started right away!
Things to do:
Things to do:
- Basic Shapes Practice (See 3/11/19 for specific instructions....you'll save a lot of time that way!)
- Form Study 1-3
- 3D Cartoon Character (4/1/19)
- NEW ASSIGNMENT! 3D Character Weebly Post (4/5/19)
- NEW ASSIGNMENT! Draw Through Method (4/8/19)
Monday, 4/8/19
Bellwork: Download the Pen Warm-up Training psd file AND the Draw Through jpeg. I will demonstrate shortly.
| pen_warmup_training__1_.psd |
Agenda:
- Pen Warm up demo
- Video on 'Drawing Through Shapes' together after demo on shape vs form. You need to have a piece of paper and a pencil. We'll meet at my table.
- Drawing Through Shapes Assignment explanation
| draw_through_practice.jpg |
Things to do:
- Basic Shapes Practice (See 3/11/19 for specific instructions....you'll save a lot of time that way!)
- Form Study 1-3
- 3D Cartoon Character (4/1/19)
- NEW ASSIGNMENT! 3D Character Weebly Post (4/5/19)
- NEW ASSIGNMENT! Draw Through Method (4/8/19)
Friday, 4/5/19
No Bellwork today. However, here is what I'd like you to do after you've finished your Cartoon Character and shown it to me for credit....
You should watch the Select and Mask with year 1 and 2....It will change your perspective on Select and Mask
Things to do:
All done? Go back to your Google Folder and watch Video 3 to see how to blend with the Smudge tool and more. Watch up to 6 mins then try Profile Study #3 first. It should not take long.
Then watch the rest of the video and try your hand at Profile Study #1. Next week, we start Character Drawing on our tablets! :)
You should watch the Select and Mask with year 1 and 2....It will change your perspective on Select and Mask
- Post 3 images to your weebly site ( 1, original jpeg of character, 2, colored version of your digital painted version with shadows and highlights, 3, jpeg of painted version in black and white.)
- Blog post explaining:
- The goal of the assignment (To make the flat character have form by adding highlights and shadows, the complementary color component, and why you've posted a black and white version too. Remember, this is going public for all to see so if you are not sure of a complete answer, ASK! Also, make sure your thoughts are complete, detailed, and written with correct spelling and grammar.
Things to do:
- Basic Shapes Practice (See 3/11/19 for specific instructions....you'll save a lot of time that way!)
- NEW ASSIGNMENT! Form Study 1-3
- NEW ASSIGNMENT! 3D Cartoon Character (4/1/19)
All done? Go back to your Google Folder and watch Video 3 to see how to blend with the Smudge tool and more. Watch up to 6 mins then try Profile Study #3 first. It should not take long.
Then watch the rest of the video and try your hand at Profile Study #1. Next week, we start Character Drawing on our tablets! :)
Thursday, 4/4/19 Red 52 Schedule
Bellwork: Title your entry,"Blend modes review"
If you use a Multiply blend mode to darken your shadows into your character, what blend mode might you use to boost the shadows AND the highlights?
TIP: Reread the Tip from 3/18 and the look at the images before you create in color. You need to imagine your cartoon character in black and white....do you have the full spectrum of values from light to dark? Not sure? Slap a Black and White Adjustment layer on there. Do you have the full gray scale? What about your highlights? Your cast shadows?
Things to do:
- Basic Shapes Practice (See 3/11/19 for specific instructions....you'll save a lot of time that way!)
- NEW ASSIGNMENT! Form Study 1-3
- NEW ASSIGNMENT! 3D Cartoon Character (4/1/19)
Wednesday, 4/3/19
Bellwork: Title the entry, "Using RGB opposite colors for Form"
Copy and paste the image below as an example of using RGB complementary colors for highlights and shadows. ALSO, check out this link where I found the image. There are amazing examples of right and wrong ways to using colors for highlights and shadows as well as tips about color theory and painting. Please check it out!
Copy and paste the image below as an example of using RGB complementary colors for highlights and shadows. ALSO, check out this link where I found the image. There are amazing examples of right and wrong ways to using colors for highlights and shadows as well as tips about color theory and painting. Please check it out!

Things to do:
- Basic Shapes Practice (See 3/11/19 for specific instructions....you'll save a lot of time that way!)
- NEW ASSIGNMENT! Form Study 1-3
- NEW ASSIGNMENT! 3D Cartoon Character (4/1/19)
Tuesday, 4/2/19 Red 52 Schedule
Bellwork: Title the entry, "Sunlight and Cast Shadows"
From the video yesterday, what pair of complementary colors are most like the highlights and shadows you would see in sunlight?
Things to do:
From the video yesterday, what pair of complementary colors are most like the highlights and shadows you would see in sunlight?
Things to do:
- Basic Shapes Practice (See 3/11/19 for specific instructions....you'll save a lot of time that way!)
- NEW ASSIGNMENT! Form Study 1-3
- NEW ASSIGNMENT! 3D Cartoon Character (4/1/19)
Monday, 4/1/19
We are taking a break from Ctrl + Paint and his Black and White tutorials. Let's play with color for a bit!
Bellwork: Title the entry, "Color Theory to Remember"
Copy and Paste the words below and fill in the answers. If you don't know or can't remember, Google it!
The complementary color for red is:
The complementary color for blue is:
The complementary color for yellow is:
Warm colors are:
Cool colors are:
Warm colors come out toward the viewer from your canvas.
Cool colors recede, go away or back from the viewer in your canvas.
Watch the tutorial below. We are playing with color today, ladies and gentlemen!
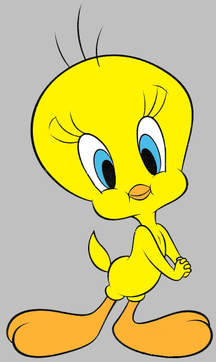
Do a Google Image search for a cartoon character. Try to keep it a simple one, not a ton of picky little details. Think old school cartoons!
Things to do:
- You want an image that is FLAT. No attempt has been made to show a light source OR shadows OR form. (See Tweety)
- Open the jpeg in Photoshop.
- Create a New layer right away!
- Create swatches for blending off to the side. You'll want to think of a warm color for your highlight and it complementary as your shading value. (It would be helpful to create a value scale of those colors.) Remember, they do NOT have to be fully saturated colors! You may wish to desaturate or choose a tint or shade of that color.
- Decide where your light source is going to be. Make and X or arrows there to denote it.
- Imagine your character as basic 3D shapes. Just like you've been practicing in greys.
- Use the temp layer, digital paint blending, and even the smudge tool to help you make your character look like a 3D version of itself.
- Watch your blending! make the gradations smooth where necessary!
- Think form shadow, terminator line, cast shadow, bounce light, etc. (For example, each of Tweety's cheeks are a sphere, in fact, most of him/her (?) can be broken down into a sphere, cylinder, or ellipse. These are all shapes you know how to shade! Keep that in mind as you are searching for your character!
Things to do:
- Basic Shapes Practice (See 3/11/19 for specific instructions....you'll save a lot of time that way!)
- NEW ASSIGNMENT! Form Study 1-3
- NEW ASSIGNMENT! 3D Cartoon Character (4/1/19)
Friday, 3/22/19
No Bellwork today! Get started right away!
Ok, so maybe completing Form 1-3 was reaching. Get as far as you can. We will start playing with color and drawing when you come back from break.
Things to do:
Ok, so maybe completing Form 1-3 was reaching. Get as far as you can. We will start playing with color and drawing when you come back from break.
Things to do:
- NEW ASSIGNMENT! Basic Shapes Practice (See 3/11/19 for specific instructions....you'll save a lot of time that way!)
- NEW ASSIGNMENT! Form Study 1-3
Thursday, 3/21/19 Red Schedule
No Bellwork today! Get started right away!
Working to complete Forms 1-3 by Spring Break. Too ambitious?
Things to do:
Working to complete Forms 1-3 by Spring Break. Too ambitious?
Things to do:
- NEW ASSIGNMENT! Basic Shapes Practice (See 3/11/19 for specific instructions....you'll save a lot of time that way!)
- NEW ASSIGNMENT! Form Study 1-3
Wednesday, 3/20/19
No Bellwork today! Get started right away!
It would be lovely to complete Forms 1-3 by Spring Break. What do you think?
Things to do:
It would be lovely to complete Forms 1-3 by Spring Break. What do you think?
Things to do:
- NEW ASSIGNMENT! Basic Shapes Practice (See 3/11/19 for specific instructions....you'll save a lot of time that way!)
- NEW ASSIGNMENT! Form Study 1-3
Tuesday, 3/19/19 Red 52 Schedule
Bellwork: When I am done teaching Year 1 and Year 2, remind me to talk about yesterday's bellwork :-P
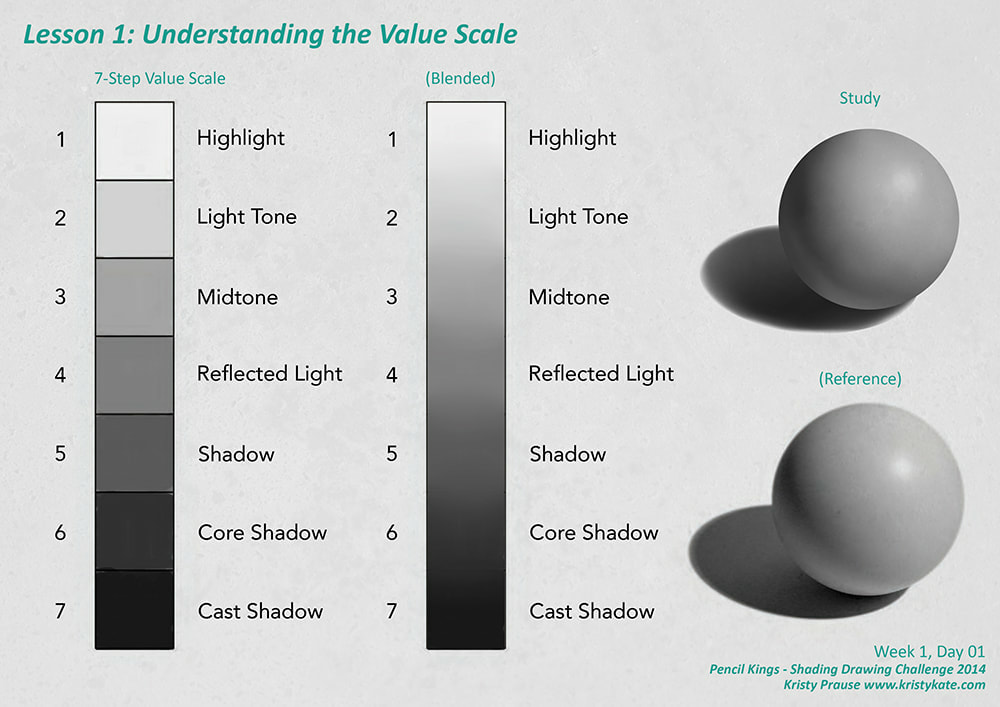
Once you have completed the Basic shapes (Form and cast shadows, bounce light, and smooth gradations), watch the remainder of video two. Again, I'd suggest taking notes on a Google Doc with time stamps for important things to remember later.
Once that is complete, you'll be ready to attack 'Form Study 1" from your folder. (Note: the light source indicated on the side of this jpeg is meant to extend all across the top of the of this jpeg, not just over on the left hand side.)
Done early?
Focus on a good range of values from the lightest light (white) to the darkest dark (black) and everything in between.
Things to do:
Once you have completed the Basic shapes (Form and cast shadows, bounce light, and smooth gradations), watch the remainder of video two. Again, I'd suggest taking notes on a Google Doc with time stamps for important things to remember later.
Once that is complete, you'll be ready to attack 'Form Study 1" from your folder. (Note: the light source indicated on the side of this jpeg is meant to extend all across the top of the of this jpeg, not just over on the left hand side.)
Done early?
- Attack Form Study 2 and 3.
Focus on a good range of values from the lightest light (white) to the darkest dark (black) and everything in between.
Things to do:
- NEW ASSIGNMENT! Basic Shapes Practice (See 3/11/19 for specific instructions....you'll save a lot of time that way!)
- NEW ASSIGNMENT! Form Study 1-3
Monday, 3/18/19
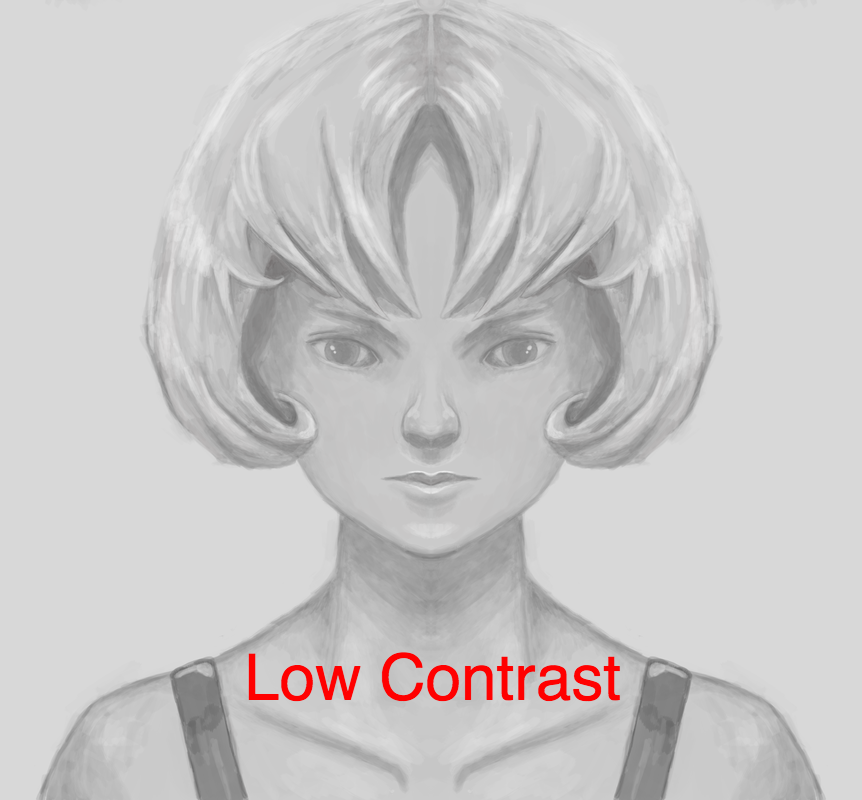
Bellwork: Title the entry, "Contrast Tip to remember"
Copy and paste the tip below into your journal entry. Copy and paste the 3 images as well to help reinforce the concept.
As you create in black in white OR color, make sure you have the complete range of lights to darks. A picture that has low contrast is flat and unrealistic.
Copy and paste the tip below into your journal entry. Copy and paste the 3 images as well to help reinforce the concept.
As you create in black in white OR color, make sure you have the complete range of lights to darks. A picture that has low contrast is flat and unrealistic.
|

|
Once you have completed the Basic shapes (Form and cast shadows, bounce light, and smooth gradations), watch the remainder of video two. Again, I'd suggest taking notes on a Google Doc with time stamps for important things to remember later.
Once that is complete, you'll be ready to attack 'Form Study 1" from your folder. (Note: the light source indicated on the side of this jpeg is meant to extend all across the top of the of this jpeg, not just over on the left hand side.)
Done early?
Focus on a good range of values from the lightest light (white) to the darkest dark (black) and everything in between.
Things to do:
Once that is complete, you'll be ready to attack 'Form Study 1" from your folder. (Note: the light source indicated on the side of this jpeg is meant to extend all across the top of the of this jpeg, not just over on the left hand side.)
Done early?
- Attack Form Study 2 and 3.
Focus on a good range of values from the lightest light (white) to the darkest dark (black) and everything in between.
Things to do:
- NEW ASSIGNMENT! Basic Shapes Practice (See 3/11/19 for specific instructions....you'll save a lot of time that way!)
- NEW ASSIGNMENT! Form Study 1-3
Friday, 3/15/19
No Bellwork! Get started right away!
Once you have completed the Basic shapes (Form and cast shadows, bounce light, and smooth gradations), watch the remainder of video two.....JOE! ;)
Again, I'd suggest taking notes on a Google Doc with time stamps for important things to remember later.
Once that is complete, you'll be ready to attack 'Form Study 1" from your folder. (Note: the light source indicated on the side of this jpeg is meant to extend all across the top of the of this jpeg, not just over on the left hand side.)
Done early?
Attack Form Study 2. No added video for 2 and 3 just increased challenge as you go.
Things to do:
(4th Marking Period)
- Intro to Brush Panel Assignments 1-3 (2/4/19)
- Keyboard Shortcuts and Paint Practice (2/5/19)
- Color Mixing with Eye dropper (2/5/19)
- Brushblending with gradations (2/7/19) Go to this link for a break down of the process.
- Temp Layers (2/7/19) Watch the video. There is some basic layer stuff, but push through that! His technique for adding highlights and shadows come from that. So does the Temp Layer technique. Sit back and enjoy! Then download the file and practice.
- Basic Rendering, Pitcher (2/8/19)
- Abstract Sculpture Rendering (2/25/19)
- NEW ASSIGNMENT! Shadow Terms (3/7/19)
- NEW ASSIGNMENT! Sculpture Weebly Post (3/7/19)
- NEW ASSIGNMENT! Basic Shapes Practice (See 3/11/19 for specific instructions....you'll save a lot of time that way!)
- NEW ASSIGNMENT! Form Study 1-3
Thursday, 3/14/19 Red 52 Schedule
Bellwork: Title the entry, "Digital Painting Issues?"
What problems, if any, are you having with the Basic Shapes or Forms digital painting? If you are not having any, type "smooth sailing" for your answer :)
Your goal is to have #8-9 for fourth marking period and (hopefully) #1 in fifth marking period finished or as close to being finished by the end of the hour.
Once you have shown Basic Shapes to me for credit, watch the remainder of video two.
Again, I'd suggest taking notes on a Google Doc with time stamps for important things to remember later.
Once that is complete, you'll be ready to attack 'Form Study 1" from your folder.
(Note: the light source indicated on the side of this jpeg is meant to extend all across the top of the of this jpeg, not just over on the left hand side.)
Things to do:
(4th Marking Period)
- Intro to Brush Panel Assignments 1-3 (2/4/19)
- Keyboard Shortcuts and Paint Practice (2/5/19)
- Color Mixing with Eye dropper (2/5/19)
- Brushblending with gradations (2/7/19) Go to this link for a break down of the process.
- Temp Layers (2/7/19) Watch the video. There is some basic layer stuff, but push through that! His technique for adding highlights and shadows come from that. So does the Temp Layer technique. Sit back and enjoy! Then download the file and practice.
- Basic Rendering, Pitcher (2/8/19)
- Abstract Sculpture Rendering (2/25/19)
- NEW ASSIGNMENT! Shadow Terms (3/7/19)
- NEW ASSIGNMENT! Sculpture Weebly Post (3/7/19)
- NEW ASSIGNMENT! Basic Shapes Practice (See 3/11/19 for specific instructions....you'll save a lot of time that way!)
Wednesday, 3/13/19
Today is a work day! Use this time wisely! Do not be distracted by other digital devices, other websites, or other classmates.
Your guest teacher is comfortable in Illustrator AND Photoshop as well as Graphic Design. Ask for feedback and/or help on your designs. Another pair of trained eyes is a gift!
Between your guest teacher, those near you and other 2nd/3rd year students in the room, you have plenty of help.
If you need personal help from me OR have some points to turn in, email me. I will try to respond ASAP.
Your goal is to have #8-9 for fourth marking period and (hopefully) #1 in fifth marking period finished or as close to being finished by the end of the hour.
Once you have shown Basic Shapes to me for credit, watch the remainder of video two.
Again, I'd suggest taking notes on a Google Doc with time stamps for important things to remember later.
Once that is complete, you'll be ready to attack 'Form Study 1" from your folder.
(Note: the light source indicated on the side of this jpeg is meant to extend all across the top of the of this jpeg, not just over on the left hand side.)
Things to do:
(4th Marking Period)
- Intro to Brush Panel Assignments 1-3 (2/4/19)
- Keyboard Shortcuts and Paint Practice (2/5/19)
- Color Mixing with Eye dropper (2/5/19)
- Brushblending with gradations (2/7/19) Go to this link for a break down of the process.
- Temp Layers (2/7/19) Watch the video. There is some basic layer stuff, but push through that! His technique for adding highlights and shadows come from that. So does the Temp Layer technique. Sit back and enjoy! Then download the file and practice.
- Basic Rendering, Pitcher (2/8/19)
- Abstract Sculpture Rendering (2/25/19)
- NEW ASSIGNMENT! Shadow Terms (3/7/19)
- NEW ASSIGNMENT! Sculpture Weebly Post (3/7/19)
- NEW ASSIGNMENT! Basic Shapes Practice (See 3/11/19 for specific instructions....you'll save a lot of time that way!)
Tuesday, 3/12/19 Red Schedule
No bellwork today! Get started right away!
Your goal is to have #8-9 for fourth marking period and (hopefully) #1 in fifth marking period finished or as close to being finished by the end of the hour.
Once you have shown Basic Shapes to me for credit, watch the remainder of video two.
Again, I'd suggest taking notes on a Google Doc with time stamps for important things to remember later.
Once that is complete, you'll be ready to attack 'Form Study 1" from your folder.
(Note: the light source indicated on the side of this jpeg is meant to extend all across the top of the of this jpeg, not just over on the left hand side.)
Things to do:
(4th Marking Period)
- Intro to Brush Panel Assignments 1-3 (2/4/19)
- Keyboard Shortcuts and Paint Practice (2/5/19)
- Color Mixing with Eye dropper (2/5/19)
- Brushblending with gradations (2/7/19) Go to this link for a break down of the process.
- Temp Layers (2/7/19) Watch the video. There is some basic layer stuff, but push through that! His technique for adding highlights and shadows come from that. So does the Temp Layer technique. Sit back and enjoy! Then download the file and practice.
- Basic Rendering, Pitcher (2/8/19)
- Abstract Sculpture Rendering (2/25/19)
- NEW ASSIGNMENT! Shadow Terms (3/7/19)
- NEW ASSIGNMENT! Sculpture Weebly Post (3/7/19)
- NEW ASSIGNMENT! Basic Shapes Practice (See 3/11/19 for specific instructions....you'll save a lot of time that way!)
Monday, 3/11/19
Bellwork: Title your entry, "Sphere/Circle with terminator/cast shadow tips"
Copy or save and paste the image below into your entry.
Copy or save and paste the image below into your entry.
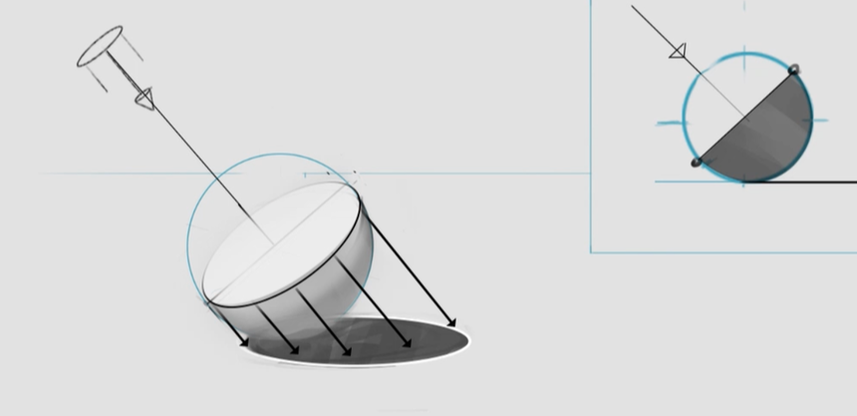
NEW ASSIGNMENT! DO NOT START THIS UNTIL YOU HAVE SHOWN ME YOUR SHADOW TERMS FOR CREDIT FROM VIDEO 1.
(Before you attack the Form Study assignments in your folder)
(Before you attack the Form Study assignments in your folder)
- Watch the first 8 minutes and 44 seconds of Video 2- Stop when you see the cylinder hovering over the cube. (Shadow Casting).
- Download the jpeg file below.
- Place the jpeg in Photoshop and use all of the Digital Painting techniques we've practiced to create the Form Shadow, Cast Shadow, and Bounce Light on all the shapes. I'll be looking for smooth gradations.
| basic_shapes_practice-01.jpg |
Things to do:
(4th Marking Period)
(4th Marking Period)
- Intro to Brush Panel Assignments 1-3 (2/4/19)
- Keyboard Shortcuts and Paint Practice (2/5/19)
- Color Mixing with Eye dropper (2/5/19)
- Brushblending with gradations (2/7/19) Go to this link for a break down of the process.
- Temp Layers (2/7/19) Watch the video. There is some basic layer stuff, but push through that! His technique for adding highlights and shadows come from that. So does the Temp Layer technique. Sit back and enjoy! Then download the file and practice.
- Basic Rendering, Pitcher (2/8/19)
- Abstract Sculpture Rendering (2/25/19)
- NEW ASSIGNMENT! Shadow Terms (3/7/19)
- NEW ASSIGNMENT! Sculpture Weebly Post (3/7/19)
- NEW ASSIGNMENT! Basic Shapes Practice (3/11/19)
Friday, 3/8/19- Half day schedule
|
Things to do:
|
Thursday, 3/7/19 Red 52 Schedule
Bellwork: Weebly post. Title your blog post, "Digital Painting from Observation"
Use Video 1 from your NEW Folder 2 to explain the terms below in your own words:
Call me over for credit when you are done.
Shape Shadow-
Form Shadow-
Terminator-
How do you figure out where the terminator line is on your shape?
Cast Shadow-
How do you figure out where the cast shadow should be?
Bounce light-
Watch video 2. Pause it from time to time and look at Form study 1, 2, and 3 to see how the new information could be used in those line drawings. They are next!
Since the video is longer than we are used to and is PACKED with information. I highly encourage you to have a Google Doc open as you watch to take notes. Jot down the time stamp for where in the video the important tip is coming from along with a phrase or two that describes what will be found there.
Things to do:
- Upload the jpeg of your sculpture AND the jpeg of your painted version side by side.
- Add text and explain your process. (How did you do it?)
- List one thing you've gotten better at painting-wise for this assignment. Explain.
- List one thing you'd still like improve upon painting-wise moving forward.
Use Video 1 from your NEW Folder 2 to explain the terms below in your own words:
Call me over for credit when you are done.
Shape Shadow-
Form Shadow-
Terminator-
How do you figure out where the terminator line is on your shape?
Cast Shadow-
How do you figure out where the cast shadow should be?
Bounce light-
Watch video 2. Pause it from time to time and look at Form study 1, 2, and 3 to see how the new information could be used in those line drawings. They are next!
Since the video is longer than we are used to and is PACKED with information. I highly encourage you to have a Google Doc open as you watch to take notes. Jot down the time stamp for where in the video the important tip is coming from along with a phrase or two that describes what will be found there.
Things to do:
- Intro to Brush Panel Assignments 1-3 (2/4/19)
- Keyboard Shortcuts and Paint Practice (2/5/19)
- Color Mixing with Eye dropper (2/5/19)
- Brushblending with gradations (2/7/19) Go to this link for a break down of the process.
- Temp Layers (2/7/19) Watch the video. There is some basic layer stuff, but push through that! His technique for adding highlights and shadows come from that. So does the Temp Layer technique. Sit back and enjoy! Then download the file and practice.
- Basic Rendering, Pitcher (2/8/19)
- Abstract Sculpture Rendering (2/25/19)
- NEW ASSIGNMENT! Shadow Terms (3/7/19)
Wednesday, 3/6/19
Bellwork: Title your entry, "Keyboard shortcut/pen trick for brush size/hard-soft"
Watch Video 2 starting from 5 minutes/42 secs. through to 6 minutes/50 secs. to answer the questions below:
Check Skyward! I have points in for everything I have found in your folders. See me if you have something done that is not recorded.
Things to do:
Watch Video 2 starting from 5 minutes/42 secs. through to 6 minutes/50 secs. to answer the questions below:
- What is the keyboard shortcut for changing your brush size while using the pen? What direction do you move the pen?
- What is the keyboard shortcut for changing your brush hardness while using the pen? What direction do you move the pen?
Check Skyward! I have points in for everything I have found in your folders. See me if you have something done that is not recorded.
Things to do:
- Intro to Brush Panel Assignments 1-3 (2/4/19)
- Keyboard Shortcuts and Paint Practice (2/5/19)
- Color Mixing with Eye dropper (2/5/19)
- Brushblending with gradations (2/7/19) Go to this link for a break down of the process.
- Temp Layers (2/7/19) Watch the video. There is some basic layer stuff, but push through that! His technique for adding highlights and shadows come from that. So does the Temp Layer technique. Sit back and enjoy! Then download the file and practice.
- Basic Rendering, Pitcher (2/8/19)
- NEW ASSIGNMENT! Abstract Sculpture Rendering (2/25/19)
Tuesday, 3/5/19 Red 52 Schedule
Bellwork: Title your entry, "Pacing"
Look carefully at your abstract sculpture rendered painting. Compare the values: where they are light and where they are dark, where they are a soft gradation and where they are a hard edge.
Your project grade will consist of your ability to recreate from observation as well as your craftsmanship with the technique of digital painting (smooth gradations).
Remembering that your goal is to duplicate in a digital painting as closely as you can from the original photograph, estimate how many days you need to finish this project.
Check Skyward! I have points in for everything I have found in your folders. See me if you have something done that is not recorded.
Things to do:
- Intro to Brush Panel Assignments 1-3 (2/4/19)
- Keyboard Shortcuts and Paint Practice (2/5/19)
- Color Mixing with Eye dropper (2/5/19)
- Brushblending with gradations (2/7/19) Go to this link for a break down of the process.
- Temp Layers (2/7/19) Watch the video. There is some basic layer stuff, but push through that! His technique for adding highlights and shadows come from that. So does the Temp Layer technique. Sit back and enjoy! Then download the file and practice.
- Basic Rendering, Pitcher (2/8/19)
- NEW ASSIGNMENT! Abstract Sculpture Rendering (2/25/19)
Monday, 3/4/19
MORE TIPS TO REMEMBER AS YOU PAINT:
Check Skyward! I have points in for everything I have found in your folders. See me if you have something done that is not recorded.
Things to do:
- You are in Photoshop. Don't forget you have Adjustment layers to adjust photos before painting...turn in black and white, adjust the contrast. I suggest you flatten the image once you have it the way you want it, then start tracing and painting.
- You also have blend modes.....these may help in your initial photo touch up OR in your painted layers.
Check Skyward! I have points in for everything I have found in your folders. See me if you have something done that is not recorded.
Things to do:
- Intro to Brush Panel Assignments 1-3 (2/4/19)
- Keyboard Shortcuts and Paint Practice (2/5/19)
- Color Mixing with Eye dropper (2/5/19)
- Brushblending with gradations (2/7/19) Go to this link for a break down of the process.
- Temp Layers (2/7/19) Watch the video. There is some basic layer stuff, but push through that! His technique for adding highlights and shadows come from that. So does the Temp Layer technique. Sit back and enjoy! Then download the file and practice.
- Basic Rendering, Pitcher (2/8/19)
- NEW ASSIGNMENT! Abstract Sculpture Rendering (2/25/19)
Friday, 3/1/19
TIPS TO REMEMBER AS YOU PAINT:
Check Skyward! I have points in for everything I have found in your folders. See me if you have something done that is not recorded.
Things to do:
- Fill your shape with a neutral base color on one layer. Then make a new layer and create a clipping mask to the layer below. You will be able to make wide, sweeping strokes with the paint brush for highlights or shadows and they will be contained within that base color shape.
- Don't forget when painting (or erasing) in a straight line you can click to start the line, then shift + click at the end of the line. It will paint (erase) in the straight line created by the two click points.
- Think Temp layers to create highlights and shadows and erase away the overspray.
- Create smooth blending using the eyedropper and half opacity or flow to build up the gradation in a smooth manner.
Check Skyward! I have points in for everything I have found in your folders. See me if you have something done that is not recorded.
Things to do:
- Intro to Brush Panel Assignments 1-3 (2/4/19)
- Keyboard Shortcuts and Paint Practice (2/5/19)
- Color Mixing with Eye dropper (2/5/19)
- Brushblending with gradations (2/7/19) Go to this link for a break down of the process.
- Temp Layers (2/7/19) Watch the video. There is some basic layer stuff, but push through that! His technique for adding highlights and shadows come from that. So does the Temp Layer technique. Sit back and enjoy! Then download the file and practice.
- Basic Rendering, Pitcher (2/8/19)
- NEW ASSIGNMENT! Abstract Sculpture Rendering (2/25/19)
Thursday, 2/28/19 Red 52 Schedule
Bellwork: Title your entry, "Pen pressure and Transfer"
Watch Video 2 from the 1 min 50 secs to 4 minutes to answer the questions below:
Things to do:
Watch Video 2 from the 1 min 50 secs to 4 minutes to answer the questions below:
- How do you change your pen tool so that the line gets bigger or smaller according to how much pressure you use on the pen?
- What does the 'Transfer' option in your brush panel control?
Things to do:
- Intro to Brush Panel Assignments 1-3 (2/4/19)
- Keyboard Shortcuts and Paint Practice (2/5/19)
- Color Mixing with Eye dropper (2/5/19)
- Brushblending with gradations (2/7/19) Go to this link for a break down of the process.
- Temp Layers (2/7/19) Watch the video. There is some basic layer stuff, but push through that! His technique for adding highlights and shadows come from that. So does the Temp Layer technique. Sit back and enjoy! Then download the file and practice.
- Basic Rendering, Pitcher (2/8/19)
- NEW ASSIGNMENT! Abstract Sculpture Rendering (2/25/19)
Wednesday, 2/27/29
Bellwork: Title your entry," Tip from Tablets"
After playing with the tablet, what is the most important tip you want to remember from either of the videos, the demo, or just exploring on your own. Something that would be useful to the next 'first timer' on the tablet to know.
Things to do:
After playing with the tablet, what is the most important tip you want to remember from either of the videos, the demo, or just exploring on your own. Something that would be useful to the next 'first timer' on the tablet to know.
Things to do:
- Intro to Brush Panel Assignments 1-3 (2/4/19)
- Keyboard Shortcuts and Paint Practice (2/5/19)
- Color Mixing with Eye dropper (2/5/19)
- Brushblending with gradations (2/7/19) Go to this link for a break down of the process.
- Temp Layers (2/7/19) Watch the video. There is some basic layer stuff, but push through that! His technique for adding highlights and shadows come from that. So does the Temp Layer technique. Sit back and enjoy! Then download the file and practice.
- Basic Rendering, Pitcher (2/8/19)
- NEW ASSIGNMENT! Abstract Sculpture Rendering (2/25/19)
Tuesday, 2/26/19 Red 52 Schedule
Open up your pen tool exercises again today to start. Erase to make room and do it again. Do more, do extra, become one with the pen :)
Lol! I knew it was an easy trick to rotate your page if the touch pad on the tablet didn't do it for you. Watch this! Easy peasy in one minute or less.
I will be around to check your progress today as well as look through your folder with you for Skyward grades as soon as I am done with 1st year folks. Please have your folder open and ready to go.
Things to do:
- Intro to Brush Panel Assignments 1-3 (2/4/19)
- Keyboard Shortcuts and Paint Practice (2/5/19)
- Color Mixing with Eye dropper (2/5/19)
- Brushblending with gradations (2/7/19) Go to this link for a break down of the process.
- Temp Layers (2/7/19) Watch the video. There is some basic layer stuff, but push through that! His technique for adding highlights and shadows come from that. So does the Temp Layer technique. Sit back and enjoy! Then download the file and practice.
- Basic Rendering, Pitcher (2/8/19)
- NEW ASSIGNMENT! Abstract Sculpture Rendering (2/25/19)
Monday, 2/25/19
Download the file below. I'll give you a quick demo of what I'm looking for before teaching 1st year today. So you're getting the demo before the tutorial and practice time....Here is written instructions if you want a preview.
After demo. Watch the tutorial below....then, do what he says in regards to gaming :) When you are comfortable using the tablet and pen. Open the Photoshop file. You'll show it to me for credit.
Video #1-Excellent tips for getting used to the pen over the mouse
After demo. Watch the tutorial below....then, do what he says in regards to gaming :) When you are comfortable using the tablet and pen. Open the Photoshop file. You'll show it to me for credit.
Video #1-Excellent tips for getting used to the pen over the mouse
| pen_practice_with_dots.psd |
If you get done early, move on to this tutorial
Video #2- Five tips for Beginners with tablets-Customizing the pen, tablet, and shortcuts
At this point you should be finishing up the videos from your folder and putting the finishing touches on your Pitcher.
When you are done, you'll upload your finished jpeg AND psd file to your folder. Notify Jones that you're done and it is ready to be graded.
Next: Do a Google Image search for a black and white photograph of an abstract sculpture.
Save the high quality jpeg and use it as a reference. (see example below) You will recreate the image as a digital painting in Photoshop using what you learned in the Pitcher painting.
The biggest differences between this assignment and the Pitcher is that you will need to create a line drawing of the basic shapes first (You may trace it on a new layer this time) AND you'll be creating the temp layers and the digital blending on your own without step by step prompting.
Try to use your observational skills along with your digital painting skills to create as close a recreation of the original as you can.
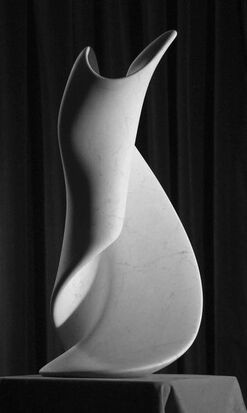
Friday, 2/22/19
No Bellwork today. Get creating right away!
The Pitcher is your priority. When you are done, you'll upload your finished jpeg AND psd file to your folder. Notify Jones that you're done and it is ready to be graded.
You have today through Friday as work days on the Pitcher and the videos from the folder. DO NOT SKIP THE VIDEOS! If you need to watch 1 or 2 at a time, then create....but don't SKIP them.
Things to do:
- Intro to Brush Panel Assignments 1-3 (2/4/19)
- Keyboard Shortcuts and Paint Practice (2/5/19)
- Color Mixing with Eye dropper (2/5/19)
- Brushblending with gradations (2/7/19) Go to this link for a break down of the process.
- Temp Layers (2/7/19) Watch the video. There is some basic layer stuff, but push through that! His technique for adding highlights and shadows come from that. So does the Temp Layer technique. Sit back and enjoy! Then download the file and practice.
- NEW ASSIGNMENT! Basic Rendering, Pitcher (2/8/19)
Thursday, 2/21/19 Red 52 Schedule
Bellwork: Title your entry, "Glaze Layer"
In your entry, explain how a glaze layer is different than a normal layer.
This is the second video in your folder. FF to 2 minutes, 9 seconds if you don't remember what makes a glaze layer different than a regular layer.
In your entry, explain how a glaze layer is different than a normal layer.
This is the second video in your folder. FF to 2 minutes, 9 seconds if you don't remember what makes a glaze layer different than a regular layer.
The Pitcher is your priority. When you are done, you'll upload your finished jpeg AND psd file to your folder. Notify Jones that you're done and it is ready to be graded.
You have today through Friday as workdays on the Pitcher and the videos from the folder. DO NOT SKIP THE VIDEOS! If you need to watch 1 or 2 at a time, then create....but don't SKIP them.
Things to do:
You have today through Friday as workdays on the Pitcher and the videos from the folder. DO NOT SKIP THE VIDEOS! If you need to watch 1 or 2 at a time, then create....but don't SKIP them.
Things to do:
- Intro to Brush Panel Assignments 1-3 (2/4/19)
- Keyboard Shortcuts and Paint Practice (2/5/19)
- Color Mixing with Eye dropper (2/5/19)
- Brushblending with gradations (2/7/19) Go to this link for a break down of the process.
- Temp Layers (2/7/19) Watch the video. There is some basic layer stuff, but push through that! His technique for adding highlights and shadows come from that. So does the Temp Layer technique. Sit back and enjoy! Then download the file and practice.
- NEW ASSIGNMENT! Basic Rendering, Pitcher (2/8/19)
Wednesday, 2/20/19
Bellwork: Title your entry, "Pacing"
In your entry describe how many days you feel you'll need to complete the Basic Rendering 1 folder.
When you are done, you'll upload your finished jpeg AND psd file to your folder. Notify Jones that you're done and it is ready to be graded.
You have today through Thursday as workdays on the Pitcher and the videos from the folder. DO NOT SKIP THE VIDEOS! If you need to watch 1 or 2 at a time, then create....but don't SKIP them. Friday we will work together on the tablets with new assignments. Use your time wisely!
Things to do:
- Intro to Brush Panel Assignments 1-3 (2/4/19)
- Keyboard Shortcuts and Paint Practice (2/5/19)
- Color Mixing with Eye dropper (2/5/19)
- Brushblending with gradations (2/7/19) Go to this link for a break down of the process.
- Temp Layers (2/7/19) Watch the video. There is some basic layer stuff, but push through that! His technique for adding highlights and shadows come from that. So does the Temp Layer technique. Sit back and enjoy! Then download the file and practice.
- NEW ASSIGNMENT! Basic Rendering, Pitcher (2/8/19)
Tuesday, 2/19/19
Bellwork: Title your entry, "Digital Painting Progress"
In your entry describe how you are doing with the digital painting process. What is frustrating? What is easy?
You have today through Thursday as workdays on the Pitcher and the videos from the folder. DO NOT SKIP THE VIDEOS! If you need to watch 1 or 2 at a time, then create....but don't SKIP them. Friday we will work together on the tablets with new assignments. Use your time wisely!
Things to do:
- Intro to Brush Panel Assignments 1-3 (2/4/19)
- Keyboard Shortcuts and Paint Practice (2/5/19)
- Color Mixing with Eye dropper (2/5/19)
- Brushblending with gradations (2/7/19) Go to this link for a break down of the process.
- Temp Layers (2/7/19) Watch the video. There is some basic layer stuff, but push through that! His technique for adding highlights and shadows come from that. So does the Temp Layer technique. Sit back and enjoy! Then download the file and practice.
- NEW ASSIGNMENT! Basic Rendering, Pitcher (2/8/19)
Thursday, 2/14/19 (Snow day Tuesday and Wednesday)
Bellwork: Title your entry, "Opacity vs Flow"
Explain the difference between opacity and flow as it pertains to the brush in Photoshop. If you are not sure, do a Google search and double check your understanding. Put it in your own words!!
Things to do:
Explain the difference between opacity and flow as it pertains to the brush in Photoshop. If you are not sure, do a Google search and double check your understanding. Put it in your own words!!
Things to do:
- Intro to Brush Panel Assignments 1-3 (2/4/19)
- Keyboard Shortcuts and Paint Practice (2/5/19)
- Color Mixing with Eye dropper (2/5/19)
- Brushblending with gradations (2/7/19) Go to this link for a break down of the process.
- Temp Layers (2/7/19) Watch the video. There is some basic layer stuff, but push through that! His technique for adding highlights and shadows come from that. So does the Temp Layer technique. Sit back and enjoy! Then download the file and practice.
- NEW ASSIGNMENT! Basic Rendering, Pitcher (2/8/19)
Monday, 2/11/19
No Bellwork!
I will be coming around to check for credit the assignments in the Things to do list excluding The Pitcher. Open them/minimize them so I can see them when ready.
Pitcher assignment chat
Things to do:
I will be coming around to check for credit the assignments in the Things to do list excluding The Pitcher. Open them/minimize them so I can see them when ready.
Pitcher assignment chat
Things to do:
- Intro to Brush Panel Assignments 1-3 (2/4/19)
- Keyboard Shortcuts and Paint Practice (2/5/19)
- Color Mixing with Eye dropper (2/5/19)
- NEW ASSIGNMENT-Brushblending with gradations (2/7/19) Go to this link for a break down of the process. Some with be reminders from yesterday, some will be new. Notice the difference in blending from yesterday. Yesterday's paint blending was in done in squares or patches....today's will show a smooth blend from one to the next. Notice how she loops the colors down from one to blend in the middle and then back up again. You will do the same. MAKE SURE YOU BLEND ENOUGH TO MAKE A SOLID COLOR THROUGHOUT, NOT TRANSPARENT IN THE MIDDLE. Use the file below in Photoshop. You may want to make a painting layer in case you need to start an area over.
- NEW ASSIGNMENT- Temp Layers (2/7/19) Watch the video. There is some basic layer stuff, but push through that! His technique for adding highlights and shadows come from that. So does the Temp Layer technique. Sit back and enjoy! Then download the file and practice.
- NEW ASSIGNMENT! Basic Rendering, Pitcher (2/8/19)
Friday, 2/8/19
Bellwork: Title your entry, "Scatter"
Based on Intro to Brush Panel assignments, explain in your own words what Scatter means? Double check your understanding with a Google search when you're done.
Things to do:
Based on Intro to Brush Panel assignments, explain in your own words what Scatter means? Double check your understanding with a Google search when you're done.
Things to do:
- Intro to Brush Panel Assignments 1-3 (2/4/19)
- Keyboard Shortcuts and Paint Practice (2/5/19)
- Color Mixing with Eye dropper (2/5/19)
- NEW ASSIGNMENT-Brushblending with gradations (2/7/19) Go to this link for a break down of the process. Some with be reminders from yesterday, some will be new. Notice the difference in blending from yesterday. Yesterday's paint blending was in done in squares or patches....today's will show a smooth blend from one to the next. Notice how she loops the colors down from one to blend in the middle and then back up again. You will do the same. MAKE SURE YOU BLEND ENOUGH TO MAKE A SOLID COLOR THROUGHOUT, NOT TRANSPARENT IN THE MIDDLE. Use the file below in Photoshop. You may want to make a painting layer in case you need to start an area over.
- NEW ASSIGNMENT- Temp Layers (2/7/19) Watch the video. There is some basic layer stuff, but push through that! His technique for adding highlights and shadows come from that. So does the Temp Layer technique. Sit back and enjoy! Then download the file and practice.
- NEW ASSIGNMENT! Basic Rendering, Pitcher (2/8/19)
- I have shared a folder called 1 Basic Rendering. Take a minute to go through the folder to find the following...... a psd file, a folder of videos, and jpegs. You will need to download the .psd file.
- The videos in the folder are broken down into 2-3 minute videos. WATCH THEM IN ORDER! DON'T SKIP! They build upon each other and will take you step by step through the process of creating your final image below. How you choose to watch and create is up to you. I watched them all to see where I was going, then went back and played and paused as I experimented. You may want to watch and play one at a time. It is up to you. Your final rendered vase is the goal. I will need to see your psd file to see the layers BEFORE YOU FLATTEN THEM!
- THERE IS A PSD FILE ALL SET UP AND READY TO GO IN THE FOLDER. You don't have to set it up from scratch this time.
- Obviously this is not a one day/baby assignment. Take the time to do it right. The rest of the semester will build from these techniques.

Thursday, 2/7/19 (Snow day Wednesday)
Bellwork: Title your entry, "Keyboard shortcuts for Brush"
Copy and Paste the following into your journal for a quick resource:
Copy and Paste the following into your journal for a quick resource:
- Hit F5 for the Brush panel.
- Hitting B on the keyboard selects the Brush Tool.
- Hit D to paint with the Default Foreground and Background Colors (Black and White)
- [ or ] to Decrease or Increase the Brush Size (respectively).
- { or } (Shift-[ or Shift-]) to Decrease or Increase the Brush Hardness.
- Holding Alt while the Brush Tool (B) is selected will bring up the Eyedropper Tool (used for blending).
- Right-click while the Brush Tool (B) is selected to bring up a mini panel for Brush Presets as well as Size/Hardness.
- Intro to Brush Panel Assignments 1-3 (2/4/19)
- Keyboard Shortcuts and Paint Practice (2/5/19)
- Color Mixing with Eye dropper (2/5/19)
- NEW ASSIGNMENT-Brushblending with gradations- Go to this link for a break down of the process. Some with be reminders from yesterday, some will be new. Notice the difference in blending from yesterday. Yesterday's paint blending was in done in squares or patches....today's will show a smooth blend from one to the next. Notice how she loops the colors down from one to blend in the middle and then back up again. You will do the same. MAKE SURE YOU BLEND ENOUGH TO MAKE A SOLID COLOR THROUGHOUT, NOT TRANSPARENT IN THE MIDDLE. Use the file below in Photoshop. You may want to make a painting layer in case you need to start an area over.
|

| ||
5. NEW ASSIGNMENT- Temp Layers Watch the video below. There is some basic layer stuff, but push through that! His technique for adding highlights and shadows come from that. So does the Temp Layer technique. Sit back and enjoy! Then download the file and practice.
| temp_layers.jpg |
Tuesday, 2/5/19
Bellwork: Title your entry, "Jitter"
Based on Intro to Brush Panel assignments, explain in your own words what Jitter means? Double check your understanding with a Google search when you're done.
Based on Intro to Brush Panel assignments, explain in your own words what Jitter means? Double check your understanding with a Google search when you're done.
Things to do (There are TWO new assignments to complete after the Intro to Brush Panels)
1. Intro to Brush Panel Assignments 1-3 (2/6/18)
2. NEW ASSIGNMENT-Keyboard shortcuts and paint practice. Watch the video below. Download the file and recreate using the tips he shared.
1. Intro to Brush Panel Assignments 1-3 (2/6/18)
2. NEW ASSIGNMENT-Keyboard shortcuts and paint practice. Watch the video below. Download the file and recreate using the tips he shared.
| shortcuts_and_practice.psd |
Examples of finished sections
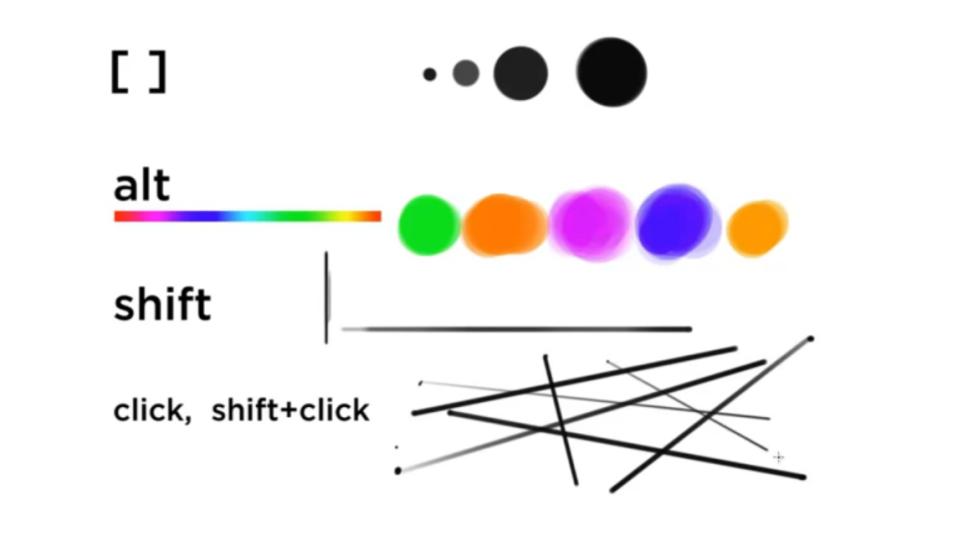
|
|
3. NEW ASSIGNMENT-Color Mixing with Eye Dropper. Watch the video below then download the jpeg and open it in Photoshop. Make a new layer on top and label it 'Painting layer' for easy do-overs and fixes.
| color_mixing_with_eye_dropper.jpg |
Monday, 2/4/19
Bellwork: Upload ABSOLUTELY EVERYTHING to your Google Drive. Our hours have shifted people so there is a strong chance we will need to move people around! Get portable! You may have to 'switch user' after you are done so that someone from another hour can grab their stuff too!
We will begin after all the uploading and attendance is taken care of. Turn your monitors off when you are done.
Return Exam Rubrics
Intro to Brush Panel Assignments #1-3 in Photoshop. Use the same link for all 3 assignments. You are not expected to finish this in one day. I'm giving you all three so that you can immediately move on when you are ready. Do them in order though as they build upon each other.
- Go to tutorial link.
- Download the file below.
- Carefully read each section and complete the exercise. Additional directions on the file will help too. Do not use the same color as the website or my examples below.
- Call me over for credit when you are done. Then JPEG it and place it in your folder.
|
| ||
|
| ||
|
| ||
Tuesday, 1/22/19-Friday, 2/1/19
Need extra lab time? The lab is open after exams every day this week until 3:00. If you need extra time beyond 3, see me to make arrangements for it to happen.
|
Exam Times:
7:35-9:20 Passing time/break 9:30-11:15 |
When you are done with your exam, check the following:
|
Done early? Things to do:
- Cinemagraph and Reflection done? Show me for credit when it's done. Blog comments have been deleted from this
- Study for your next exam.
Snowday :( Monday, 1/21/19
Today is the last day for me to accept missing work! Make sure you check Skyward to see that it is accurate according to what you have done. Tell me immediately if you finish an assignment.
Most people have started their exams. Therefore, it needs to be a testing atmosphere. NO TALKING! If you have a question or problem in Public Service Announcement Poster, use Google, the class site, or your Journal to help you. Your neighbor is no longer an option.
Performance testing will be going on all hour. If you have a question or something to turn in for credit, please wait until we are done.
Review the checklist of the exam to make sure you have everything! (1/17/19)
Things to do:
- Missing 3rd marking period assignments
- Cinemagraph Reflection posted on weebly/psd and gifs in folder for me to post on my weebly site.
- Final Exam (example)
Friday, 1/18/19
Bellwork: Creating Folder for Exam
Things to do:
- Open your Google Folder for this class (The one you shared with me.)
- WITH THAT OPEN, create a new folder INSIDE YOUR CLASS FOLDER.
- Rename the new folder, "Last Name, First Name Exam"
- OPEN YOUR NEW EXAM FOLDER and create a Google Doc.
- Name the Google Doc, "Artist Statement"
- Create another Google Doc and title it Exam Works Cited
Things to do:
- Missing 3rd marking period assignments
- Final Exam (example)
Thursday, 1/17/19-Snow Day Wednesday, 1/16/19
Bellwork: Cinemagraph Blog Post. You want to have this published with BOTH of your cinemagraphs by the end of the hour.
Cinemagraph blog post-artist statement
Explanation of Final Exam with example.
Things to do:
Cinemagraph blog post-artist statement
- What did you like/dislike about this project and why?
- What are some new skills that you learned in this project?
- What are some previously learned skills that were useful in creating this project?
- Name at least one thing you did well in this project and one thing that could be improved.
- How creative was your project?
Explanation of Final Exam with example.
Things to do:
- Cinemagraph research (12/14/18) I need to see 3 ideas sketched. One that is doable at home and two at school.
- Cinemagraph (2)- Cinemagraph Project/Rubric
Tuesday, 1/15/19 Red 52 Schedule
Bellwork: Title it, “Cinemagraph Strengths”
What about this assignment did you enjoy the most? OR What surprised you about the process that was easier than you expected?
Remember you want BOTH school and home cinemagraph posted on your weebly site by the end of the hour Wednesday.
Your final exam will be explained Wednesday.
Things to do:
What about this assignment did you enjoy the most? OR What surprised you about the process that was easier than you expected?
Remember you want BOTH school and home cinemagraph posted on your weebly site by the end of the hour Wednesday.
Your final exam will be explained Wednesday.
Things to do:
- Cinemagraph research (12/14/18) I need to see 3 ideas sketched. One that is doable at home and two at school.
- Cinemagraph (2)- Cinemagraph Project/Rubric
Monday, 1/14/19
Bellwork: Title it, “Cinemagraph Obstacles”
What has been the hardest part of creating the cinemagraph so far?
Your goal is to have at least one cinemagraph posted by end of hour with your second posted by end of hour Wednesday.
Your final exam will be explained Wednesday.
Things to do:
What has been the hardest part of creating the cinemagraph so far?
Your goal is to have at least one cinemagraph posted by end of hour with your second posted by end of hour Wednesday.
Your final exam will be explained Wednesday.
Things to do:
- Cinemagraph research (12/14/18) I need to see 3 ideas sketched. One that is doable at home and two at school.
- Cinemagraph (2)- Cinemagraph Project/Rubric
Friday, 1/11/19
No bellwork today!
But a tip.....
Not crazy about the new 2018 Creative Suite workspace in Illustrator? Click on 'Essentials' on the top tool bar (Control Panel) and change the workspace to Essentials Classic. It'll go back to pre-update workspace. :)
It's a workday!
REMEMBER, THE CINEMAGRAPH IS ON THIS MARKING PERIOD AND YOUR FINAL EXAM STARTS NEXT WEEK! Your goal is to have BOTH cinemagraphs completed and loaded onto your weebly site by the end of the hour Monday.
Things to do:
- Cinemagraph research (12/14/18) I need to see 3 ideas sketched. One that is doable at home and two at school.
- Coffee Cinemagraph Practice (12/14/18)
- Cinemagraph Conference with Jones- I want to know your plan!
- Record/Begin your School Cinemagraph
Thursday, 1/10/19-Red 52 Schedule
Bellwork: Title your entry, "Camera or phone on tripod"
Why is it so important that your video be recorded on a phone/camera that is totally still (attached to a tripod or otherwise stationary)?
REMEMBER, THE CINEMAGRAPH IS ON THIS MARKING PERIOD AND YOUR FINAL EXAM STARTS NEXT WEEK! Your goal is to have BOTH cinemagraphs completed and loaded onto your weebly site by the end of the hour Monday.
Things to do:
- Cinemagraph research (12/14/18) I need to see 3 ideas sketched. One that is doable at home and two at school.
- Coffee Cinemagraph Practice (12/14/18)
- Cinemagraph Conference with Jones- I want to know your plan!
- Record/Begin your School Cinemagraph
Wednesday, 1/9/19
Bellwork: Title your entry, "Analysis #2"
Analyze the student created cinemagraph below. What other photoshop techniques can you see that have been done besides adding the video and masking away all but one area of motion?
Also, as a side note, this is an example of motion that was copied/reversed/pasted :)
Analyze the student created cinemagraph below. What other photoshop techniques can you see that have been done besides adding the video and masking away all but one area of motion?
Also, as a side note, this is an example of motion that was copied/reversed/pasted :)
REMEMBER, THE CINEMAGRAPH IS ON THIS MARKING PERIOD AND YOUR FINAL EXAM STARTS NEXT WEEK! Your goal is to have BOTH cinemagraphs completed and loaded onto your weebly site by the end of the hour Monday.
Things to do:
Things to do:
- Cinemagraph research (12/14/18) I need to see 3 ideas sketched. One that is doable at home and two at school.
- Coffee Cinemagraph Practice (12/14/18)
- Cinemagraph Conference with Jones- I want to know your plan!
- Record/Begin your School Cinemagraph
Tuesday, 1/8/19-Red 52 Schedule
Bellwork: Title your entry, "Analysis #1"
What was done well with the student created cinemagraph below? What bothers you? How would you fix it?
What was done well with the student created cinemagraph below? What bothers you? How would you fix it?
Things to do:
- Cinemagraph research (12/14/18) I need to see 3 ideas sketched. One that is doable at home and two at school.
- Coffee Cinemagraph Practice (12/14/18)
- Cinemagraph Conference with Jones- I want to know your plan!
- Record/Begin your School Cinemagraph
Monday, 1/7/19
Bellwork: Title your entry, "2 at school and 1 at home"
What are your 3 ideas for your cinemagraph?
Explanation of Cinemagraph Project/Rubric and timeline for completion.
Things to do:
What are your 3 ideas for your cinemagraph?
Explanation of Cinemagraph Project/Rubric and timeline for completion.
Things to do:
- Cinemagraph research (12/14/18) I need to see 3 ideas sketched. One that is doable at home and two at school.
- Coffee Cinemagraph Practice (12/14/18)
- Cinemagraph Conference with Jones- I want to know your plan!
- Record/Begin your School Cinemagraph
Friday, 12/21/18
ALERT! Computers are going to be reimaged and CC2018 updated over break! You need to get everything into your Google Drive. Do it now!!!
Here's one more way to mask that seems easiest to me. PHLEARN style :)
Here's one more way to mask that seems easiest to me. PHLEARN style :)
Want a holiday break? Do you want to build a snowflake? Take the snowflake challenge! Learn Rotate and Duplicate. Two easy tricks to make visually stunning geometric radial designs.
Things to do:
- Use today to finish up your Design Packet. LOOK AT THE CHECKLIST TO MAKE SURE YOU ARE ALL SET! Let me know when you are done!
- Upload past artworks and print your Scholastic entry forms.
- Cinemagraph research (12/14/18) I need to see 3 ideas sketched. One that is doable at home and two at school.
- Coffee Cinemagraph Practice (12/14/18)
- Cinemagraph Conference with Jones- I want to know your plan!
Thursday, 12/20/18
Bellwork: Title your entry, "Favorite Cinemagraph from compilation"
Watch the short video below and list your two favorite cinemagraphs.
Watch the short video below and list your two favorite cinemagraphs.
LAST DAY TO UPLOAD ARTWORK TO SCHOLASTIC SITE AND PRINT FORMS TO BE SIGNED AND RETURNED TOMORROW!!!
ALERT! Computers are going to be reimaged and CC2018 updated over break! You need to get everything into your Google Drive.
Scholastic Entries are priority! When you are done, download the pdf and, if needed, waiver form, and email it to me to print.
Watch the 3 minute video below to see how to do the actual recording. Remember, you need three ideas: 2 you could shoot at school and 1 from home.
Things to do:
- Use today to finish up your Design Packet. LOOK AT THE CHECKLIST TO MAKE SURE YOU ARE ALL SET! Let me know when you are done!
- Upload past artworks and print your Scholastic entry forms.
- Cinemagraph research (12/14/18) I need to see 3 ideas sketched. One that is doable at home and two at school.
- Coffee Cinemagraph Practice (12/14/18)
- Cinemagraph Conference with Jones- I want to know your plan!
Wednesday, 12/19/18
Last day to load any pdfs/jpegs into print folder I shared with you before sending it off to the print shop!
Bellwork: Title it "Cinemagraph Actions"
For your cinema graph to work, you need to film an action WITHOUT the camera moving! Think tripod!
The action should take place in a scene where other action is expected (so it looks surreal to have that area still). The action should also be loop-able, stops and starts in the same place or can be repeated over and over without a definite start and stop point.
List at least three possible actions you may record for this project.
ALERT! Computers are going to be reimaged and CC2018 updated over break! You need to get everything into your Google Drive.
Scholastic Entries are priority! When you are done, download the pdf and, if needed, waiver form, and email it to me to print.
Things to do:
- Use today to finish up your Design Packet. LOOK AT THE CHECKLIST TO MAKE SURE YOU ARE ALL SET! Let me know when you are done!
- Upload past artworks and print your Scholastic entry forms.
- Cinemagraph research (12/14/18) I need to see 3 ideas sketched. One that is doable at home and two at school.
- Coffee Cinemagraph Practice (12/14/18)
Tuesday, 12/18/18
No Bellwork! Get started right away!
ALERT! Computers are going to be reimaged and CC2018 updated over break! You need to get everything into your Google Drive.
Scholastic Entries are priority! When you are done, download the pdf and, if needed, waiver form, and email it to me to print.
Things to do:
ALERT! Computers are going to be reimaged and CC2018 updated over break! You need to get everything into your Google Drive.
Scholastic Entries are priority! When you are done, download the pdf and, if needed, waiver form, and email it to me to print.
Things to do:
- Use today to finish up your Design Packet. LOOK AT THE CHECKLIST TO MAKE SURE YOU ARE ALL SET! Let me know when you are done!
- Upload past artworks and print your Scholastic entry forms.
- Cinemagraph research (12/14/18)
- Coffee Cinemagraph Practice (12/14/18)
Monday, 12/17/18
No Bellwork! But be ready to listen to the Scholastic chat/demo given to 1st year as you will be going through the same process.
Scholastic Chat/demo
Scholastic Chat/demo
ORIGINALITY - Work that challenges conventions, blurs the boundaries between genres, and shifts notions of how a particular concept or emotion can be expressed. Jurors are encouraged to look for works of art that surprise them and leave a lasting impression
PERSONAL VISION - Work with an authentic and unique point of view and style.
.
TECHNICAL SKILL - Work that uses a technique to advance an original perspective or a personal vision, and show skills being utilized to create something unique, powerful, and innovative. Exhibition of technical skill alone should not be rewarded unless it’s exercised in the service of expressing an idea that is unique, powerful, and innovative and helps to highlight the artist’s vision.
Above is the 2018 artwork awarded National Medals in the Michigan Thumb Art Region.
Things to do:
- Use today to finish up your Design Packet. LOOK AT THE CHECKLIST TO MAKE SURE YOU ARE ALL SET! Let me know when you are done!
- Upload past artworks and print your Scholastic entry forms.
- Cinemagraph research (12/14/18)
- Coffee Cinemagraph Practice (12/14/18)
Friday, 12/14/18
Bellwork: Title it "Hour Goal"
For your entry, set a realistic goal of what you want to accomplish today. Finish Christmas Design Packet? Create a Scholastic Account? Upload a past assignment? Explore the Cinemagraph resources below?
If you finish with something today, send me an email to tell me it's in your Google Folder OR attach the .ai file and I'll get the points in this weekend. Zeros are going in this weekend for Christmas Design Packet.
If you get stuck, ask those around you for help....then try the 2nd/3rd year people.....then, if everyone is stumped, email me! I will have my phone nearby and will try to get back to you ASAP.
Things to do:
- Use today to finish up your Design Packet. LOOK AT THE CHECKLIST TO MAKE SURE YOU ARE ALL SET! Let me know when you are done!
- Upload past artworks and print your Scholastic entry forms.
- Cinemagraph research
- Coffee Cinemagraph Practice
| coffee_footage.mp4 |
Thursday, 12/13/18
Bellwork: Title your entry, "Cinemagraph"
Visit this link. In your entry describe what you notice about all of the examples on this site? This is where we are heading next! Google it if you want to know more :)
Things to do:
Visit this link. In your entry describe what you notice about all of the examples on this site? This is where we are heading next! Google it if you want to know more :)
Things to do:
- Use today/tomorrow to finish up your Design Packet. LOOK AT THE CHECKLIST TO MAKE SURE YOU ARE ALL SET! Let me know when you are done!
- Upload past artworks and print your Scholastic entry forms.
- See me when you are ready for more cinemograph info :)
Wednesday, 12/12/18
Bellwork: Go to the Online Registration Site to create an account for the Scholastics competition and get all of your information entered. You will have to 'Create an account' again.
Be thinking about past pieces you can enter. Your best bet will be one we created a wrap up for because it will have the url addresses you'll need for the images you used. You can also be confident in the licensing of those images. Think Independent Project from last year (since our entries didn't count last year due to the mail!) Think Double exposure from last year! Think Gradient Mesh from last year! See me about your possibilities...I have definite ideas of what I'd like you to enter.
Once you finish your program as the final piece of your Christmas Design package, let me know so I can give you credit. Double check the Design Checklist before doing so.
Next, we'll discuss plans for our next project. I want your input.
Things to do:
- PHHS Logo Modification (11/12/18)
- Christmas Concert Pack Assignment (11/26/18)
Tuesday, 12/11/18- Red 52 schedule
Congratulations to design for flyers and tickets at the Christmas in Port Huron event next week!
Next, attack the Program for the event! See the design checklist for the required text and the order of events in the link below. You will use the same design elements for the program as you did for the flyer and the tickets. It should look as though it is part of a set. Your logo should be in there too but does not have to be the main image. Use a standard 8.5 x 11 artboard for this.
Things to do:
Things to do:
- PHHS Logo Modification (11/12/18)
- Christmas Concert Pack Assignment (11/26/18)
Monday, 12/10/18
Look at your weebly sites for comments. Take the suggestions into consideration and make any necessary revisions. I HAVE MADE COMMENTS AS WELL. I will meet with each of you today do discuss final revisions.
By the end of the hour Today, you need to have your Christmas Flyer and tickets as a pdf and a jpeg in order for your design to be considered for the Christmas in Port Huron event. I'll also need the .ai file.
WHEN YOU ARE DONE, CREATE A NEW FOLDER IN YOUR FOLDER FOR THIS CLASS AND UPLOAD ALL THREE INTO THAT. Title THE FOLDER 'Christmas Design Package'.
Next, attack the Program for the event! See the design checklist for the required text and the order of events. You will use the same design elements for the program as you did for the flyer and the tickets. It should look as though it is part of a set. Your logo should be in there too but does not have to be the main image.
Friday, 12/6/18- Half Day Schedule
|
1st hour- Look at Joe and Makayla's weebly sites to provide feedback. Comment on each. You are critiquing for unity, balance, and the requirements from the design checklist, specifically CRAP. |
All three of you need to look at your weebly sites for comments. Take the suggestions into consideration and make any necessary revisions.
By the end of the hour Monday, you need to have your flyer and tickets each as a pdf and a jpeg. I'll also need to see the .ai file.
Next, you will finish the Program. (See the Design Checklist.)
Look at your Graphic Design Principles! Hierarchy of Text and CRAP, Unity, and Balance!
By the end of the hour Monday, you need to have your flyer and tickets each as a pdf and a jpeg. I'll also need to see the .ai file.
Next, you will finish the Program. (See the Design Checklist.)
Look at your Graphic Design Principles! Hierarchy of Text and CRAP, Unity, and Balance!
Monday, 12/3/18- Thursday, 12/6/18
New Marking Period! Start Strong!
You will post jpegs of your Christmas Flyer and ticket design to your weebly site before you leave today, finished or not!
In your text under the jpeg include the following:
6th hour- Look at Ryan's to provide feedback. Comment on each. You are critiquing for unity, balance, and the requirements from the design checklist, specifically CRAP.
Your Design packet must use these design principles:
Design Checklist:
_____ Modified logo appears on all three documents (tickets, program,
and flyer)
_____ All documents look as if they are part of a set due to unity of
design principles and elements (font, color, symbols, etc.).
_____ Contrast, Repetition, Alignment, and Proximity are successfully
used within and between all four Documents.
_____ All designs are created within one Illustrator file using multiple
artboards.
_____ All required text is included and spelled correctly.
_____ Hierarchy of text is used on all documents.
Scholastic Sign Up (12/5/18)
In your text under the jpeg include the following:
- If you are finished, ask for specific feedback? Where do you want you colleagues to focus with their suggestions?
- If you are not finished, briefly explain what you plan to include and ask for specific feedback or help to overcome a specific obstacle.
6th hour- Look at Ryan's to provide feedback. Comment on each. You are critiquing for unity, balance, and the requirements from the design checklist, specifically CRAP.
Your Design packet must use these design principles:
- CONTRAST- Important text and images stand out and are the first thing to catch the audience' eye because of the contrast in color, size, orientation, or placement.
- REPETITION- Your style (choices of font, color, symbols, spacing, etc.) should be repeated and unified throughout your designs.
- ALIGNMENT- Nothing is placed randomly in a design! It should 'line up' with the edge of other text or major images. Use the grid!
- PROXIMITY- Not only is 'like' information grouped together in the design, but there is also an obvious 'empty space or breathing room' around that group of information to make it easily recognized as unique/different. Don't forget about breathing space around the edge of your design as well...don't crowd the edge.
Design Checklist:
_____ Modified logo appears on all three documents (tickets, program,
and flyer)
_____ All documents look as if they are part of a set due to unity of
design principles and elements (font, color, symbols, etc.).
_____ Contrast, Repetition, Alignment, and Proximity are successfully
used within and between all four Documents.
_____ All designs are created within one Illustrator file using multiple
artboards.
_____ All required text is included and spelled correctly.
_____ Hierarchy of text is used on all documents.
Scholastic Sign Up (12/5/18)
- Participation Terms
- Category descriptions
- How to enter
- Explore past submission galleries and log in
Friday, 11/30/18-Last in the marking period. Check Skyward!
Bellwork: Title your entry, "Bad Example"
Analyze the infographic below. Keeping the CRAP principles and Hierarchy of Text in mind along with what you know about Balance and Unity, list at least two things that are a problem in this design.
Analyze the infographic below. Keeping the CRAP principles and Hierarchy of Text in mind along with what you know about Balance and Unity, list at least two things that are a problem in this design.
Explanation of Christmas Concert Pack Assignment
Time to work (The end of the marking period is this Friday!
Time to work (The end of the marking period is this Friday!
- Calligram Blog post (10/2/18)
- 2 comments on different Calligram posts (10/17/18) Screenshot and paste in journal.
- 2 comments on any Back to School tutorial posts 2nd or 3rd year (10/1/18) Screenshot and paste in journal.
- Illustrated Photograph
- Illustrated Photograph Blog Post (11/5/18)
- Photo and Text Effects (11/5/18) 2 from each folder.
- Two blog post comments (11/12/18) Screen shot and EMAIL to me.
- NEW ASSIGNMENT PHHS Logo Modification (11/12/18)
- NEW ASSIGNMENT Christmas Concert Pack Assignment (11/26/18)
Thursday, 11/29/18- 2 Days left in the marking period. Check Skyward!
Bellwork: Title your entry, "Hierarchy of Text"
What does Hierarchy of Text mean? How does it help the viewer? (If you're not sure, see the Hierarchy of Information video from Monday.)
Explanation of Christmas Concert Pack Assignment
Time to work (The end of the marking period is this Friday!
What does Hierarchy of Text mean? How does it help the viewer? (If you're not sure, see the Hierarchy of Information video from Monday.)
Explanation of Christmas Concert Pack Assignment
Time to work (The end of the marking period is this Friday!
- Calligram Blog post (10/2/18)
- 2 comments on different Calligram posts (10/17/18) Screenshot and paste in journal.
- 2 comments on any Back to School tutorial posts 2nd or 3rd year (10/1/18) Screenshot and paste in journal.
- Illustrated Photograph
- Illustrated Photograph Blog Post (11/5/18)
- Photo and Text Effects (11/5/18) 2 from each folder.
- Two blog post comments (11/12/18) Screen shot and EMAIL to me.
- NEW ASSIGNMENT PHHS Logo Modification (11/12/18)
- NEW ASSIGNMENT Christmas Concert Pack Assignment (11/26/18)
Wednesday, 11/28/18
Bellwork: Title your entry, "Making a symbol"
What is the reasoning behind turning objects or text into a symbol?
Explanation of Christmas Concert Pack Assignment
Time to work (The end of the marking period is this Friday!
What is the reasoning behind turning objects or text into a symbol?
Explanation of Christmas Concert Pack Assignment
Time to work (The end of the marking period is this Friday!
- Calligram Blog post (10/2/18)
- 2 comments on different Calligram posts (10/17/18) Screenshot and paste in journal.
- 2 comments on any Back to School tutorial posts 2nd or 3rd year (10/1/18) Screenshot and paste in journal.
- Illustrated Photograph
- Illustrated Photograph Blog Post (11/5/18)
- Photo and Text Effects (11/5/18) 2 from each folder.
- Two blog post comments (11/12/18) Screen shot and EMAIL to me.
- NEW ASSIGNMENT PHHS Logo Modification (11/12/18)
- NEW ASSIGNMENT Christmas Concert Pack Assignment (11/26/18)
Tuesday, 11/27/18 Red 52 Schedule
Bellwork: Title your entry, "Alignment marks in Artboards"
Where do you find 'Show Center Mark' and 'Crosshairs' in your artboards and what do they do? (If you are not sure, see the multiple artboards video from 11/26 at 2 mins 40 secs.)
If you haven't watched those videos yet, do so today!
Explanation of Christmas Concert Pack Assignment
Time to work (The end of the marking period is this Friday!
- Calligram Blog post (10/2/18)
- 2 comments on different Calligram posts (10/17/18) Screenshot and paste in journal.
- 2 comments on any Back to School tutorial posts 2nd or 3rd year (10/1/18) Screenshot and paste in journal.
- Illustrated Photograph
- Illustrated Photograph Blog Post (11/5/18)
- Photo and Text Effects (11/5/18) 2 from each folder.
- Two blog post comments (11/12/18) Screen shot and EMAIL to me.
- NEW ASSIGNMENT PHHS Logo Modification (11/12/18)
- NEW ASSIGNMENT Christmas Concert Pack Assignment (11/26/18)
Monday, 11/26/18
Today is an information gathering day. Watch the tutorials below. I will be meeting with you to discuss the Design Checklist tomorrow and my expectations for the Christmas Concert Package.
The tutorial below will demonstrate some very important tools/techniques necessary to build the flyer, program, and tickets for the Christmas Concert. (Specifically look for how to create centered guidelines per artboard, creating/deleting/copying/resizing each individual artboard.)
The tutorial below will demonstrate some very important tools/techniques necessary to build the flyer, program, and tickets for the Christmas Concert. (Specifically look for how to create centered guidelines per artboard, creating/deleting/copying/resizing each individual artboard.)
This tutorial is going to show you how to make a global edit. (You may find you want to edit text/images in your set of artboards. This short 3 minute tutorial will show you how you can change one and it will change all the rest simultaneously. A huge time saver!) This video shows you how to do it with text!
This tutorial reminds you of Hierarchy of Text as well as some suggestions for getting started in poster design with composition tips.
This tutorial reminds you of each of the CRAP Design Principles.
Explanation of Christmas Concert Pack Assignment
Time to work (The end of the marking period is this Friday!
Time to work (The end of the marking period is this Friday!
- Calligram Blog post (10/2/18)
- 2 comments on different Calligram posts (10/17/18) Screenshot and paste in journal.
- 2 comments on any Back to School tutorial posts 2nd or 3rd year (10/1/18) Screenshot and paste in journal.
- Illustrated Photograph
- Illustrated Photograph Blog Post (11/5/18)
- Photo and Text Effects (11/5/18) 2 from each folder.
- Two blog post comments (11/12/18) Screen shot and EMAIL to me.
- NEW ASSIGNMENT PHHS Logo Modification (11/12/18)
- NEW ASSIGNMENT Christmas Concert Pack Assignment (11/26/18)
Monday, 11/19/18 and Tuesday, 11/20/18-1st hour PBIS lesson on Monday
Bellwork: Title your entry, "CRAP Cheat notes"
Copy and Paste the reminders below into your journal. As you will be creating a set of graphic design pieces for the upcoming Christmas concert (Flyer, Program, and tickets), I want to reinforce the CRAP principles again. ALL OF YOUR PRODUCTS WILL BE A UNIFIED SET.
ALSO, SOMETIME BEFORE THE END OF THE HOUR TUESDAY, WATCH BOTH OF THE VIDEOS BELOW ON THE 'CURVATURE' TOOL.
You do NOT want to miss this beauty! It was added last year and I missed it. It could change how you create! Each video shows you a different way to use it. Watch both! You can start the second one at one minute. Both are short!)
Copy and Paste the reminders below into your journal. As you will be creating a set of graphic design pieces for the upcoming Christmas concert (Flyer, Program, and tickets), I want to reinforce the CRAP principles again. ALL OF YOUR PRODUCTS WILL BE A UNIFIED SET.
- CONTRAST- Important text and images stand out and are the first thing to catch the audience' eye because of the contrast in color, size, orientation, or placement.
- REPETITION- Your style (choices of font, color, symbols, spacing, etc.) should be repeated and unified throughout your designs.
- ALIGNMENT- Nothing is placed randomly in a design! It should 'line up' with the edge of other text or major images. Use the grid!
- PROXIMITY- Not only is 'like' information grouped together in the design, but there is also an obvious 'empty space or breathing room' around that group of information to make it easily recognized as unique/different. Don't forget about breathing space around the edge of your design as well...don't crowd the edge.
ALSO, SOMETIME BEFORE THE END OF THE HOUR TUESDAY, WATCH BOTH OF THE VIDEOS BELOW ON THE 'CURVATURE' TOOL.
You do NOT want to miss this beauty! It was added last year and I missed it. It could change how you create! Each video shows you a different way to use it. Watch both! You can start the second one at one minute. Both are short!)
|
|
|
Things to do:
- Calligram Blog post (10/2/18)
- 2 comments on different Calligram posts (10/17/18) Screenshot and paste in journal.
- 2 comments on any Back to School tutorial posts 2nd or 3rd year (10/1/18) Screenshot and paste in journal.
- Illustrated Photograph
- Illustrated Photograph Blog Post (11/5/18)
- Photo and Text Effects (11/5/18) 2 from each folder.
- NEW ASSIGNMENT Two blog post comments (11/12/18) Screen shot and EMAIL to me.
- NEW ASSIGNMENT PHHS Logo Modification (11/12/18)
Friday, 11/16/18
Bellwork: Title your entry, "Hour Goal"
Check Skyward! Look at the list of assignments below. What is your goal to complete today? It may be to complete an entire assignment or to complete a certain section of a project. Describe your goal in your journal.
Things to do:
Check Skyward! Look at the list of assignments below. What is your goal to complete today? It may be to complete an entire assignment or to complete a certain section of a project. Describe your goal in your journal.
Things to do:
- Calligram Blog post (10/2/18)
- 2 comments on different Calligram posts (10/17/18) Screenshot and paste in journal.
- 2 comments on any Back to School tutorial posts 2nd or 3rd year (10/1/18) Screenshot and paste in journal.
- Illustrated Photograph
- Illustrated Photograph Blog Post (11/5/18)
- Photo and Text Effects (11/5/18) 2 from each folder.
- NEW ASSIGNMENT Two blog post comments (11/12/18) Screen shot and EMAIL to me.
- NEW ASSIGNMENT PHHS Logo Modification (11/12/18)
Thursday, 11/15/18 Red 52 Schedule
Bellwork: Title your entry, "Noise"
In your entry, explain what 'noise' adjusts on the panel when setting up your Image Trace of a jpeg.
Things to do:
In your entry, explain what 'noise' adjusts on the panel when setting up your Image Trace of a jpeg.
Things to do:
- Calligram Blog post (10/2/18)
- 2 comments on different Calligram posts (10/17/18) Screenshot and paste in journal.
- 2 comments on any Back to School tutorial posts 2nd or 3rd year (10/1/18) Screenshot and paste in journal.
- Illustrated Photograph
- Illustrated Photograph Blog Post (11/5/18)
- Photo and Text Effects (11/5/18) 2 from each folder.
- NEW ASSIGNMENT Two blog post comments (11/12/18) Screen shot and EMAIL to me.
- NEW ASSIGNMENT PHHS Logo Modification (11/12/18)
Wednesday, 11/14/18
Bellwork: Title your entry, "Ignore White"
In your entry, explain the advantage of choosing 'ignore white' when setting up your Image Trace of a jpeg.
Things to do:
In your entry, explain the advantage of choosing 'ignore white' when setting up your Image Trace of a jpeg.
Things to do:
- Calligram Blog post (10/2/18)
- 2 comments on different Calligram posts (10/17/18) Screenshot and paste in journal.
- 2 comments on any Back to School tutorial posts 2nd or 3rd year (10/1/18) Screenshot and paste in journal.
- Illustrated Photograph
- Illustrated Photograph Blog Post (11/5/18)
- Photo and Text Effects (11/5/18) 2 from each folder.
- NEW ASSIGNMENT Two blog post comments (11/12/18) Screen shot and EMAIL to me.
- NEW ASSIGNMENT PHHS Logo Modification (11/12/18)
Tuesday, 11/13/18 Red 52 Schedule!
Bellwork: Title your entry, "Threshold"
In your entry, explain what 'threshold' does/means on the Image Trace options panel.
Things to do:
In your entry, explain what 'threshold' does/means on the Image Trace options panel.
Things to do:
- Calligram Blog post (10/2/18)
- 2 comments on different Calligram posts (10/17/18) Screenshot and paste in journal.
- 2 comments on any Back to School tutorial posts 2nd or 3rd year (10/1/18) Screenshot and paste in journal.
- Illustrated Photograph
- Illustrated Photograph Blog Post (11/5/18)
- Photo and Text Effects (11/5/18) 2 from each folder.
- NEW ASSIGNMENT Two blog post comments (11/12/18) Screen shot and EMAIL to me.
- NEW ASSIGNMENT PHHS Logo Modification (11/12/18) I have copies of the logo at my desk. You can place a blank computer paper on top and modify paper/pencil first.
Monday, 11/12/18
Bellwork: For your bellwork time today, I want you to look through and read the blog posts of your fellow 2nd and/or 3rd year students (You are welcome to look through/comment on both.) You will be responsible for commenting on AT LEAST TWO DIFFERENT BLOGS. This time, take a screenshot (print screen) of the comment BEFORE you post it and paste it into an email to me.
The comments need to be emailed to me by Friday (11/16/18) The link for the sites can be found above in the description for this class.
The etiquette for blog comments is the same as if we were critiquing on a Google Sheet.
POSSIBLE COMMENT TOPICS:
For a 2nd year blog
For a 3rd year blog
Explanation of PHHS Logo Modification Assignment
Read through this while I am demonstrating with Year 1 and Year 2 so that we can discuss it and I can answer any questions you may have.
The comments need to be emailed to me by Friday (11/16/18) The link for the sites can be found above in the description for this class.
The etiquette for blog comments is the same as if we were critiquing on a Google Sheet.
- Keep it respectful and supportive.
- Be specific with your comments and suggestions.
- Try not to get defensive. Be open to the suggestions. Explore the idea, then, make a decision as an artist whether to revise or keep 'as is'.
- Make sure no one is left out. As you start to think about who gets your second post, look for blogs that don't have a comment yet.
POSSIBLE COMMENT TOPICS:
For a 2nd year blog
- Analyze the typography image posted. Is it recognizable as the original object? What suggestions can you give as to adding details or changing of colors to help it along?
- What is a strength in this design? Be specific.
- Are they missing anything from the Design Checklist? How can it be added?
For a 3rd year blog
- Analyze the Illustrated Photography image posted for Unity. What suggestions do you have to help the vector and the pixel designs seamlessly blend to become one design.
- What suggestions do you have of additional vector or pixel images that could be added to this design?
- What suggestions do you have in regards to space and depth? shadows and highlights?
- What strengths do you see in this design? Be specific.
Explanation of PHHS Logo Modification Assignment
Read through this while I am demonstrating with Year 1 and Year 2 so that we can discuss it and I can answer any questions you may have.
|
| ||||
Things to do:
- Calligram Blog post (10/2/18)
- 2 comments on different Calligram posts (10/17/18) Screenshot and paste in journal.
- 2 comments on any Back to School tutorial posts 2nd or 3rd year (10/1/18) Screenshot and paste in journal.
- Illustrated Photograph
- Illustrated Photograph Blog Post (11/5/18)
- Photo and Text Effects (11/5/18) 2 from each folder.
- PHHS Logo Modification (11/12/18)
Friday, 11/9/18
Bellwork: Make sure you have your weebly site up to date with an Illustrated Photograph blog post with an artist statement. Commenting will begin Monday. Make sure yours is ready.
Things to do:
Things to do:
- Calligram Blog post (10/2/18)
- 2 comments on different Calligram posts (10/17/18) Screenshot and paste in journal.
- 2 comments on any Back to School tutorial posts 2nd or 3rd year (10/1/18) Screenshot and paste in journal.
- Illustrated Photograph
- Illustrated Photograph Blog Post (11/5/18)
- Photo and Text Effects (11/5/18) 2 from each folder.
Thursday, 11/8/18
Bellwork-Title it , "CRAP Review-Alignment"
Analyze the image below. Explain how the Design Principle of Proximity is being used. If you can't remember this principle, look up, Graphic Design Principle-Proximity.
Analyze the image below. Explain how the Design Principle of Proximity is being used. If you can't remember this principle, look up, Graphic Design Principle-Proximity.
Things to do:
- Calligram Blog post (10/2/18)
- 2 comments on different Calligram posts (10/17/18) Screenshot and paste in journal.
- 2 comments on any Back to School tutorial posts 2nd or 3rd year (10/1/18) Screenshot and paste in journal.
- Illustrated Photograph
- Illustrated Photograph Blog Post (11/5/18)
- Photo and Text Effects (11/5/18) 2 from each folder.
Wednesday, 11/7/18
Bellwork-Title it , "CRAP Review-Alignment"
Analyze the image below. Explain how the Design Principle of Alignment is being used.
Analyze the image below. Explain how the Design Principle of Alignment is being used.
Things to do:
- Calligram Blog post (10/2/18)
- 2 comments on different Calligram posts (10/17/18) Screenshot and paste in journal.
- 2 comments on any Back to School tutorial posts 2nd or 3rd year (10/1/18) Screenshot and paste in journal.
- Illustrated Photograph
- Illustrated Photograph Blog Post (11/5/18)
- Photo and Text Effects (11/5/18) 2 from each folder.
Tuesday, 11/6/18
Bellwork-Title it , "CRAP Review-Repetition"
Analyze the image below. Explain how the Design Principle of Repetition is being used.
Analyze the image below. Explain how the Design Principle of Repetition is being used.
Things to do:
- Calligram Blog post (10/2/18)
- 2 comments on different Calligram posts (10/17/18) Screenshot and paste in journal.
- 2 comments on any Back to School tutorial posts 2nd or 3rd year (10/1/18) Screenshot and paste in journal.
- Illustrated Photograph
- Illustrated Photograph Blog Post (11/5/18)
- Photo and Text Effects (11/5/18) 2 from each folder.
Monday, 11/5/18
Bellwork-Title it , "CRAP Review-Contrast"
Analyze the image below. Explain how the Design Principle of Contrast is being used.
Analyze the image below. Explain how the Design Principle of Contrast is being used.

New Blog Post "Illustrated Photograph"
In your post itself, describe the following:
Old/New Assignment! Same folders, different technique.
Choose at least 2 Effects to try from each folder (download the pdf and follow the instructions). Choose something different from last year and something you've never tried before. I will need the .psd and the JPEG in your folder for credit. Call me over when it is complete.
Choose something that interests you, but might also be used in an Independent Design:
Photo Effects
Text Effects
Things to do:
- Post the final JPEG for your Illustrated Photograph design.
- Post the original photograph as well.
In your post itself, describe the following:
- What was the main challenge for this design? What were you asked to do? (See the Design checklist page if you need a refresher.)
- What are you most proud of in this design?
- What was the most difficult portion of this design? How did you solve that problem?
- Where, specifically, would you like your fellow Year 3 colleagues to focus their feedback when commenting begins? Any spots you need help with? Something you're not quite satisfied with? Questions for them?
Old/New Assignment! Same folders, different technique.
Choose at least 2 Effects to try from each folder (download the pdf and follow the instructions). Choose something different from last year and something you've never tried before. I will need the .psd and the JPEG in your folder for credit. Call me over when it is complete.
Choose something that interests you, but might also be used in an Independent Design:
Photo Effects
Text Effects
Things to do:
- Calligram Blog post (10/2/18)
- 2 comments on different Calligram posts (10/17/18) Screenshot and paste in journal.
- 2 comments on any Back to School tutorial posts 2nd or 3rd year (10/1/18) Screenshot and paste in journal.
- Illustrated Photograph
- Illustrated Photograph Blog Post (11/5/18)
- NEW ASSIGNMENT Photo and Text Effects (11/5/18) 2 from each folder.
Friday, 11/2/18
Check SKYWARD to make sure I am right. Also, check your weebly site to approve any comments that are waiting for points.
All three of you are so close to being done. Your goal is to be done by the end of the hour if possible.
Upload your jpeg AND your .ai AND .psd files to your Google Folder when completed and let me know you are done.
Things to do:
All three of you are so close to being done. Your goal is to be done by the end of the hour if possible.
Upload your jpeg AND your .ai AND .psd files to your Google Folder when completed and let me know you are done.
Things to do:
- Calligram Blog post (10/2/18)
- 2 comments on different Calligram posts (10/17/18) Screenshot and paste in journal.
- 2 comments on any Back to School tutorial posts 2nd or 3rd year (10/1/18) Screenshot and paste in journal.
- Illustrated Photograph
Thursday, 11/1/18
Check your weebly site to approve any comments that are waiting for points.
TIPS:
Things to do:
TIPS:
- Make sure you overlap your vector artwork with pixel (Select and area and ctrl + J is to a new layer, restack your layer order is one way.)
- Make sure the lightsource from the photography creates a highlight and shadow on the vector AND pixels as your try to integrate the two. (Displacement map? Drop shadow? Remember the 'Girl in a Room' assignment last year?)
- Make sure your vector artwork follows the scale and depth of the photograph.
- Make sure your vector artwork is balanced in the design.
- Finally, how could adjustment layers help to tie it all together? Experiment.
Things to do:
- Calligram Blog post (10/2/18)
- 2 comments on different Calligram posts (10/17/18) Screenshot and paste in journal.
- 2 comments on any Back to School tutorial posts 2nd or 3rd year (10/1/18) Screenshot and paste in journal.
- Illustrated Photograph
Wednesday, 10/31/18

|
Half Day Schedule:
1st: 7:35-8:05 2nd: 8:10-8:40 3rd: 8:45-9:15 4th: 9:20-9:50 5th: 9:55-10:25 6th: 10:30-11:00 |
Check your weebly site to approve any comments that are waiting for points.
TIPS:
Things to do:
TIPS:
- Make sure you overlap your vector artwork with pixel (Select and area and ctrl + J is to a new layer, restack your layer order is one way.)
- Make sure the lightsource from the photography creates a highlight and shadow on the vector AND pixels as your try to integrate the two. (Displacement map? Drop shadow? Remember the 'Girl in a Room' assignment last year?)
- Make sure your vector artwork follows the scale and depth of the photograph.
- Make sure your vector artwork is balanced in the design.
- Finally, how could adjustment layers help to tie it all together? Experiment.
Things to do:
- Calligram Blog post (10/2/18)
- 2 comments on different Calligram posts (10/17/18) Screenshot and paste in journal.
- 2 comments on any Back to School tutorial posts 2nd or 3rd year (10/1/18) Screenshot and paste in journal.
- Illustrated Photograph
Tuesday, 10/30/18
All 3 of you have shifted from Illustrator into Photoshop. Here are some tips for success as you proceed. Your goal is to have a completed jpeg and blog post by Friday. More on blog post later.....
Things to do:
- Make sure you overlap your vector artwork with pixel (Select and area and ctrl + J is to a new layer, restack your layer order is one way.)
- Make sure the lightsource from the photography creates a highlight and shadow on the vector AND pixels as your try to integrate the two. (Displacement map? Drop shadow? Remember the 'Girl in a Room' assignment last year?)
- Make sure your vector artwork follows the scale and depth of the photograph.
- Make sure your vector artwork is balanced in the design.
- Finally, how could adjustment layers help to tie it all together? Experiment.
Things to do:
- Calligram Blog post (10/2/18)
- 2 comments on different Calligram posts (10/17/18) Screenshot and paste in journal.
- 2 comments on any Back to School tutorial posts 2nd or 3rd year (10/1/18) Screenshot and paste in journal.
- Illustrated Photograph
Monday, 10/29/18
Check your weebly site to approve any comments that are waiting for points.
All 3 of you are still working on the Illustrated Photograph. They need to be wrapped up by the end of the week as we are moving on into a joint project with 2nd year folks. Be ready!
Things to do:
All 3 of you are still working on the Illustrated Photograph. They need to be wrapped up by the end of the week as we are moving on into a joint project with 2nd year folks. Be ready!
Things to do:
- Calligram Blog post (10/2/18)
- 2 comments on different Calligram posts (10/17/18) Screenshot and paste in journal.
- 2 comments on any Back to School tutorial posts 2nd or 3rd year (10/1/18) Screenshot and paste in journal.
- Illustrated Photograph
Friday, 10/26/18
(4th and 6th hour: I'm leaving at lunch to attend a 4.0 ceremony for my son at Central. If you finish something for credit, you can screenshot it and email it to me (I'll need your AI file in your folder as well) or show me on Monday. Otherwise, if you have any questions email me or lean on your colleagues. Google might be able to answer your problem too!)
Check your weebly site to approve any comments that are waiting for points.
Things to do:
Things to do:
- Calligram Blog post (10/2/18)
- 2 comments on different Calligram posts (10/17/18) Screenshot and paste in journal.
- 2 comments on any Back to School tutorial posts 2nd or 3rd year (10/1/18) Screenshot and paste in journal.
- Illustrated Photograph
Thursday, 10/25/18
Check your weebly site to approve any comments that are waiting for points. I'll be around today to see if Friday is a possibility as an ending goal for the Illustrated Photograph.
Things to do:
Things to do:
- Calligram Blog post (10/2/18)
- 2 comments on different Calligram posts (10/17/18) Screenshot and paste in journal.
- 2 comments on any Back to School tutorial posts 2nd or 3rd year (10/1/18) Screenshot and paste in journal.
- Illustrated Photograph
Wednesday, 10/24/18
Check your weebly site to approve any comments that are waiting for points.
Things to do:
Things to do:
- Calligram Blog post (10/2/18)
- 2 comments on different Calligram posts (10/17/18) Screenshot and paste in journal.
- 2 comments on any Back to School tutorial posts 2nd or 3rd year (10/1/18) Screenshot and paste in journal.
- Illustrated Photograph
Tuesday, 10/23/18
Bellwork-Title it , "Pacing"
How many days do you think you need to complete this project to your satisfaction and fulfilling all the requirements from the checklist? If you are done, copy and paste, "I am finished!" into your journal entry.
Things to do:
How many days do you think you need to complete this project to your satisfaction and fulfilling all the requirements from the checklist? If you are done, copy and paste, "I am finished!" into your journal entry.
Things to do:
- Calligram Blog post (10/2/18)
- 2 comments on different Calligram posts (10/17/18) Screenshot and paste in journal.
- 2 comments on any Back to School tutorial posts 2nd or 3rd year (10/1/18) Screenshot and paste in journal.
- Illustrated Photograph
Monday, 10/22/18- 3.5 assembly (shortened am hours)
We touched on this one last year, but I wanted to bring it up again to remind you as it might prove useful.
Bellwork: Title it, "Touch Type Tool". Watch the 2 min video.
Use the technique on an Artboard with a word of your choosing. Then screenshot it (Printscreen button on keyboard) and paste it into your journal.
Be thinking about pacing this week! I'm looking at planning the next project and need to have an idea of when to roll it out. End of this week? First thing next week?
Things to do:
- Calligram Blog post (10/2/18)
- 2 comments on different Calligram posts (10/17/18) Screenshot and paste in journal.
- Illustrated Photograph
Friday, 10/19/18-Homecoming Half Day!
|
Bell schedule:
1st hour- 7:35-7:55 2nd hour- 8:00-8:20 3rd hour- 8:25-8:45 4th hour- 8:50-9:10 5th hour- 9:15-9:35 6th hour- 9:40-10:00 Spirit Assembly |
Things to do:
- Calligram Blog post (10/2/18)
- 2 comments on different Calligram posts (10/17/18) Screenshot and paste in journal.
- Illustrated Photograph
Wednesday, 10/17/18
|
Half day schedule for conferences
|
Bellwork: For your bellwork time today, I want you to look through and read the blog posts of your fellow 3rd year students for the Calligram project. You will be responsible for commenting on TWO DIFFERENT BLOGS. The comments need to be posted by Friday (10/19/18) The link for the sites can be found above.
Once published, take a screenshot of your comment and paste it in your journal.
The etiquette for blog comments is the same as if we were critiquing on a Google Sheet.
POSSIBLE COMMENT TOPICS:
Things to do:
Once published, take a screenshot of your comment and paste it in your journal.
The etiquette for blog comments is the same as if we were critiquing on a Google Sheet.
- Keep it respectful and supportive.
- Be specific with your comments and suggestions.
- Try not to get defensive. Be open to the suggestions. Explore the idea, then, make a decision as an artist whether to revise or keep 'as is'.
- Make sure no one is left out. As you start to think about who gets your second post, look for blogs that don't have a comment yet.
POSSIBLE COMMENT TOPICS:
- Be specific about what you like about a calligram.
- Be specific with a suggestion to help the calligram illustrate the word better OR to help it become more legible.
- Comment or ask a question regarding something the artist said in their blog post.
Things to do:
Tuesday, 10/16/18
Throwback to 10/2/18. Only one site has calligrams posted with an artist statement. Finish this today. Tomorrow you will receive a commenting assignment on these posts.
If/When you are done with your Calligram project, post the JPEG of all three designs in your blog along with post that covers the following:
Be specific with your answers. Complete paragraphs, not lists. Reread and edit as much as possible before posting public! Reread for clarity and check for grammar or spelling issues. This is a representation of you going world wide. Make a good impression! :)
Things to do:
If/When you are done with your Calligram project, post the JPEG of all three designs in your blog along with post that covers the following:
- Explain the project. What was your goal?
- What part/parts of this text project was difficult or frustrating for you from planning to final design?
- Which Calligram is your favorite? What about it are you most proud of?
- Which Calligram is your least favorite? What would you try differently with this design if you had another shot at it?
Be specific with your answers. Complete paragraphs, not lists. Reread and edit as much as possible before posting public! Reread for clarity and check for grammar or spelling issues. This is a representation of you going world wide. Make a good impression! :)
Things to do:
Monday, 10/14/18
No Bellwork but..... a tip to think about as you create!
Consider scale and proportion when you are creating your vector artwork within the photograph setting.
Does the size of your object 'fit in' with the size of its surroundings? OR consider deliberately playing with scale.
Will your vector artwork appear like giants in your scene or like miniatures?
Be sure to make it look like you mean it if that is your plan!
Time to work!
Friday, 10/12/18 LAST DAY OF THE MARKING PERIOD!
Bellwork: CHECK SKYWARD! If you see something that is marked as missing, finish it today! OR if it is marked as missing and you have it done.... you have two choices to get credit:
As you work today, stay focused and get as far as you can. Hopefully you are all into your project by now. If not, kick it into high gear.
If you get stuck, ask for help! There are several experts in the room, other 2nd year students and perhaps other 3rd year students in the room. Work together so you can get you passed the problem and keep creating.
Otherwise, I am accessible all day through email (I have the app on my phone and my phone is permanently attached to me so I can get back to you asap) Send me any questions.
THE EXPECTATION IS THAT YOU ARE CREATING ALL HOUR. DO NOT LET OTHER WEBSITES OR YOUR PHONE DISTRACT YOU!
Checklist of Past assignments to be completed:
1. Back to School Tutorial and ORIGINAL design (.ai AND jpeg)
2. Weebly site made and published.
3. Blog page and first 'back to school' post with jpegs published.
4. At least 2 comments (screenshot and pasted in journal) made
on other Back to School Tutorials (2nd year too!).
5. Calligram .ai and jpeg in folder (3 different designs)
6. Calligram blog posted with jpeg of all three designs and artist
statement published.
7. Illustrated Photograph
- Take a screenshot WITH THE LAYERS PANEL OPEN and paste it in an email and send ([email protected])
- Upload it to your classroom folder and send me an email that it is complete and in your folder.
As you work today, stay focused and get as far as you can. Hopefully you are all into your project by now. If not, kick it into high gear.
If you get stuck, ask for help! There are several experts in the room, other 2nd year students and perhaps other 3rd year students in the room. Work together so you can get you passed the problem and keep creating.
Otherwise, I am accessible all day through email (I have the app on my phone and my phone is permanently attached to me so I can get back to you asap) Send me any questions.
THE EXPECTATION IS THAT YOU ARE CREATING ALL HOUR. DO NOT LET OTHER WEBSITES OR YOUR PHONE DISTRACT YOU!
Checklist of Past assignments to be completed:
1. Back to School Tutorial and ORIGINAL design (.ai AND jpeg)
2. Weebly site made and published.
3. Blog page and first 'back to school' post with jpegs published.
4. At least 2 comments (screenshot and pasted in journal) made
on other Back to School Tutorials (2nd year too!).
5. Calligram .ai and jpeg in folder (3 different designs)
6. Calligram blog posted with jpeg of all three designs and artist
statement published.
7. Illustrated Photograph
Thursday, 10/11/18
Bellwork: Title your entry, "Depth"
List some things to keep in mind/steps to take in order to create depth in your picture.
Use all of your mad illustrator skills you've accumulated over the past two years to make this as professional looking as possible (Gradients, Mesh Gradients, Pen Tooling, Effects, Blend modes, Tricks to create depth-overlapping, large to small, detailed to plain/blurred, colorful to faded.)
Checklist of Past assignments to be completed:
1. Back to School Tutorial (.ai AND jpeg)
2. Weebly site made and published.
3. Blog page and first 'back to school' post with jpeg published.
4. At least 2 comments made on Back to School Tutorials.
5. Calligram .ai and jpeg in folder (3 different designs)
6. Calligram blog posted with jpeg of all three designs and artist
statement published.
Wednesday, 10/10/18
No Bellwork! Get started right away on your Illustrated Photograph OR check the list for past assignments below...
Use all of your mad illustrator skills you've accumulated over the past two years to make this as professional looking as possible (Gradients, Mesh Gradients, Pen Tooling, Effects, Blend modes, Tricks to create depth-overlapping, large to small, detailed to plain/blurred, colorful to faded.)
Checklist of Past assignments to be completed:
1. Back to School Tutorial (.ai AND jpeg)
2. Weebly site made and published.
3. Blog page and first 'back to school' post with jpeg published.
4. At least 2 comments made on Back to School Tutorials.
5. Calligram .ai and jpeg in folder (3 different designs)
6. Calligram blog posted with jpeg of all three designs and artist
statement published.
Tuesday, 10/9/18
Bellwork: Title your entry, "Analyze the pic"
1. What did the artist do to the illustration(vector) portion to
make the doodle look as though it fits in this space?
2. What did the artist do to the photograph to make the doodle
look as though it fits in this space?
1. What did the artist do to the illustration(vector) portion to
make the doodle look as though it fits in this space?
2. What did the artist do to the photograph to make the doodle
look as though it fits in this space?
At this point you should be developing your 'Illustrated photograph' design. Know that both Illustrator and Photoshop are at your fingertips to illustrate with vector/modify photographs as you see fit. Review the Design Checklist (9/26/17) so you have a clear idea of what needs to be included in your design.
Use all of your mad illustrator skills you've accumulated over the past two years to make this as professional looking as possible (Gradients, Mesh Gradients, Pen Tooling, Effects, Blend modes, Tricks to create depth-overlapping, large to small, detailed to plain/blurred, colorful to faded.)
Checklist of Past assignments to be completed:
1. Back to School Tutorial (.ai AND jpeg)
2. Weebly site made and published.
3. Blog page and first 'back to school' post with jpeg published.
4. At least 2 comments made on Back to School Tutorials.
5. Calligram .ai and jpeg in folder (3 different designs)
6. Calligram blog posted with jpeg of all three designs and artist
statement published.
Monday, 10/8/18
Bellwork: Title your entry, "How did he do that?"
Imagine the picture above was created in both Illustrator (the doodle) and Photoshop. If the doodle was placed on the background in photoshop, how did he make it behind the pole from the photograph? (There is more than one way to solve this problem.) Explain one.
It's a work day. I'll be around to discuss your plans for this project and check on your progress. Up to this point, you should have the following completed/in your folder:
1. Back to School Tutorial (.ai AND jpeg)
2. Weebly site made and published.
3. Blog page and first 'back to school' post with jpeg published.
4. At least 2 comments made on Back to School Tutorials.
5. Calligram .ai and jpeg in folder (3 different designs)
6. Calligram blog posted with jpeg of all three designs and artist
statement published.
If you are done with everything, begin experimenting with creating your vector art for your photograph. I suggest PLACING your photograph in Illustrator, locking that layer, and creating on a new layer. Experiment! If you find a better way to proceed, share it. I'll pass it on :)
Use all of your mad illustrator skills you've accumulated over the past two years to make this as professional looking as possible (Gradients, Mesh Gradients, Pen Tooling, Effects, Blend modes, Tricks to create depth-overlapping, large to small, detailed to plain/blurred, colorful to faded.)
If you don't have a photograph, experiment with a Google Image for now. Make sure it is licensed to modify just in case it turns out amazing and we want to publish it :)
Friday, 10/5/18
Fall Assembly today. Shortened hours after lunch:
5th Hour 12:26-1:01
6th Hour 1:06-1:40
Bellwork: Title your entry, "Illustrated Photograph Brainstorming #2- 3 questions"
Look at the images below. For each, imagine if this was your picture, explain what and where you add vector art in the foreground, middle, and background ?
#1 (Using a pic with a lot of depth so you can see the challenge of how you would balance the vector art and still make it recognizable (not too tiny).
#2- While this image is the same subject matter, the depth is more shallow. Explain what and where you would place vector art in the fore/mid/background.

#3 Which type of picture do you think would be easier to design for this project? Deep or Shallow depth? Explain.
Up to this point, you should have the following completed/in your folder:
1. Back to School Tutorial (.ai AND jpeg)
2. Weebly site made and published.
3. Blog page and first 'back to school' post with jpeg published.
4. At least 2 comments made on Back to School Tutorials.
5. Calligram .ai and jpeg in folder (3 different designs)
6. Calligram blog posted with jpeg of all three designs and artist
statement published.
If you are done with everything, begin experimenting with creating your vector art for your photograph. I suggest PLACING your photograph in Illustrator, locking that layer, and creating on a new layer. Experiment! If you find a better way to proceed, share it. I'll pass it on :)
Use all of your mad illustrator skills you've accumulated over the past two years to make this as professional looking as possible (Gradients, Mesh Gradients, Pen Tooling, Effects, Blend modes, Tricks to create depth-overlapping, large to small, detailed to plain/blurred, colorful to faded.)
If you don't have a photograph, experiment with a Google Image for now. Make sure it is licensed to modify just in case it turns out amazing and we want to publish it :)
Thursday, 10/4/18
Bellwork: Title your entry, "Illustrated Photograph Brainstorming #1"
List three possible scenes you can use for your Illustrated photograph project. Better yet, if you have the photos already, insert the jpegs to your journal entry. Otherwise, explain with words the possible backgrounds you are considering.
Up to this point, you should have the following completed/in your folder:
1. Back to School Tutorial (.ai AND jpeg)
2. Weebly site made and published.
3. Blog page and first 'back to school' post with jpeg published.
4. At least 2 comments made on Back to School Tutorials.
5. Calligram .ai and jpeg in folder (3 different designs)
6. Calligram blog posted with jpeg of all three designs and artist
statement published.
If you are done with everything, begin experimenting with creating your vector art for your photograph. I suggest PLACING your photograph in Illustrator, locking that layer, and creating on a new layer. Experiment! If you find a better way to proceed, share it. I'll pass it on :)
If you don't have a photograph, experiment with a Google Image for now. Make sure it is licensed to modify just in case it turns out amazing and we want to publish it :)
Wednesday, 10/3/18
Bellwork: Open an Illustrator artboard. Get back in the habit of using gradients and blend modes to create form in a shape. Title it, "Sphere"
Call me over for credit THEN JPEG it and put it in your journal entry for today.
Things to do today:
- Make a perfect circle
- Add as many gradients/blend modes as necessary to make it appear like a sphere.
- Add as many gradients/blend modes as necessary to make it cast a shadow on a flat surface.
Call me over for credit THEN JPEG it and put it in your journal entry for today.
Things to do today:
- Blogging comments on Back to School Tutorials (2 by Friday)
- Finish Calligram
- Post Calligram JPEGS to blog and write accompanying artist statement as described on 10/2/18.
- Start brainstorming/planning Illustrated Photograph project.
Tuesday, 10/2/18
Bellwork: Check your blogs for any comments and publish them. You're welcome to respond. Remember to use blogging etiquette in all comments. If you didn't have time to complete your comments on other blogs yet, take the time to do one now. Details on the comments and blogging etiquette are on Monday's agenda.
If/When you are done with your Calligram project, post the JPEG of all three designs in your blog along with post that covers the following:
Be specific with your answers. Complete paragraphs, not lists. Reread and edit as much as possible before posting public! Reread for clarity and check for grammar or spelling issues. This is a representation of you going world wide. Make a good impression! :)
Things to do:
If/When you are done with your Calligram project, post the JPEG of all three designs in your blog along with post that covers the following:
- Explain the project. What was your goal?
- What part/parts of this text project was difficult or frustrating for you from planning to final design?
- Which Calligram is your favorite? What about it are you most proud of?
- Which Calligram is your least favorite? What would you try differently with this design if you had another shot at it?
Be specific with your answers. Complete paragraphs, not lists. Reread and edit as much as possible before posting public! Reread for clarity and check for grammar or spelling issues. This is a representation of you going world wide. Make a good impression! :)
Things to do:
- Blogging comments on Back to School Tutorials (2 by Friday)
- Finish Calligram
- Post Calligram JPEGS to blog and write accompanying artist statement as described above.
- Check out the following links to get inspired for our new project. Mixing Illustrations with Photos
- https://desket.co/blogs/news/awesome-subway-doodles
- http://theendearingdesigner.com/photographic-pencil/#here
- https://petapixel.com/2014/06/30/talented-artist-combines-photography-illustration-capture-sketch-life/
- https://www.pinterest.com/explore/photo-illustration/?lp=true
- https://www.pinterest.com/blabbermouse/illustration-photography-mashup/?lp=true
Monday, 10/1/18
Bellwork: For your bellwork time today, I want you to look through and read the blog posts of your fellow 2nd and 3rd year students. You will be responsible for commenting on AT LEAST TWO DIFFERENT BLOGS. Take a screenshot (print screen) of the comment you posted and paste it into your journal. The comments need to be posted by next Friday (10/5/18) The link for the sites can be found above in the description for this class.
The etiquette for blog comments is the same as if we were critiquing on a Google Sheet.
POSSIBLE COMMENT TOPICS:
Time to finish Calligrams. I will be around to check your progress in terms of how many days you need. Many, I feel, are finished or just need today. Make sure I talk to you if that is not the case.
Done early?
The etiquette for blog comments is the same as if we were critiquing on a Google Sheet.
- Keep it respectful and supportive.
- Be specific with your comments and suggestions.
- Try not to get defensive. Be open to the suggestions. Explore the idea, then, make a decision as an artist whether to revise or keep 'as is'.
- Make sure no one is left out. As you start to think about who gets your second post, look for blogs that don't have a comment yet.
POSSIBLE COMMENT TOPICS:
- Follow the link to the tutorial. Scan through it. Ask clarifying questions. What needs more explanation than what the tutorial gives?
- Ask questions about any required information from the post. Did they specify what level the tutorial is? (Beginner, Intermediate, Advanced) Did they rate the tutorial for how easy to understand it is? (How many star out of five) Did they provide a link to the tutorial?
- Ask clarifying questions about the post. Is there something the author said that doesn't make sense? Needs more information?
- Give a suggestion about how this technique could be used in an original design.
Time to finish Calligrams. I will be around to check your progress in terms of how many days you need. Many, I feel, are finished or just need today. Make sure I talk to you if that is not the case.
Done early?
- Finish designing your weebly site. Fill in or delete the extra text boxes. Add JPEGS from past projects to your Home page. Provide a brief description of the project with a text box underneath. Personalize it!
- Your Calligrams JPEGS and .ai files are in your Folder.
- Your Calligram JPEGS are posted on your weebly site.
- Work on a tutorial of your own finding (put the url address of the siteon your artboard.) Try to find one that teaches a technique you've never done before, something completely new and different.
- Use this time to start an Independent project in Illustrator. Something to print? Something to give as a gift? Something for the upcoming Scholastics Art Competition?
Friday, 9/28/18
No bellwork today! Get started right away.
Your goal is to have 3 Calligrams completed by the end of the day today.
If/When you are done with your Calligram project, post the JPEG of all three designs in your blog along with post that covers the following:
Be specific with your answers. Complete paragraphs, not lists. Reread and edit as much as possible before posting public! Reread for clarity and check for grammar or spelling issues. This is a representation of you going world wide. Make a good impression! :)
Your goal is to have 3 Calligrams completed by the end of the day today.
If/When you are done with your Calligram project, post the JPEG of all three designs in your blog along with post that covers the following:
- Explain the project. What was your goal?
- What part/parts of this text project was difficult or frustrating for you from planning to final design?
- Which Calligram is your favorite? What about it are you most proud of?
- Which Calligram is your least favorite? What would you try differently with this design if you had another shot at it?
Be specific with your answers. Complete paragraphs, not lists. Reread and edit as much as possible before posting public! Reread for clarity and check for grammar or spelling issues. This is a representation of you going world wide. Make a good impression! :)
Thursday, 9/27/18
No bellwork today! Get started right away.
Your goal is to have 3 Calligrams completed by the end of the day Friday.
Your goal is to have 3 Calligrams completed by the end of the day Friday.
Wednesday, 9/26/18
Bellwork: Title your entry, “Envelope Warp” and date it.
Explain how to find Envelope Warp in Illustrator and how it works. If you can't remember the process, revisit this tutorial.
Things to do:
Explain how to find Envelope Warp in Illustrator and how it works. If you can't remember the process, revisit this tutorial.
Things to do:
- First Priority-Make sure your first blog post is complete and published. Some are still missing. We will start commenting for a grade this week.
- Calligram designs- Three different words. Three different designs. Three different artboards so we can jpeg them separate.
Tuesday, 9/25/18
Bellwork: Title your entry, "Punch a shape" and date it.
Explain how to punch a shape into a letter. (Using the shape on top to cut into the shape or letter on the bottom) If you can't remember the process, revisit this tutorial.
Things to do:
Explain how to punch a shape into a letter. (Using the shape on top to cut into the shape or letter on the bottom) If you can't remember the process, revisit this tutorial.
Things to do:
- First Priority-Make sure your first blog post is complete and published. Some are still missing. We will start commenting for a grade this week.
- Calligram designs- Three different words. Three different designs. Three different artboards so we can jpeg them separate.
Monday, 9/24/18
Bellwork: Title your entry, "Release compound path" and date it.
Explain how to release a compound path.
How could you use this technique in one of your caligram designs?
A compound path is a shape that has two or more paths that create 'holes' in the shape, like the letter 'o' or 'B'. If you can't remember the process, revisit this tutorial.
Things to do:
Explain how to release a compound path.
How could you use this technique in one of your caligram designs?
A compound path is a shape that has two or more paths that create 'holes' in the shape, like the letter 'o' or 'B'. If you can't remember the process, revisit this tutorial.
Things to do:
- First Priority-Make sure your first blog post is complete and published. Some are still missing. We will start commenting for a grade this week.
- Did you tell me on Friday what your three words are going to be? Make sure you do today! You will sketch it first so I can see what you are thinking BEFORE you get started in Illustrator. I want to make sure you are on the right track!
- Calligram designs created in Illustrator. Three different words. Three different designs. Three different artboards so we can jpeg them separate.
Friday, 9/21/18
Bellwork: Title your entry, "Converting text to objects" and date it.
Explain how to turn text into objects so that each letter can be modified with paths and anchors. How could you use this in one of your calligram designs?
If you can't remember the process, check out this video.
Your goal before you leave today is to tell me the three words you plan to change into a Calligram. Remember, you are manipulating the text so that it creates an image, an image that stands for the meaning of the word. You will create 3 different Calligrams for this project.
First Priority-Make sure your first blog post is complete and published. Some are still missing. We will start commenting for a grade next week.
Since we just started Calligrams, being done with everything is unlikely, but I wanted to give you a checklist of things you could be doing.
Done early?
1. Is your first blog post complete and published? Some are still
missing. We will start commenting for a grade this week.
2. Finish designing your weebly site. Fill in or delete the extra text
boxes. Add JPEGS from past projects to your Home page. Provide a
brief description of the project with a text box underneath.
Personalize it!
3. Work on a tutorial of your own finding (put the url address of the site
on your artboard.)
4. Check your Journal Doc to make sure it has everything on it.
5. Your Calligrams JPEGS and .ai files are in your Folder.
Thursday, 9/20/18
YOUR TOP PRIORITY IS TO HAVE YOUR WEEBLY URL EMAILED TO ME AND YOUR FIRST BLOG POST PUBLISHED BEFORE THE END OF THE HOUR ON FRIDAY. NEXT WEEK, I'LL SHARE THE LINKS AND COMMENTING CAN BEGIN.

|
|
calligram
ˈkaləˌɡram/
noun
This is a typography review. While you won't be creating an entire picture filled with words like you did last year. You will take a single word and manipulate the letters in that word to illustrate its meaning.
If you haven't done the brainstorming from Monday yet, do it. I'll be looking for it in your journal AND it's a good kickstart to get your mind moving.
These designs will be your creations so don't Google research too much. In fact, once you understand what a Calligram is, I'd stop looking at examples and start coming up with your own.
Your final project will include 3 separate Calligram images. Use today to get a head start on experimenting.
Your goal for Monday is to have the three words you intend to illustrate along with a basic idea/sketch of how you will manipulate the letters to make the image.
Things to do: SHOW ME WHEN YOU COMPLETE SOMETHING NEW!
ˈkaləˌɡram/
noun
- a word or piece of text in which the design and layout of the letters creates a visual image related to the meaning of the words themselves.
This is a typography review. While you won't be creating an entire picture filled with words like you did last year. You will take a single word and manipulate the letters in that word to illustrate its meaning.
If you haven't done the brainstorming from Monday yet, do it. I'll be looking for it in your journal AND it's a good kickstart to get your mind moving.
These designs will be your creations so don't Google research too much. In fact, once you understand what a Calligram is, I'd stop looking at examples and start coming up with your own.
Your final project will include 3 separate Calligram images. Use today to get a head start on experimenting.
Your goal for Monday is to have the three words you intend to illustrate along with a basic idea/sketch of how you will manipulate the letters to make the image.
Things to do: SHOW ME WHEN YOU COMPLETE SOMETHING NEW!
- Syllabus/Expectations in Google Folder (9/10/18)
- Email sent for Digital Contract (9/10/18)
- Tutorial from BTS (Back to School) links completed with .ai and jpeg in Google Folder. (9/4/18)
- Original Creation from techniques/tools learned in tutorial completed with .ai and jpeg in Google Folder.
- Weebly site created and email sent with url to Jones. (9/11/18)
- First blog post (9/13/18)
- Brainstorm for calligram assignment (9/17/18)
- Sketch of three calligram design ideas (9/19/18)
Wednesday, 9/19/18
No Bellwork! Get started right away.
Things to do: SHOW ME WHEN YOU COMPLETE SOMETHING NEW!
Things to do: SHOW ME WHEN YOU COMPLETE SOMETHING NEW!
- Syllabus/Expectations in Google Folder (9/10/18)
- Email sent for Digital Contract (9/10/18)
- Tutorial from BTS (Back to School) links completed with .ai and jpeg in Google Folder. (9/4/18)
- Original Creation from techniques/tools learned in tutorial completed with .ai and jpeg in Google Folder.
- Weebly site created and email sent with url to Jones. (9/11/18)
- First blog post (9/13/18)
- Brainstorm for calligram assignment (9/17/18)
Tuesday, 9/18/18
No Bellwork! Get started right away.
Things to do:
Things to do:
- Syllabus/Expectations in Google Folder (9/10/18)
- Email sent for Digital Contract (9/10/18)
- Tutorial from BTS (Back to School) links completed with .ai and jpeg in Google Folder. (9/4/18)
- Original Creation from techniques/tools learned in tutorial completed with .ai and jpeg in Google Folder.
- Weebly site created and email sent with url to Jones. (9/11/18)
- First blog post (9/13/18)
- Brainstorm for calligram assignment (9/17/18)
Monday, 9/17/18
If you haven't done so already, publish your weebly site. I'm checking every day to see if it is live yet. Your goal is to have the site published and your blog post completed as soon as possible.
This week you will get your first commenting assignment. Both blogging and commenting will become a regular way for you to communicate with each other this year in terms of explaining techniques and getting feedback on your work. EMAIL ME THE URL ADDRESS FOR YOUR SITE!!
If you have published your site and posted your first blog post, you can start getting ready for your first project.
Your first project will get you thinking about type and remind you of the tricks we've used in the past to manipulate it. (Create Outlines around a letter to move the paths/anchors, Distort > Envelope Warp, Releasing Compound Paths to make a letter solid, Using Minus Front to punch shapes into letters, etc.)
Review the following sites to see where we are headed for your 'Words as Images' Project.
View the following sites:
Link #1 http://designtaxi.com/news/394412/Creative-Typographic-Logos-Cleverly-Visualizes-The-Meanings-Of-Words/
Link #2
Examples from last year's students:
The official term is called a Calligram. You can always Google for more examples, there are tons out there.
The tricky thing about that is that you want to create something new.....if you see it all......it makes it harder to create a calligram that hasn't been done before.....so be careful. Research enough to understand what it is, then start brainstorming some possibilities.
The tricky thing about that is that you want to create something new.....if you see it all......it makes it harder to create a calligram that hasn't been done before.....so be careful. Research enough to understand what it is, then start brainstorming some possibilities.
- Brainstorm- List at least 20 interesting verbs in your journal, the more the better. Then, list 20 interesting objects, again, the more the better. At this point, it is better just to list away without judging how good the words are.....just free write.
- Review your words and change the font color of those that have the best 'visual' possibilities (The letters can be used to create a visual that symbolizes it's meaning.) Show me for credit.
- Experiment with some possibilities. You will turn in your best 3 for a grade. (Design checklist coming soon)
Friday, 9/14/18
Get started right away! Your goal is to have your original creation based on the tutorial techniques finished today. See me if that is not going to happen. Otherwise, new assignments start Monday.
Things to do (In Skyward):
Things to do (In Skyward):
- Syllabus/Expectations in Google Folder (9/10/18)
- Email sent for Digital Contract (9/10/18)
- Tutorial from BTS (Back to School) links completed with .ai and jpeg in Google Folder. (9/4/18)
- Original Creation from techniques/tools learned in tutorial completed with .ai and jpeg in Google Folder.
- Weebly site created and email sent with url to Jones. (9/11/18)
- First blog post (9/13/18)
Thursday, 9/13/18
Get started right away! Your goal is to have your original creation based on the tutorial techniques finished by Friday.
Things to do (In Skyward):
Include in your post:
1. The link to the tutorial you chose.
2. The exported JPEG from that tutorial. If your colors are off-save
your .ai file as RGB and export a new jpeg.....title it RGB so you
know which is which.
3. Describe in detail what areas or techniques in the tutorial gave you
the most trouble. Also, in order to help others, describe how you
solved the problem. (If the tutorial was breezy for you, describe an
area that might cause others problems with tips how to get through
it.)
4. Describe something new you learned either about the tutorial or
something within this new version of Illustrator that is different from
the way you are used to do that technique.
5. Review the tutorial itself, like a Rotten Tomato review :)
6. Include the jpeg for YOUR CREATION based on what you learned or
the style of the tutorial you chose.
7. Give a description of HOW you used the first tutorial to help you with
your second creation.
Things to do (In Skyward):
- Syllabus/Expectations in Google Folder (9/10/18)
- Email sent for Digital Contract (9/10/18)
- Tutorial from BTS (Back to School) links completed with .ai and jpeg in Google Folder. (9/4/18)
- Original Creation from techniques/tools learned in tutorial completed with .ai and jpeg in Google Folder.
- Weebly site created and email sent with url to Jones. (9/11/18)
- First blog post (9/13/18)
Include in your post:
1. The link to the tutorial you chose.
2. The exported JPEG from that tutorial. If your colors are off-save
your .ai file as RGB and export a new jpeg.....title it RGB so you
know which is which.
3. Describe in detail what areas or techniques in the tutorial gave you
the most trouble. Also, in order to help others, describe how you
solved the problem. (If the tutorial was breezy for you, describe an
area that might cause others problems with tips how to get through
it.)
4. Describe something new you learned either about the tutorial or
something within this new version of Illustrator that is different from
the way you are used to do that technique.
5. Review the tutorial itself, like a Rotten Tomato review :)
- Was it easy to understand the directions?
- Did you have to modify it a lot? If so, how and where?
- What level of difficulty would you rate this tutorial (Easy,
6. Include the jpeg for YOUR CREATION based on what you learned or
the style of the tutorial you chose.
7. Give a description of HOW you used the first tutorial to help you with
your second creation.
Wednesday, 9/12/18
Get started right away! Your goal is to have your original creation based on the tutorial techniques finished by Friday. You will have a blog post assignment that comes from this too so make sure you create a NEW weebly site in order to be ready. (See ALL of the instructions on 9/11/18)
Things to do (In Skyward):
Things to do (In Skyward):
- Syllabus/Expectations in Google Folder (9/10/18)
- Email sent for Digital Contract (9/10/18)
- Tutorial from BTS (Back to School) links completed with .ai and jpeg in Google Folder. (9/4/18)
- Original Creation from techniques/tools learned in tutorial completed with .ai and jpeg in Google Folder.
- Weebly site created and email sent with url to Jones. (9/11/18)
Tuesday, 9/11/18
Today you will create a website for a digital portfolio. (This is a new site from last year....I want you to have one you can continue beyond your PHHS years. You may decide to open both sites and copy things from last year into this one. Your site from last year will not be available forever and ever.....this one will.
Watch the video below for quick tips for setup and how to create on the site. (It is different from last year.)
Watch the video below for quick tips for setup and how to create on the site. (It is different from last year.)
Additional Instructions before you begin building.
Things to do:
- Set up weebly site.
- Email domain name to Jones.
- Customize weebly site to your liking. (Remember, NO PERSONAL INFO.)
- Make sure you have a jpeg and .ai file of tutorial in your folder.
- Make sure you have a jpeg and .ai file of original creation inspired by tutorial in your folder.
Done with everything?
Choose a different tutorial or start an independent project.
Monday, 9/10/18
- Download each of the files below and upload them to your Google Folder for this class.
- The expectations have not changed from last year. Review them. Read the syllabus for this year.
- EASY POINTS NEXT! Then, you will send Mrs Jones ([email protected]) an empty email from your school gmail account with the subject as, "I have read and understand the syllabus and expectations for Digital Design."
|
| ||||
Your goal by the end of this week is to have completed your tutorial AND your original design you made based on the style and techniques learned in the tutorial. .Ai files and JPEGS for BOTH should be in your folder when completed.
Friday, 9/7/18
Bellwork: Look ahead in your tutorial. With serious focus all hour in the days ahead, determine how many more days you think you will need to finish. Put it in your journal.
ALSO, you are expected to create your own design based on the techniques and style from your tutorial. How long do you expect to need for that?
I will be around to check with you today and will decide when we are moving on.
IF YOU GET DONE BEFORE THE END TIME OF THIS ASSIGNMENT. START A DIFFERENT TUTORIAL. RAISE THE DIFFICULTY LEVEL A NOTCH. CHALLENGE YOURSELF!
Thursday, 9/6/18
Bellwork: Title it, "Tutorial bits" and date it.
What, if anything, have you found in your tutorial that is new, doesn't make sense, or is giving you trouble.
Use the rest of the hour to get as far as you can on the tutorial. Tomorrow I will be checking in to see how many days you think you will need to finish.
Remember, once you are done with the tutorial you will create your own design based on what you learned in the tutorial.
I'll be around today to see pacing needs as we go into next week.
Wednesday, 9/5/18
Bellwork: Title it "Back to School Tutorial" and date it.
What tutorial did you decide to create? Why?
Use the rest of the hour to get as far as you can on the tutorial. I am looking at finishing these up by Friday if at all possible. We'll chat about that.
What tutorial did you decide to create? Why?
Use the rest of the hour to get as far as you can on the tutorial. I am looking at finishing these up by Friday if at all possible. We'll chat about that.
Tuesday, 9/4/18
Try to sit by another 2nd or 3rd year student! I can help with that.
Tutorials Link
- Create a Google Folder and name it your Last name, First name. Share the Folder with Mrs. Jones ([email protected])
- With your Folder open, create a New Google Doc. Name it '1 Journal' and share with Mrs. Jones ([email protected]) Click 'Can Comment'.
- No Journal entry today but it's ready to go :)
- To refresh your memory in basic Illustrator, you will begin by choosing a tutorial from the link below to follow and create. Do not expect to finish all in one day.
- While I will be teaching you new techniques in small group, there will times when I am teaching 1st year students and/or 2nd year students cannot immediately come to your aid. Use this time to reacquaint yourself with Illustrator basics, but also to become independent learners.
- If you are stuck, use Adobe Help or Google to find your answer...or ask a fellow 2nd or 3rd year student. If all else fails, move on to a different area until Design 1 and/or 2 students are independent and I can help you.
Tutorials Link

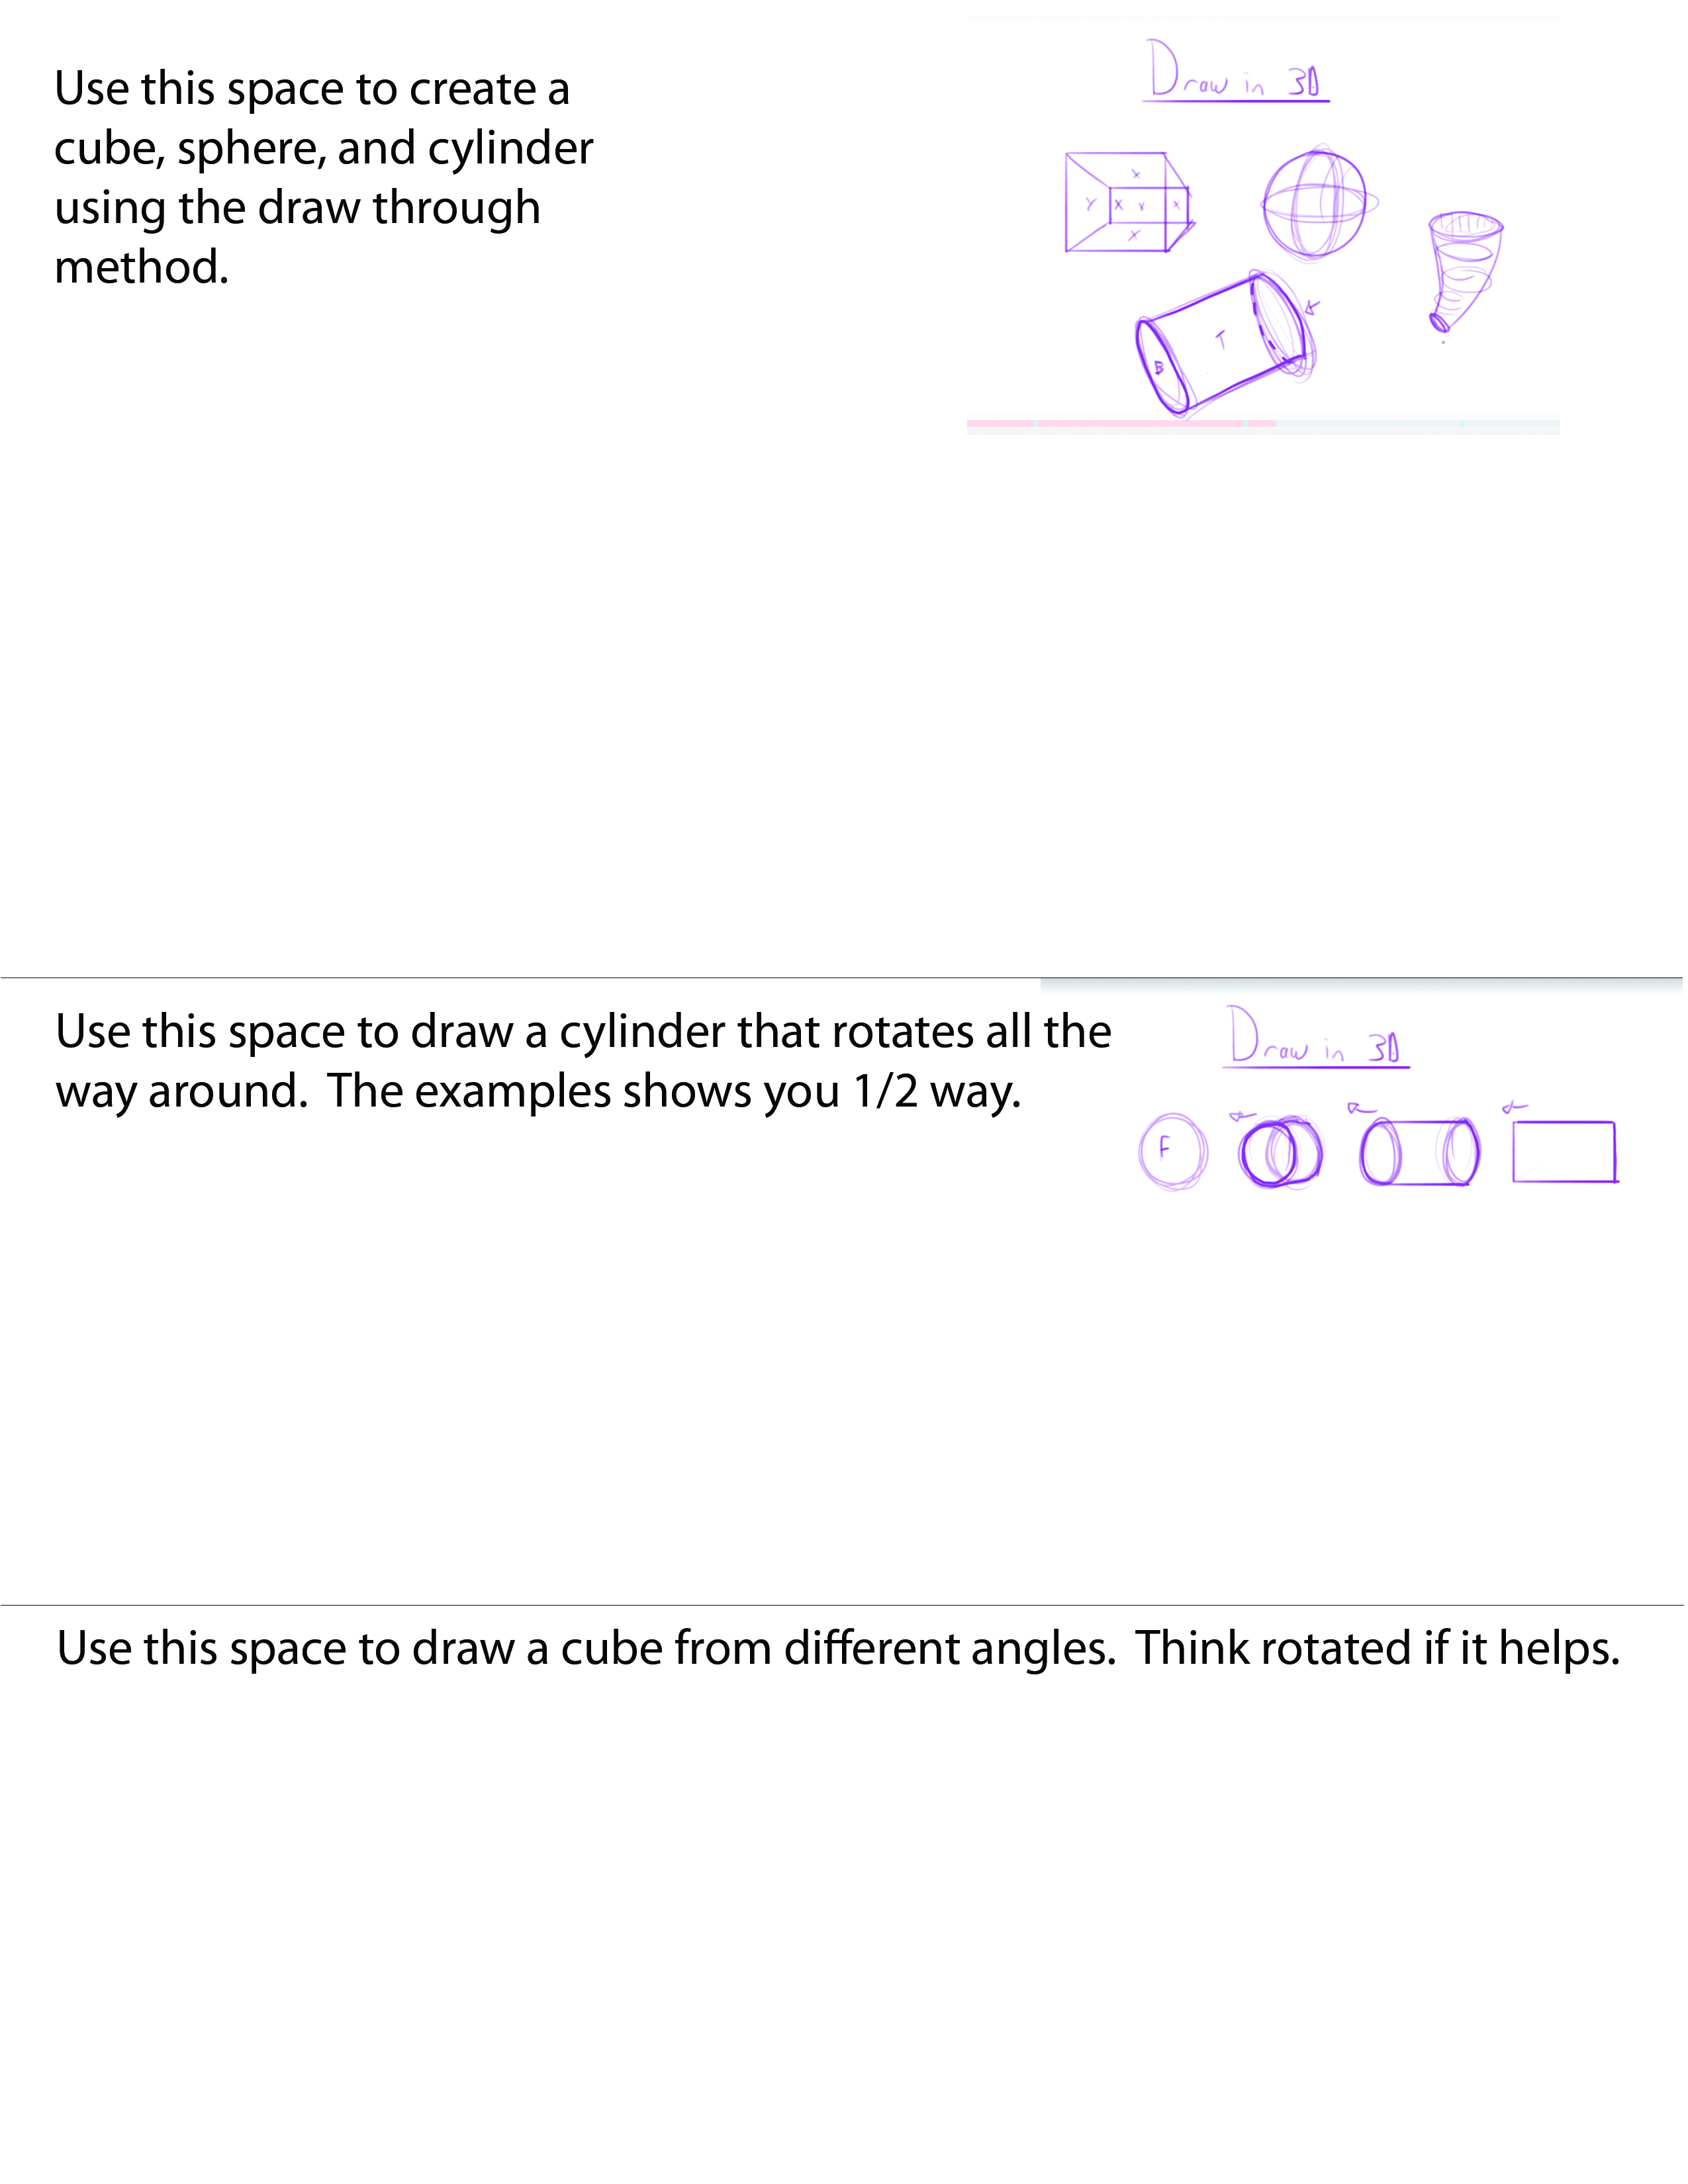
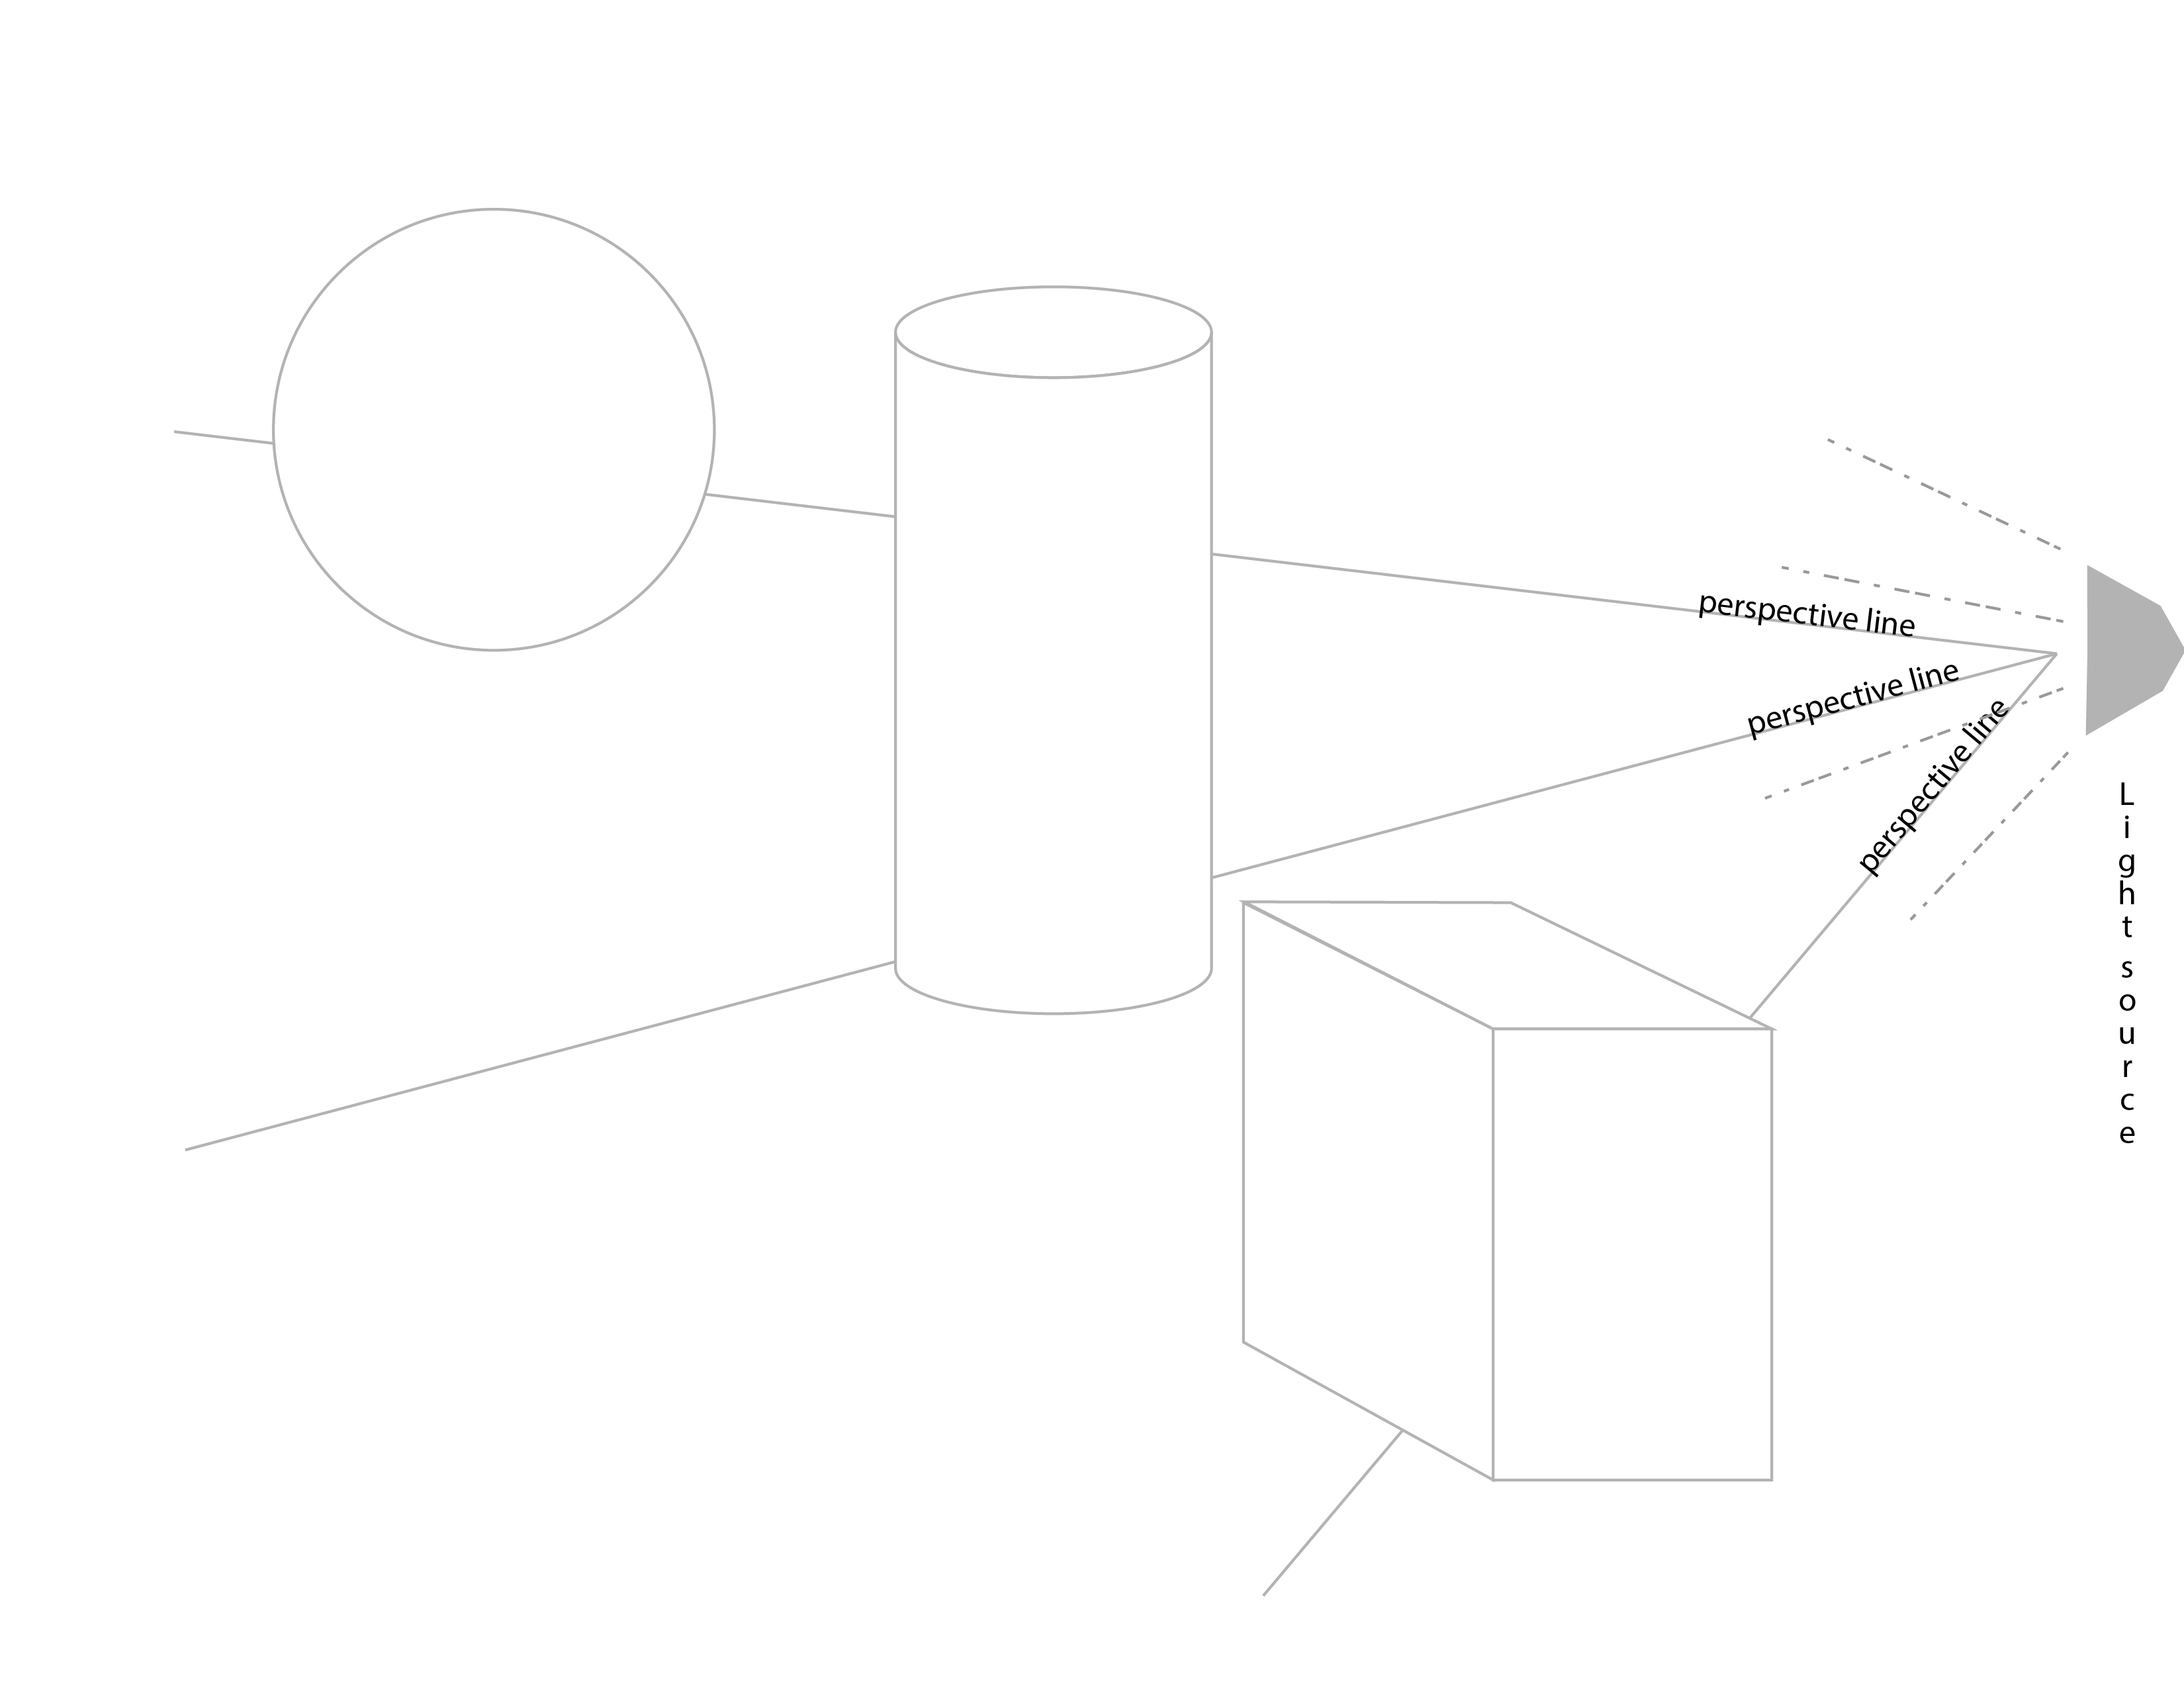
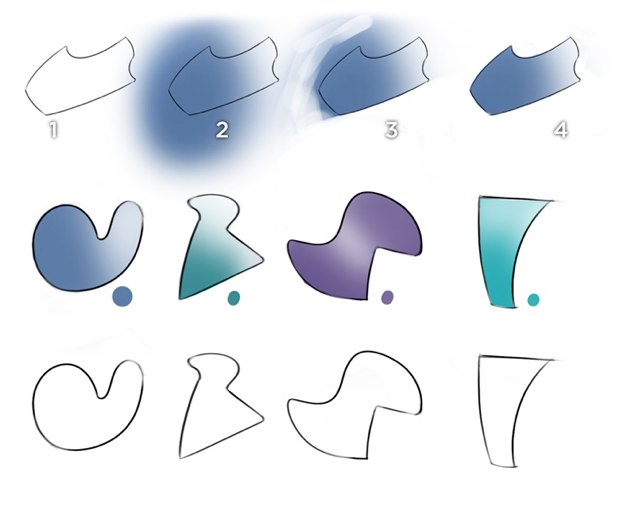
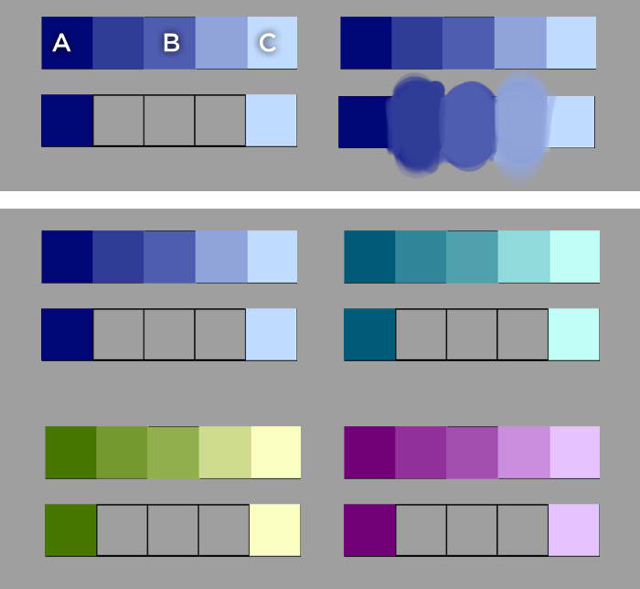